Your object detection model works perfectly in the lab. But deploy it to a security camera on a rainy Tuesday night, and suddenly a raincoat looks like a suspicious package.
This is the classic "Domain Shift" problem. In the security industry, AI video analysis (IVA) is exploding, with the market projected to hit billions by 2026. However, developers face a harsh reality: A model trained on ImageNet or COCO is useless for specific, localized security contexts.
If you are building AI for physical security, you cannot rely on "Big Data" alone. You need "Smart Data" gathered directly from the edge.
In this engineering guide, based on recent field research into high-accuracy security systems, we will architect an On-Site Learning Pipeline. We will move beyond static inference and build a "Human-in-the-Loop" system that allows edge devices to get smarter over time without violating privacy or bandwidth constraints.
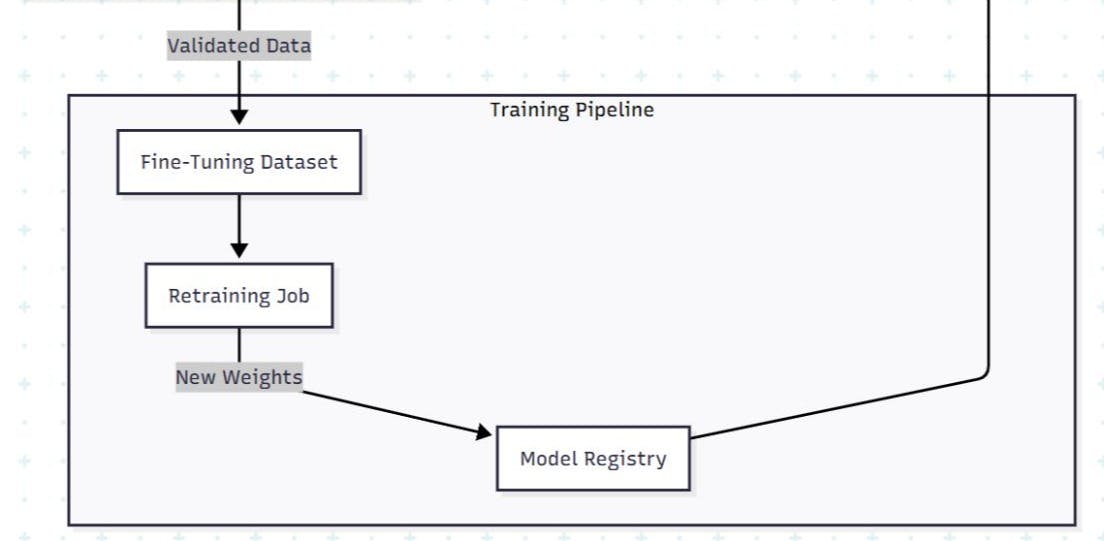
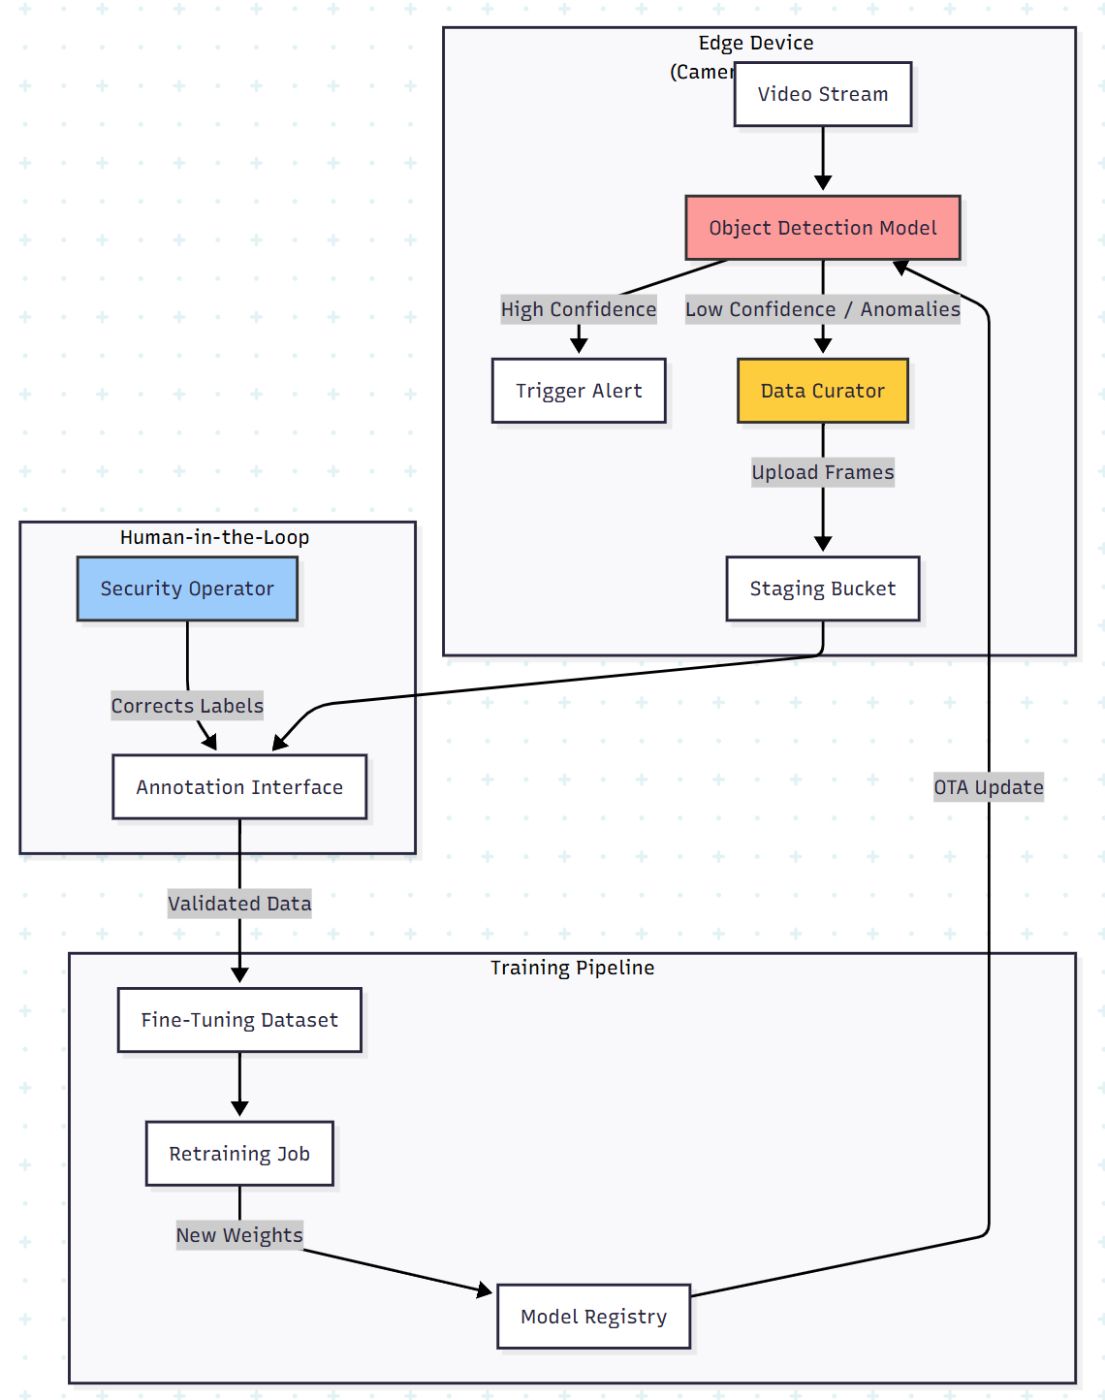
The Architecture: The On-Site Learning Loop
Most developers deploy a model and forget it. To achieve high accuracy (90%+), you need a feedback loop. The architecture must shift from a linear "Train → Deploy" to a circular "Deploy → Curate → Re-train."
Here is the data flow for a privacy-preserving, active learning pipeline:
The Core Challenge: Data Selection
You cannot upload 24/7 video to the cloud for retraining. It kills bandwidth and violates privacy laws (GDPR/CCPA).
The solution isUser-Driven Data Selection. Instead of random sampling, we let the end-user (the security guard or facility manager) flag the errors.
Phase 1: The "Data Curator" Logic
We need to capture data where the model fails. In the research, this was achieved by allowing users to correct "False Positives" (e.g., the AI tagged a shadow as a person) and "False Negatives" (the AI missed a person).
From a code perspective, we can automate the suggestion of frames using Uncertainty Sampling. If the model is unsure (e.g., confidence score between 0.3 and 0.6), we save that frame.
import cv2
import numpy as np

def active_learning_sampler(frame, model_output, threshold_lower=0.3, threshold_upper=0.7):
    """
    Decides if a frame should be saved for Human-in-the-Loop retraining.
    Only captures frames where the model is 'confused'.
    """
    save_frame = False

    for detection in model_output:
        confidence = detection['confidence']
        label = detection['class']

        # Logic: If confidence is in the 'uncertainty valley', grab it.
        # Also grab it if users manually flagged similar timestamps.
        if threshold_lower < confidence < threshold_upper:
            save_frame = True
            break

    if save_frame:
        # Save metadata for the annotation tool
        filename = f"uncertain_{timestamp}.jpg"
        cv2.imwrite(filename, frame)
        return {"file": filename, "reason": "low_confidence", "meta": model_output}

    return None
Why this matters: In the case study, collecting just 37,000 targeted images via this method allowed the system to fine-tune a model (v2 and v3) that significantly outperformed the generic base model (v1).
Phase 2: The Annotation Interface (The Fix)
The biggest friction point in fine-tuning is labeling. Security operators are not Data Scientists. They don't know what a "Bounding Box" is.
Your UI must be simple:
- Visual Confirmation: Show the image with the AI's guess.
- One-Click Correction: "Is this a Person?" → [Yes] / [No].
- Attribute Tagging: Dropdowns for attributes (Red shirt, Backpack, SUV vs. Sedan).
By empowering the local user to tag data, you solve the Distribution Drift. The model learns the specific lighting of that parking garage and the specific uniforms of that factory.
Phase 3: Evaluating "Unevenness" (Metrics)
Global accuracy is a vanity metric. A model might have 90% accuracy overall but 0% accuracy on "Red Cars at Night."
The research highlights the importance of Slicing Analysis. You must visualize performance across specific attributes to ensure the model isn't overfitting to the majority class.
Calculating Per-Attribute F-Measure
We use the F-Measure (Harmonic mean of Precision and Recall) to track performance stability.
def calculate_metrics(predictions, ground_truth):
    """
    Calculate TP, FP, FN and F-Measure for specific attributes
    """
    tp = 0 # True Positive
    fp = 0 # False Positive
    fn = 0 # False Negative

    for pred, truth in zip(predictions, ground_truth):
        if pred == truth and pred == 1:
            tp += 1
        elif pred == 1 and truth == 0:
            fp += 1
        elif pred == 0 and truth == 1:
            fn += 1

    # Avoid division by zero
    precision = tp / (tp + fp) if (tp + fp) > 0 else 0
    recall = tp / (tp + fn) if (tp + fn) > 0 else 0

    f_measure = 0
    if (precision + recall) > 0:
        f_measure = (2 * precision * recall) / (precision + recall)

    return {
        "precision": round(precision, 2),
        "recall": round(recall, 2),
        "f1_score": round(f_measure, 2)
    }

# Example: The model improved significantly on specific attributes after local training
# Base Model (v1) -> Fine-Tuned (v3)
# Attribute: 'Car Color' -> F1 improved from 0.73 to 0.82
Visualization Strategy
Don't just show a number. Show a heatmap of improvement.
|
Attribute |
Base Model (v1) |
Fine-Tuned (v2) |
Fine-Tuned (v3) |
|---|---|---|---|
|
Gender |
90.1% |
90.9% |
92.1% |
|
Clothing (Top) |
73.9% |
77.8% |
77.9% |
|
Accessories |
65.0% |
68.9% |
67.6% |
|
Vehicle Type |
62.6% |
78.7% |
81.0% |
Note: Data derived from field testing. Notice how Vehicle Type accuracy jumped nearly 20% by learning from local data.
Phase 4: The Future is Federated
The ultimate evolution of this architecture is Federated Learning.
Currently, we pull data to the cloud to train. This has privacy risks. The next step is to send the training code to the edge device. The edge device computes the weight updates locally and sends only the gradients (mathematical updates) back to the central server.
Why Federated Learning?
- Privacy: No video ever leaves the premise.
- Bandwidth: Gradients are kilobytes; Video is gigabytes.
- Collective Intelligence: One camera learns to identify a new type of theft, and all cameras get the update.
Summary Checklist for Developers
If you are building Edge AI for security:
- Don't trust pre-trained models. They will fail in unique environments.
- Build a feedback loop. The UI for the end-user to correct the AI is as important as the AI itself.
- Target your data. Don't just upload everything. Use uncertainty sampling to find the edge cases.
- Slice your metrics. Measure accuracy by attribute (Day/Night, Male/Female, Car/Truck) to find hidden biases.
The difference between a "Science Project" and a "Product" is how the system handles failure. By building an on-site learning loop, you turn failures into training data.
[story continues]
tags