Android SDK provides APIs for most of the common work which a developer uses every day like direct share, app linking, fingerprint authentication and so on.Sometimes we might need to work on low-level functionality which mostly are available as C/C++ libraries.With Android NDK we can use these pre-built libraries by creating a C/C++ wrapper around it and the use JNI to invoke the native code from Kotlin/Java.
Through this article I will be explaining
- How to integrate pre-built libraries with Android app e.g. FFmpeg
- Create a wrapper around the pre-built library to use with your android application.
For information on NDK basics and callbacks from native code you can look into my previous articles :
- Android NDK:Using Kotlin Episode 1- The Concepts
- Android NDK:Using Kotlin Episode 2- Callbacks(kotlin to cpp)
- Android NDK:Using Kotlin Episode 3- Callbacks continued.
Integrating FFmpeg with Android application
For one of the projects there was a requirement to use FFmpeg for video processing.Being new to using FFmpeg I came across remuxing, transcoding, transrating and the transsizing process which are required to process videos.
Remuxing
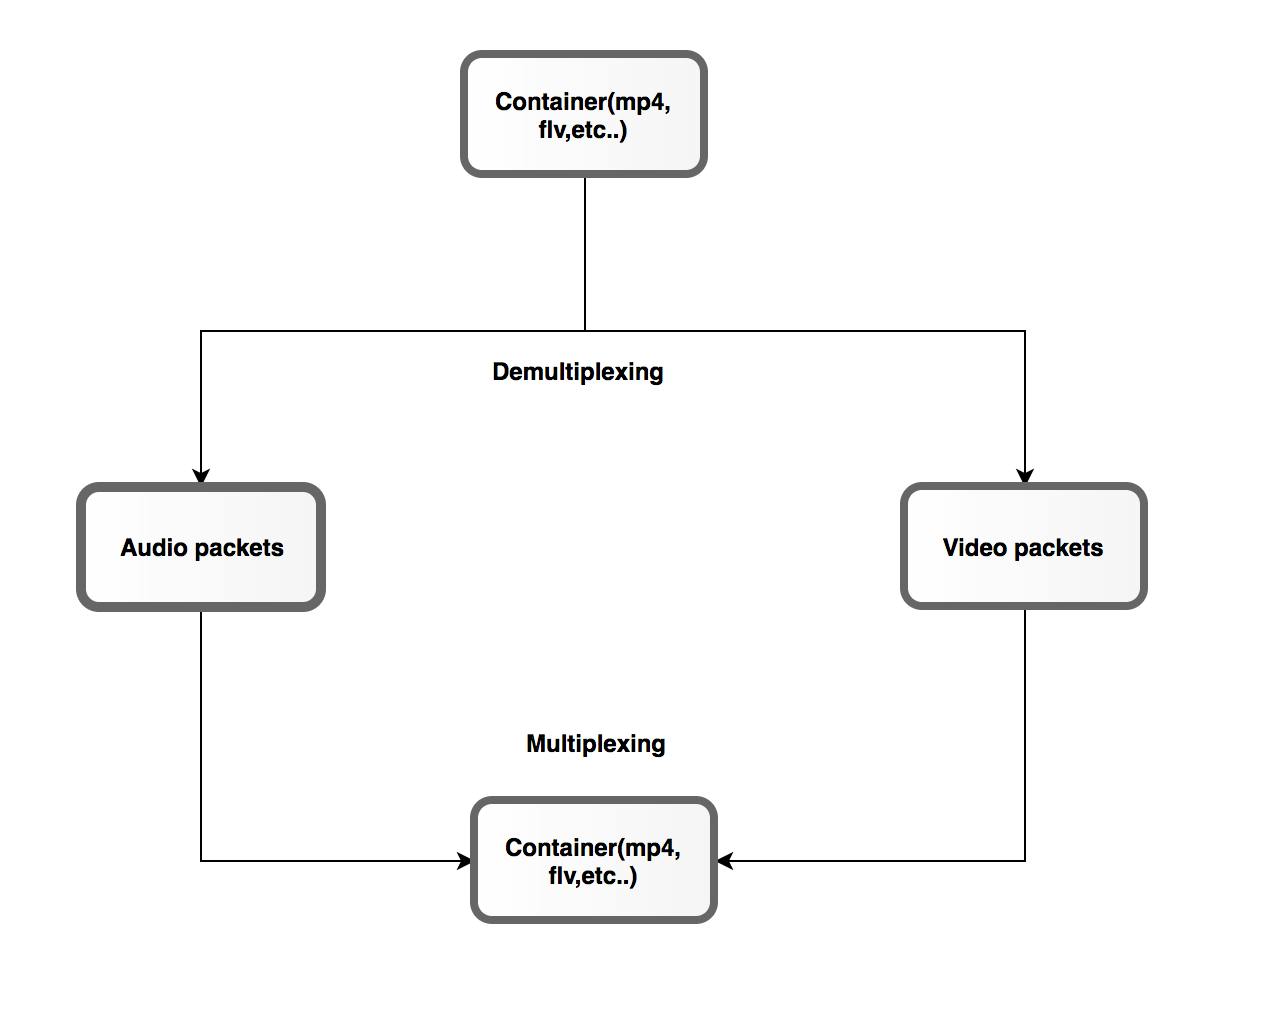
Remuxing is a lossless process that is used to change the container format of a given file(e.g. mp4 to avi or vice versa).
Remuxing
Transcoding
Transcoding is the process of converting a file from one encoding format to another so that the content can be viewed on different playback devices.
Transcoding
Transrating
Transrating is the process by which video files and audio files are converted to a reduced bit rate while still maintaining the original media format.
Transsizing
Transsizing refers to changing the picture size of video, and is useful if the output resolution differs from the resolution of the media.
Depending on the requirements one can choose remuxing or transcoding.
For example:
To convert one format to another — Remuxing
To crop a video or play live streams — Transcoding
To reduce bit rates — Transrating
To change resolution — Transsizing
Often these methods are used in combination to obtain the desired results
Compiling FFmpeg for Android
Here comes the important part i.e. compiling the FFmpeg source code to generate libraries for android(Cross- Compilation). Having worked with some of the hardware related projects helped me a lot as the terminology was not sounding alien to me anymore 😛. Here are some of the tutorials I followed to generate the libraries.
These tutorials will help you through the hurdle of cross compilation.
After compilation you will have the ABIs as shown below:
FFmpeg Library
There are two kinds of libraries in C/C++
- Shared: Shared libraries are
.sofiles.All the code related to the library is in this file, and it is referenced by programs using it at run-time.
A program using a shared library only makes reference to the code that it uses in the shared library.
- Static:Static libraries are the .a files.All the code related to the library is in this file, and it is directly linked into the program at compile time.
A program using a static library takes copies of the code that it uses from the static library and makes it part of the program.
FFmpeg contains a set of shared libraries which can be used for different operations:
[libavcodec](https://www.ffmpeg.org/libavcodec.html): provides a generic encoding/decoding framework and contains multiple decoders and encoders for audio, video and subtitle streams, and several bitstream filters.[libavutil](https://www.ffmpeg.org/libavutil.html): is a utility library to aid portable multimedia programming.[libavformat](https://www.ffmpeg.org/libavformat.html): provides a generic framework for multiplexing and demultiplexing (muxing and demuxing) audio, video and subtitle streams.[libavdevice](https://www.ffmpeg.org/libavdevice.html): provides a generic framework for grabbing from and rendering to many common multimedia input/output devices, and supports several input and output devices, including Video4Linux2, VfW, DShow, and ALSA.[libavfilter](https://www.ffmpeg.org/libavfilter.html): provides a generic audio/video filtering framework containing several filters, sources and sinks.[libavresample](https://www.ffmpeg.org/doxygen/2.5/group__lavr.html): is a library that handles audio resampling, sample format conversion and mixing.[libswscale](https://www.ffmpeg.org/libswscale.html): this library performs highly optimized image scaling and colorspace and pixel format conversion operations.[libswresample](https://www.ffmpeg.org/libswresample.html): this library performs highly optimized audio resampling, rematrixing and sample format conversion operations.libpostproc: is a post processing library for use in transcode.
Depending on the project requirements one can choose the libraries required to be integrated in the project.
Adding Compiled Libraries to your Project
You can include the libraries under the JNI folder as below depending on the requirements:
Adding Shared Libs and header files to project
Add this to CMakeLists.txt file
Creating a wrapper to work with the Libraries
As we have added the FFmpeg libraries to the project and linked the JNIFunctions.cpp to the FFmpeg libraries using target_link_libraries , we can now use the available functions from the libraries by including the header files in *.h .
Here is one of the functions which get the SPS(Sequence Parameter Set) frames from the RTSP feed:
Conclusion
FFmpeg is an awesome library for A/V processing.We can perform demuxing, rotation of display matrix, video cropping, merging audio and video streams etc. There are lot of open Source projects using FFmpeg library.Do hop into them for more information.
If you liked this post, hit 👏 . Special thanks to my friend and colleague Arun Sasidharan for pushing me to write this article.
Catch me here:Twitter: @iamnitishbhatt_LinkedIn:_ https://www.linkedin.com/in/iamnitishbhatt/Github: https://github.com/initishbhatt