The average time to resolve a cyber incident is 43 days. If you work in Blue Teaming or Digital Forensics, you know why. When a laptop gets compromised, you aren't looking for a needle in a haystack; you are looking for a needle in a stack of needles.
A typical corporate workstation has thousands of executable files. Manually analyzing 5,000 files assuming 1 minute per file takes 80 hours. That is two weeks of work for one analyst, just to find "Patient Zero."
Most forensic teams use the NIST NSRL (National Software Reference Library) to whitelist known-good files. But here is the problem: Standard NSRL is generic. It doesn't know about your company's custom software, and it often fails on localized OS versions (like Japanese Windows builds).
In this guide, based on field research from a large enterprise Cyber Response Team, we are going to build a Three-Stage Forensic Filter that reduced the investigation scope from 6,897 files down to just 16.
We are going to move from "Brute Force" forensics to "Smart Filtering."
The Architecture: The "Funnel" Strategy
The core concept is simple: Don't analyze malware. Filter out everything that isn't malware.
We will build a pipeline that aggressively removes "Safe" files using three layers of verification.
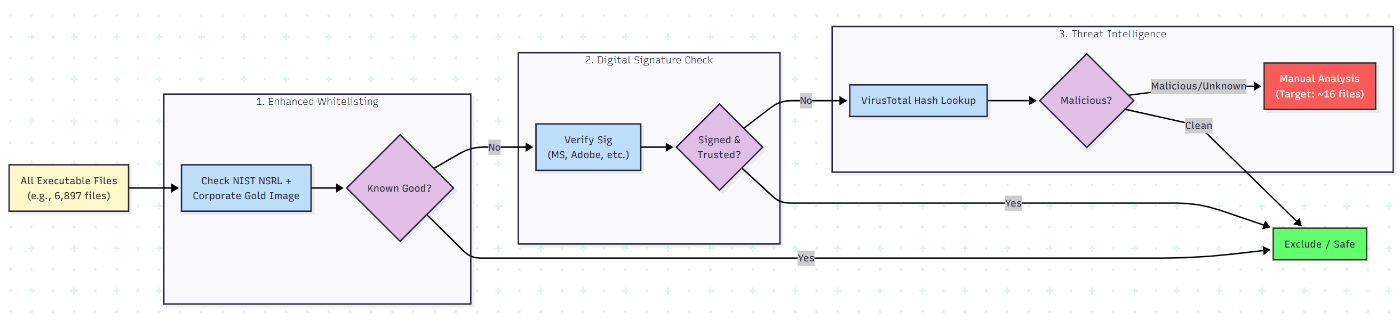
Stage 1: The Enhanced Whitelist (NSRL + Local Context)
The standard NIST database is great, but it misses files specific to your environment. In the research case study, standard NSRL missed 10,875 system files simply because they were from a Japanese Windows build, and it missed all proprietary corporate tools (like Systemwalker).
To fix this, we don't just use NIST. We hash our own "Golden Image" (a clean corporate laptop) and add those hashes to our database.
The Code: Building the Hash Database
Here is a Python script to scan a directory (or a mounted image) and generate your own "Gold Master" whitelist.
import os
import hashlib
import csv

def calculate_sha256(filepath):
    sha256_hash = hashlib.sha256()
    try:
        with open(filepath, "rb") as f:
            for byte_block in iter(lambda: f.read(4096), b""):
                sha256_hash.update(byte_block)
        return sha256_hash.hexdigest()
    except (PermissionError, FileNotFoundError):
        return None

def build_whitelist(directory, output_csv):
    with open(output_csv, 'w', newline='') as csvfile:
        fieldnames = ['file_path', 'sha256']
        writer = csv.DictWriter(csvfile, fieldnames=fieldnames)
        writer.writeheader()

        print(f"Scanning {directory} for Golden Image baseline...")

        for root, dirs, files in os.walk(directory):
            for file in files:
                # We typically care about executables (exe, dll, sys)
                if file.endswith(('.exe', '.dll', '.sys')):
                    full_path = os.path.join(root, file)
                    file_hash = calculate_sha256(full_path)

                    if file_hash:
                        writer.writerow({'file_path': full_path, 'sha256': file_hash})

# Usage: Run this on a CLEAN corporate laptop
# build_whitelist("C:\\Windows\\System32", "corp_whitelist.csv")
Stage 2: Digital Signature Verification
After Stage 1, you will still have files that aren't in the whitelist like updates, portable apps, or drivers. For these, we check the Digital Signature.
If a file is signed by "Microsoft Corporation" or "Adobe Inc." and the certificate chain is valid, we can generally trust it (ignoring sophisticated supply chain attacks for this rapid triage context).
The Tool: We can automate Microsoft's Sigcheck utility or use Python's pefile.
import subprocess

def is_digitally_signed(filepath):
    # Using Sysinternals Sigcheck (must be in PATH)
    try:
        # -q: quiet, -v: csv output
        result = subprocess.run(
            ['sigcheck.exe', '-q', '-v', filepath],
            capture_output=True,
            text=True
        )
        output = result.stdout

        # Sigcheck CSV format: Path,Verified,Date,Publisher...
        if "Signed" in output or "Microsoft Corporation" in output:
            return True
        return False
    except Exception as e:
        print(f"Error checking signature: {e}")
        return False

# Logic flow
# if file_hash not in whitelist:
#     if is_digitally_signed(file):
#         mark_as_safe()
Stage 3: The VirusTotal Tie-Breaker
This is the final filter. We have filtered out the known corporate files and the digitally signed vendor files. We are left with "The Unknowns."
Instead of analyzing them manually, we query their Hash against VirusTotal.
Privacy Note: We only send the hash, not the file itself. This prevents leaking sensitive corporate data (PII or IP) to the public cloud.
import requests
import json

API_KEY = 'YOUR_VT_API_KEY'
BASE_URL = 'https://www.virustotal.com/api/v3/files/'

def check_virustotal(file_hash):
    headers = {'x-apikey': API_KEY}
    response = requests.get(BASE_URL + file_hash, headers=headers)

    if response.status_code == 200:
        json_response = response.json()
        stats = json_response['data']['attributes']['last_analysis_stats']

        # If any engine flags it as malicious, flag it for review
        if stats['malicious'] > 0:
            return "DANGER"
        else:
            return "SAFE"
    elif response.status_code == 404:
        return "UNKNOWN" # File never seen by VT before
    else:
        return "ERROR"

# Example Usage
# status = check_virustotal("a1b2c3d4...")
The Results: 99.8% Reduction
Does this actually work? The research team tested this pipeline on compromised terminals (labeled A, B, and C).
Here is the data comparing the Standard Method (NIST NSRL only) vs. the Proposed Method (Custom Whitelist + SigCheck + VirusTotal).
|
Terminal |
Total Files |
Files Remaining (Standard Method) |
Files Remaining (Proposed Method) |
Reduction Rate |
|---|---|---|---|---|
|
Terminal A |
6,897 |
4,843 |
16 |
99.8% |
|
Terminal B |
4,802 |
3,481 |
159 |
96.7% |
|
Terminal C |
5,665 |
4,099 |
262 |
95.4% |
The Impact:
- Terminal A: Instead of analyzing 4,843 files, the analyst only had to look at 16 files.
- Time Saved: Assuming 1 minute per file, the workload dropped from 80 hours to 16 minutes.
Conclusion
Digital Forensics often feels like a bottleneck. By shifting from a "search for evil" mindset to a "filter out good" mindset, we can automate the boring parts of Incident Response.
Your Action Plan:
- Generate a Golden Image Hash Set: Don't rely on NIST alone. Hash your own fresh corporate builds.
- Script the Verification: Combine Hashing, Signature verification, and Threat Intel APIs into a single script.
- Focus on the 1%: Let the machine handle the 99% of safe files so you can focus your human expertise on the 16 files that actually matter.
[story continues]
tags