This is chapter 1 of my Rust-Bevy tutorial series “The Impatient Programmer’s Guide to Bevy and Rust: Build a Video Game from Scratch”. I will be going in-depth into Bevy and game development in this series, and will also cover NPCs powered by AI Agents.
Join our community to be updated on new releases in this series. Source code for this chapter is available here.
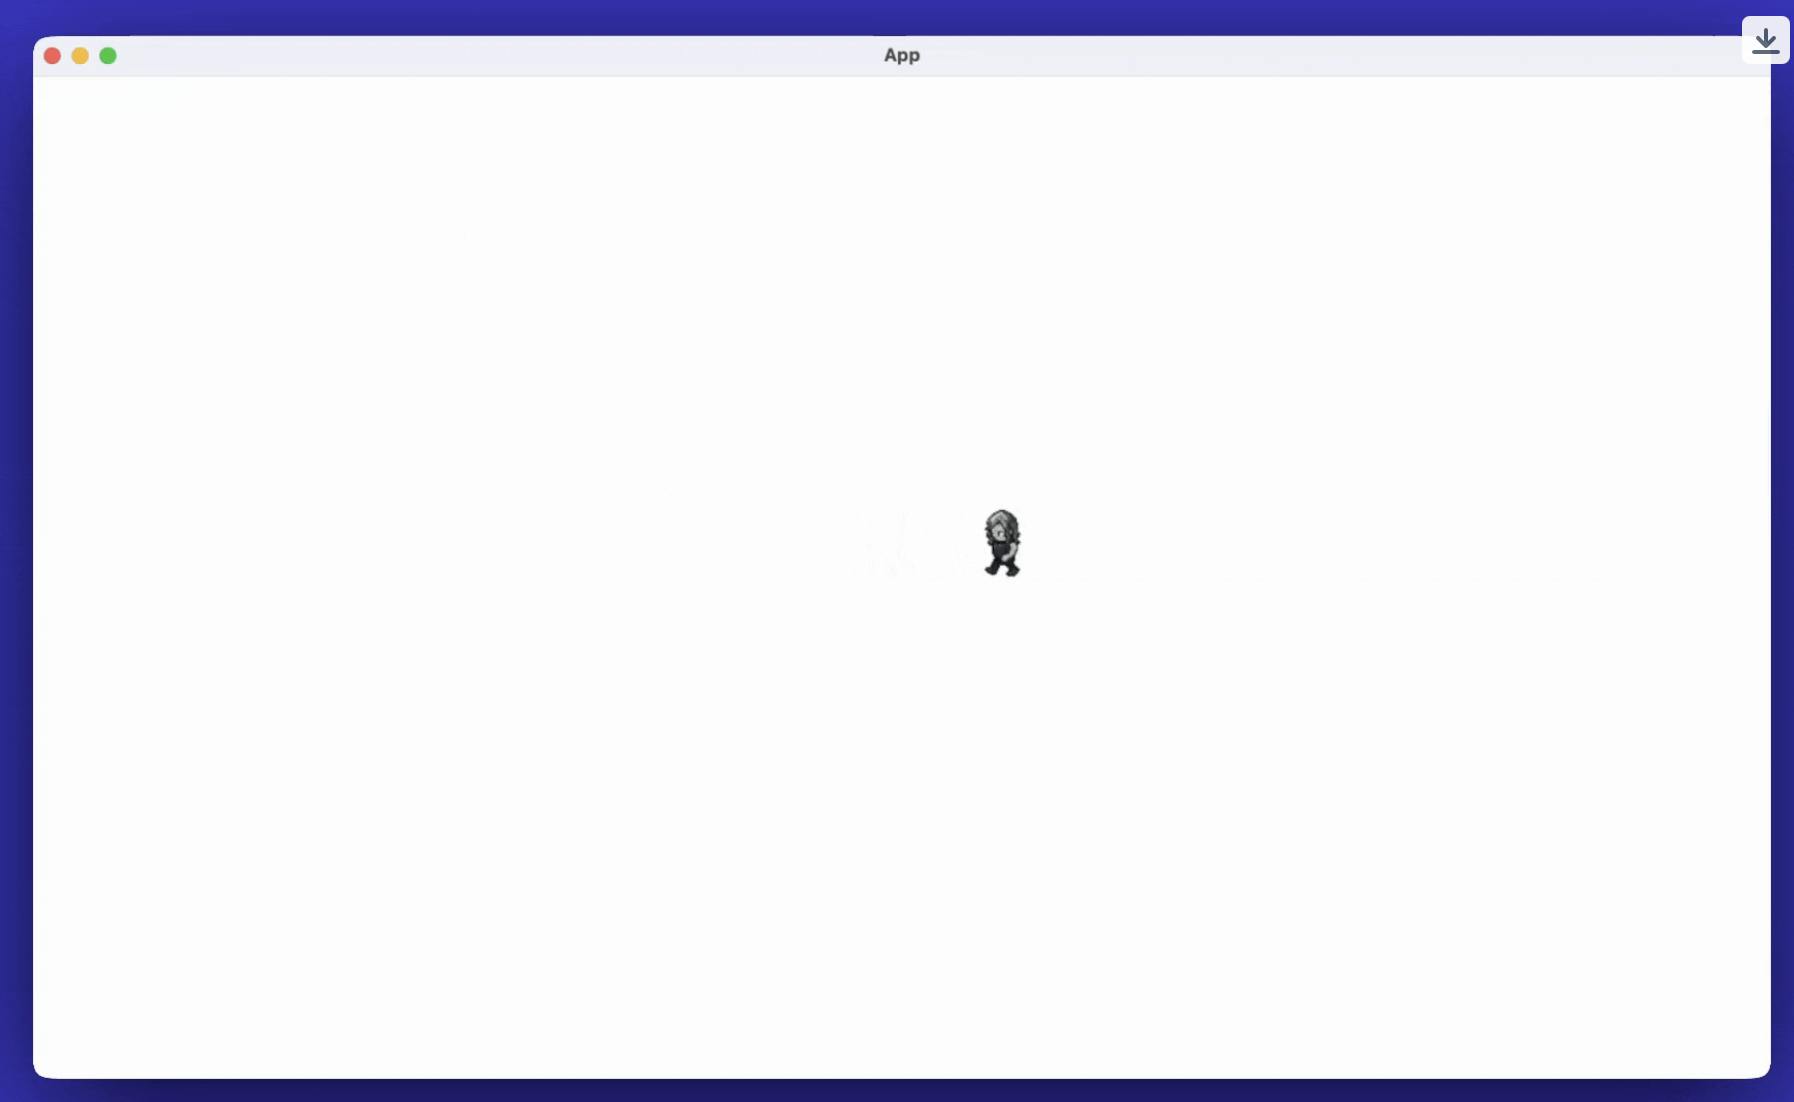
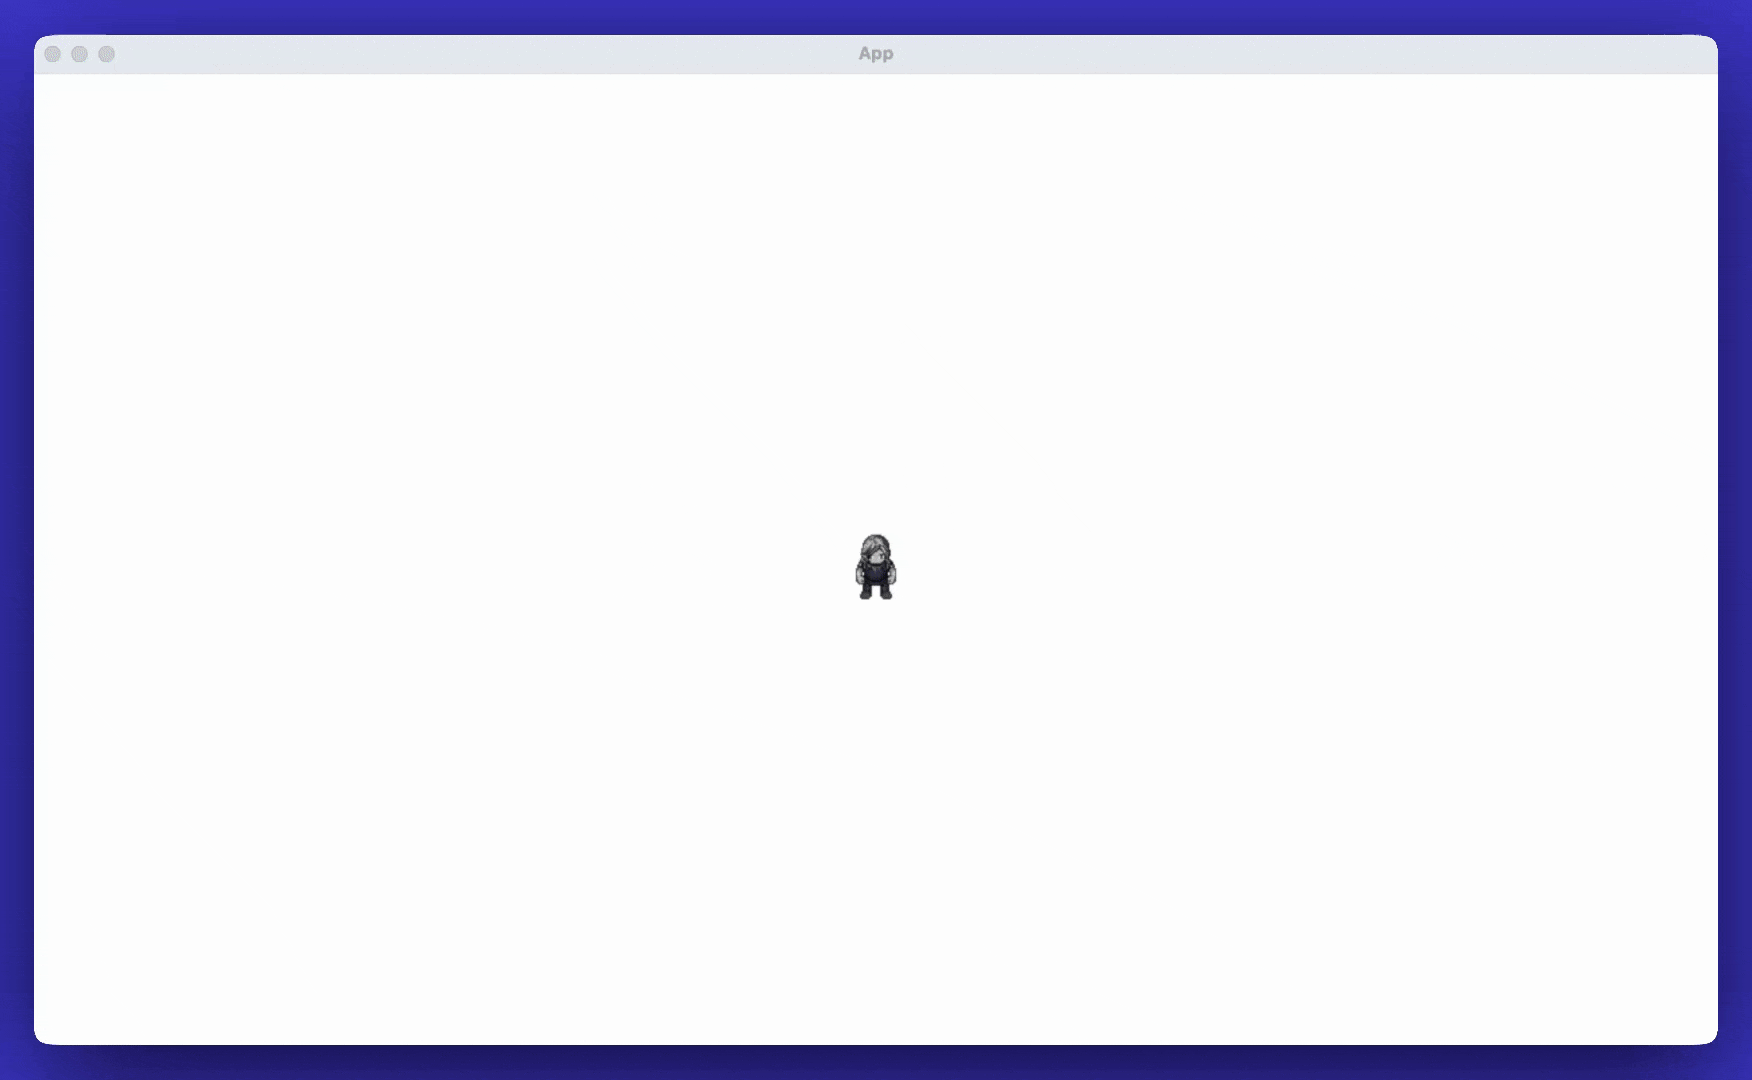
At the end of this chapter, you’ll be able to achieve the results in the GIF below:
Setup Instructions
If you haven’t setup Rust yet, please follow the official guide to set it up.
-
Create a fresh project:
cargo new bevy_game cd bevy_game -
Open
Cargo.tomland add Bevy:[dependencies] bevy = "0.16.1"
I am going to assume you have programming experience in any one language like javascript or python.
Thinking in Systems
What do we need to build a simple game that allows player to move from keyboard input?
- World System: Create a game world where the player can move.
- Input System: Monitor keyboard input and translate it into player movement.
We see the above pattern very common in building games, the pattern of create/setup and the pattern of monitoring game state changes and updating the game world entities.
- Setup: Spawn enemy with different behaviors, load enemy sprites and animations, configure enemy health and damage values.
- Update: Move enemies toward the player, check if enemies are hit by bullets, remove dead enemies and spawn new enemies at intervals.
At the core of Bevy, we have this simple setup and update system. This foundational pattern is what makes Bevy both powerful and easy to understand - once you grasp this concept, building with bevy becomes easier.
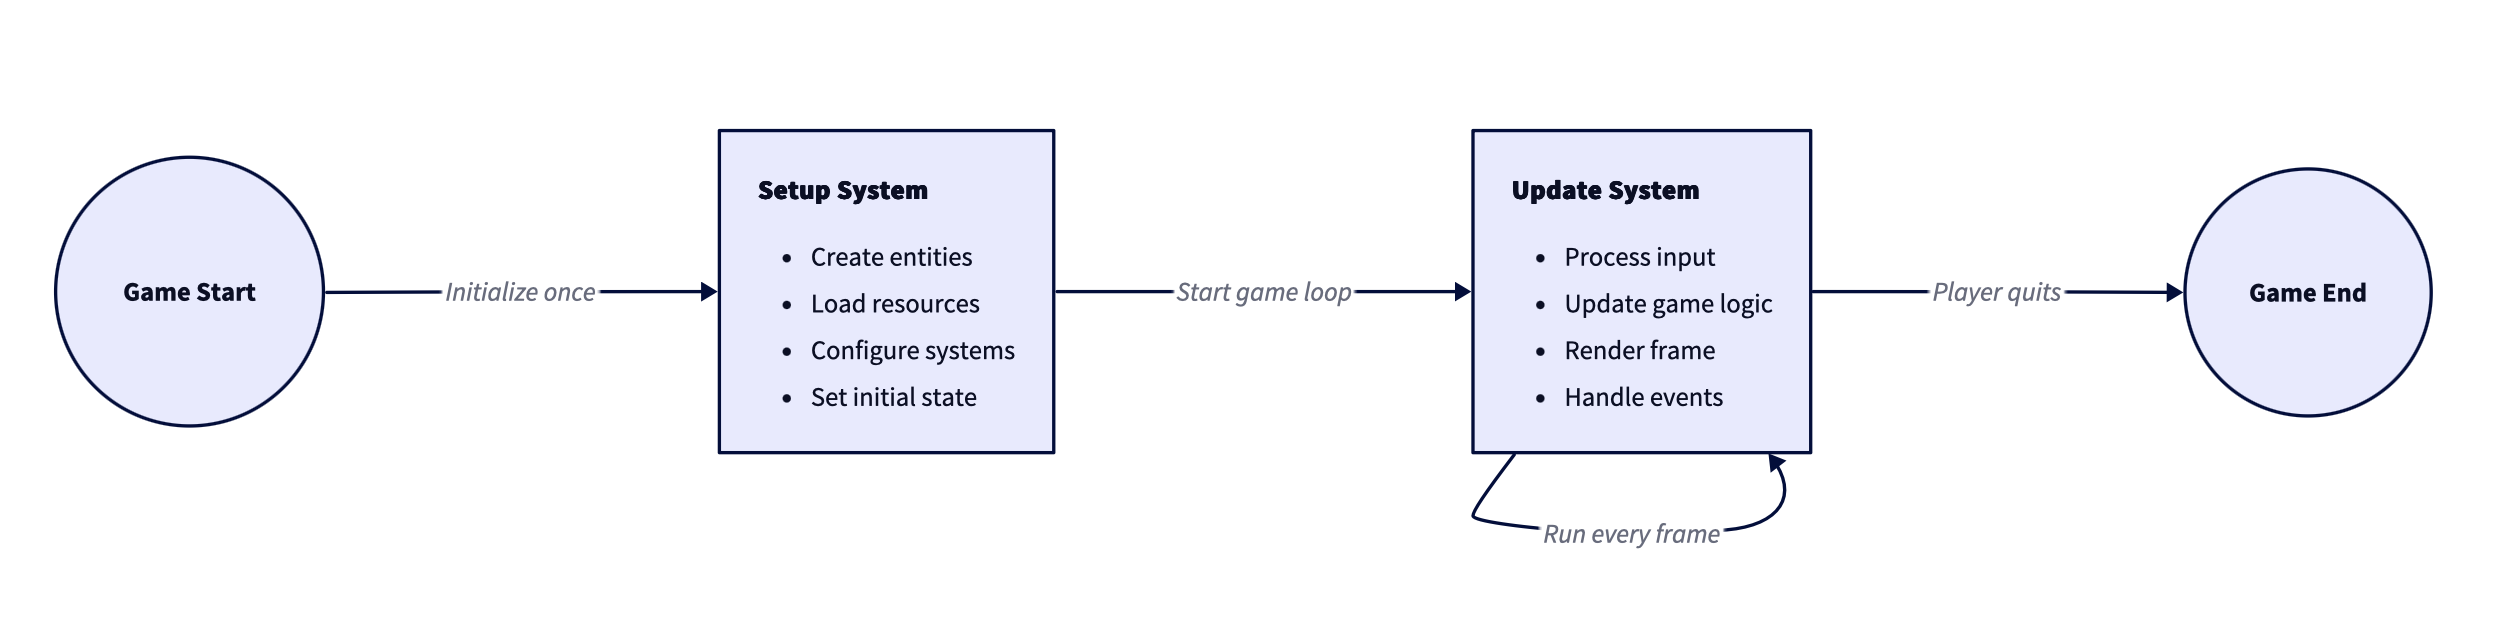

Imagine a function called setup, that gives you “commands” as an argument, and it give you spawn ability to create or spawn anything you want. Well, bevy gives you exactly that.
// Pseudo code, doesn't compile
fn setup(mut commands: Commands) {
	// Create anything you want
	commands.spawn()
}
What’s mut?
mut is short for mutate. In Rust we need to explicitly mention that we are planning to change this value. By default, Rust treats declared values as read only. muttells Rust we plan to change the value. Rust uses this knowledge to prevent a whole class of bugs.


And what’s this mut commands: Commands?
It’s from bevy library, that allows you to add things to your game world. Rust likes explicit types, so :Commands lets the compiler know this parameter is Bevy’s command interface. Skip the hint and Rust can’t be sure what shows up, so it blocks the build.

What’s a type?
A type tells Rust what kind of value you are handling—numbers, text, timers, Bevy commands, and so on. Once the compiler knows the type, it can check that every operation you perform on it actually makes sense.
Isn’t this too much work?
It prevents mistakes and helps you with performance, ex: If you try to add a string to a number, the compiler stops you before the game runs. On top of that, knowing the exact type lets Rust pack data tightly.
A Vec2 is just two numbers, so Rust stores exactly two numbers, no surprise extra space, which keeps things fast when you have thousands of game entities. These helps your game to be memory efficient.
When you create a Vec2 object in JavaScript or Python, you’re not just storing two numbers. The runtime adds type metadata, property information, and prototype references - turning your simple 8-byte data structure into ~48 bytes of memory.
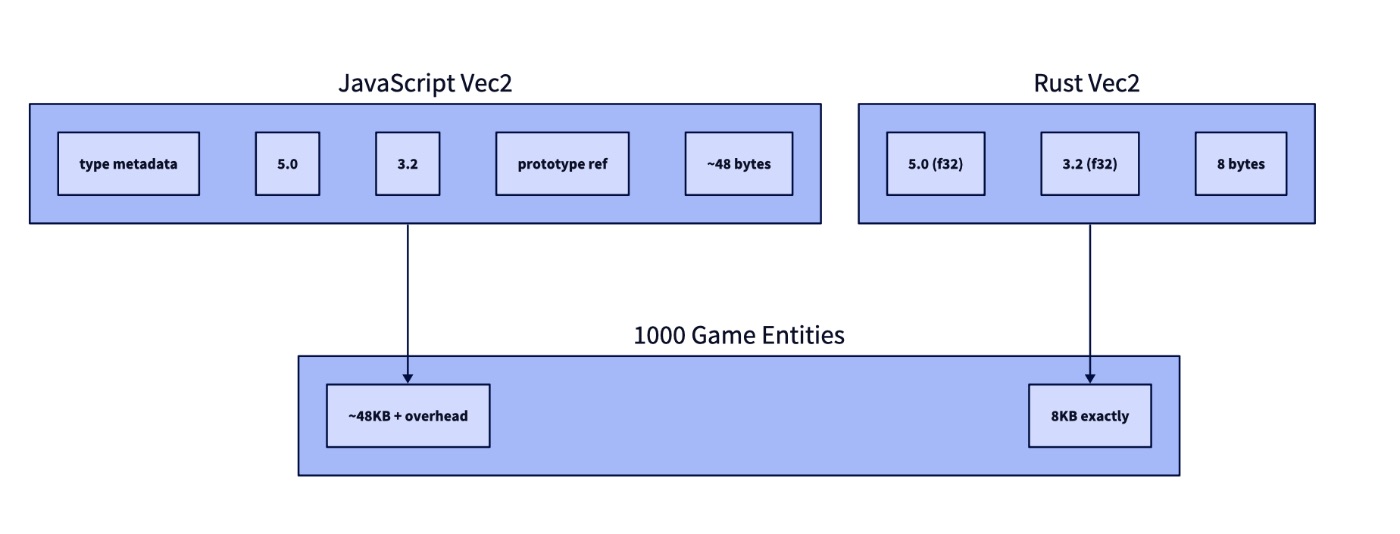
Rust’s type system works at compile time. When you declare a Vec2 struct with two f32 fields, that’s exactly what gets stored - just 8 bytes, no extra metadata. The compiler already knows the types, so no runtime type information is needed.
With 1000 game entities, this difference becomes dramatic:
|
Language |
Memory Usage |
Overhead |
|---|---|---|
|
Rust |
8KB |
None |
|
Dynamic language |
~48KB+ |
6x overhead |
This isn’t just about memory usage - it’s about performance. Smaller, predictable memory layouts mean better CPU cache utilization, which directly translates to faster frame rates in games where you’re processing thousands of entities every frame. The compiler catches type errors before your game runs, and the tight memory packing keeps it running fast.

Setting up a Camera
What should we setup first?
We need a camera because nothing shows on screen without one. The world can exist in data, but the camera decides what actually gets drawn.
//Pseudo code, don't use this yet
fn setup(mut commands: Commands) {
	commands.spawn(Camera2d)
}
What’s Camera2d?
Camera2d is Bevy’s built-in 2D camera bundle. Spawn it and you get a ready-to-go view of your 2D scene.
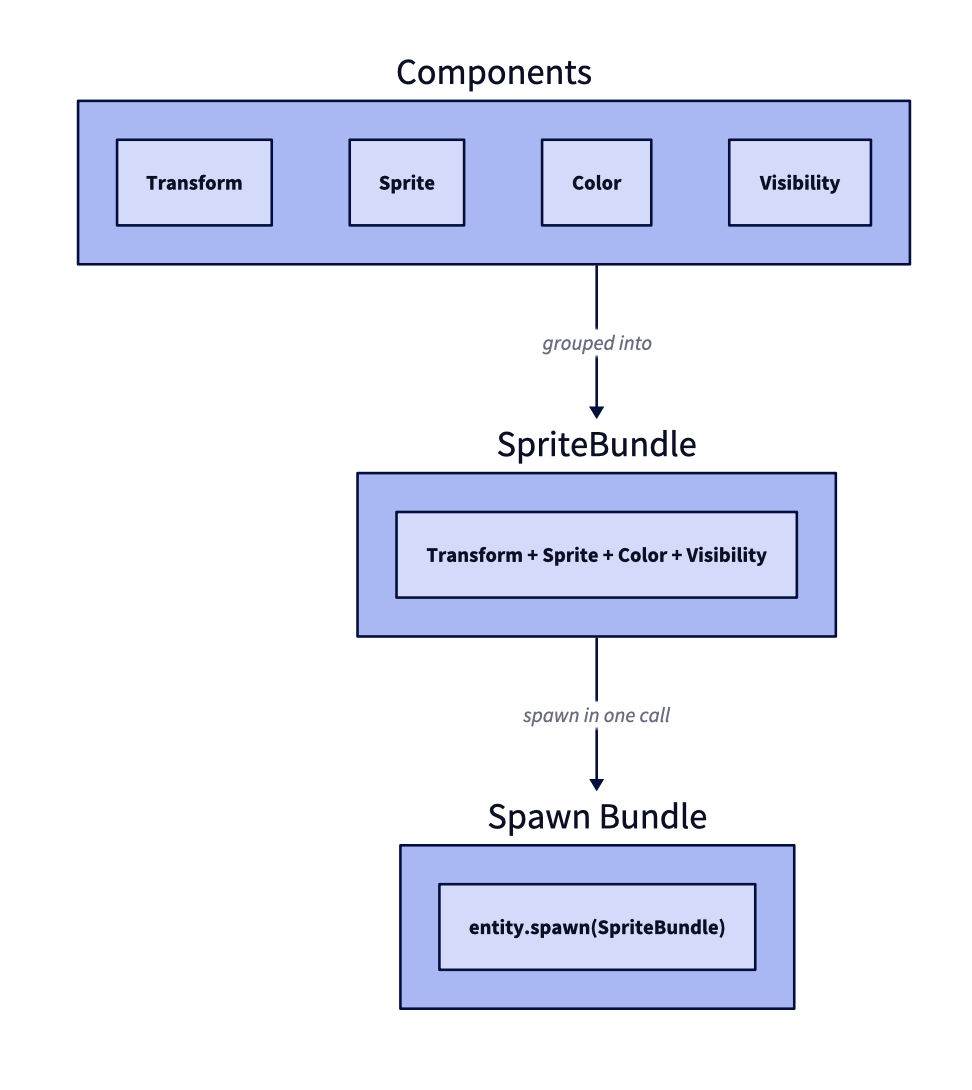
What’s a bundle?
A bundle is just a group of components you often spawn together. For example, Bevy ships a SpriteBundle that packs position, texture, color tint, and visibility; spawning that bundle gives a sprite entity in one call.

Registering our setup function
We need to register our setup function with bevy to be triggered on Startup.
Update your src/main.rs with the following code.
// Replace your main.rs with the following code.
use bevy::prelude::*;

fn main() {
	App::new()
	.add_plugins(DefaultPlugins)
	.add_systems(Startup, setup)
	.run();
}

fn setup(mut commands: Commands) {
	commands.spawn(Camera2d);
}
What’s bevy::prelude?
bevy::prelude is like a starter kit, things you reach for constantly when building a game—App, Commands, components, math helpers, etc.
What’s App::new()…?
App::new() creates the game application, add_plugins(DefaultPlugins) loads rendering, input, audio, and other systems, add_systems(Startup, setup) registers our startup function, and run() hands control to Bevy’s main loop.
Why register a startup function? What does it do?
Startup systems run once before the first frame. We use them to set up cameras, players, and other things that should exist as soon as the window opens.
What’s bevy main loop?
After startup, Bevy enters its main loop: it polls input, runs your systems, updates the world, and renders a frame. That loop repeats until you quit the game.

Let’s run it
cargo run
A blank screen? Yup, we have only setup the camera, now let’s add our player.
Setting up the Player
Now let’s create our player! Remember our Setup System and Update System from earlier? Well, in Bevy, everything is an Entity with Components that systems can work with.
Think of an entity as a unique ID (like a social security number) and components as the data attached to it. For our player, we need components like movement speed, health, or special abilities. In Rust, the perfect way to create these components is with a struct.
struct is one of the core building blocks of rust. It groups similar data together. Here we declare an empty Player struct so the type itself acts as a tag we can attach to the player entity. Later we can add things like player health.
// Place this before main function in main.rs
#[derive(Component)]
struct Player;

Why tag?
Tag marks an entity for later lookup. Because Player is attached to only our hero, systems can ask Bevy, “give me the entity with the Player tag” and work with just that one.
What’s this #[derive(component)]?
derive tells Rust to attach the component macro code to this struct. A macro is Rust’s way of generating pre-defined template code for you. #[derive(Component)]automatically injects the boilerplate Bevy needs, so it can store and find Playerentities, saving us from copying the same glue code everywhere. We’ll take a closer look at macros later in the series. This is the moment our player type becomes a component.
What’s a component, and why should the player be a component?
A component is a piece of data attached to an entity. Position, velocity, health, and even the idea of “this is the player” all live in components. By making Playera component we can query for that entity later, add more components (like health or inventory), and let Bevy’s systems pick out exactly the entities they need to update.
For now we will represent our character on screen using the “@” symbol. Modify the setup function.
// Replace existing setup function in main.rs with the following code
fn setup(mut commands: Commands) {
    commands.spawn(Camera2d);

    // Code Update Alert
    // Append the following lines to your setup function.
    commands.spawn((
        Text2d::new("@"),
        TextFont {
            font_size: 12.0,
            font: default(),
            ..default()
        },
        TextColor(Color::WHITE),
        Transform::from_translation(Vec3::ZERO),
        Player,
    ));
}
commands.spawn(( ... )) takes that tuple and treats it as a bundle of components. This single call adds the text we want to show, its font settings, the color, the position, and the Player tag that identifies the entity.
What’s a tuple?
A tuple is an ordered list of values written in parentheses. Rust keeps track of each position, so (Text2d::new("@"), TextColor(Color::WHITE)) holds two values side by side without needing to create a struct.
Whats an entity?
An entity is the unique ID Bevy uses to tie components together. By itself it holds no data, but once you attach components to it, that ID represents something in your game world.
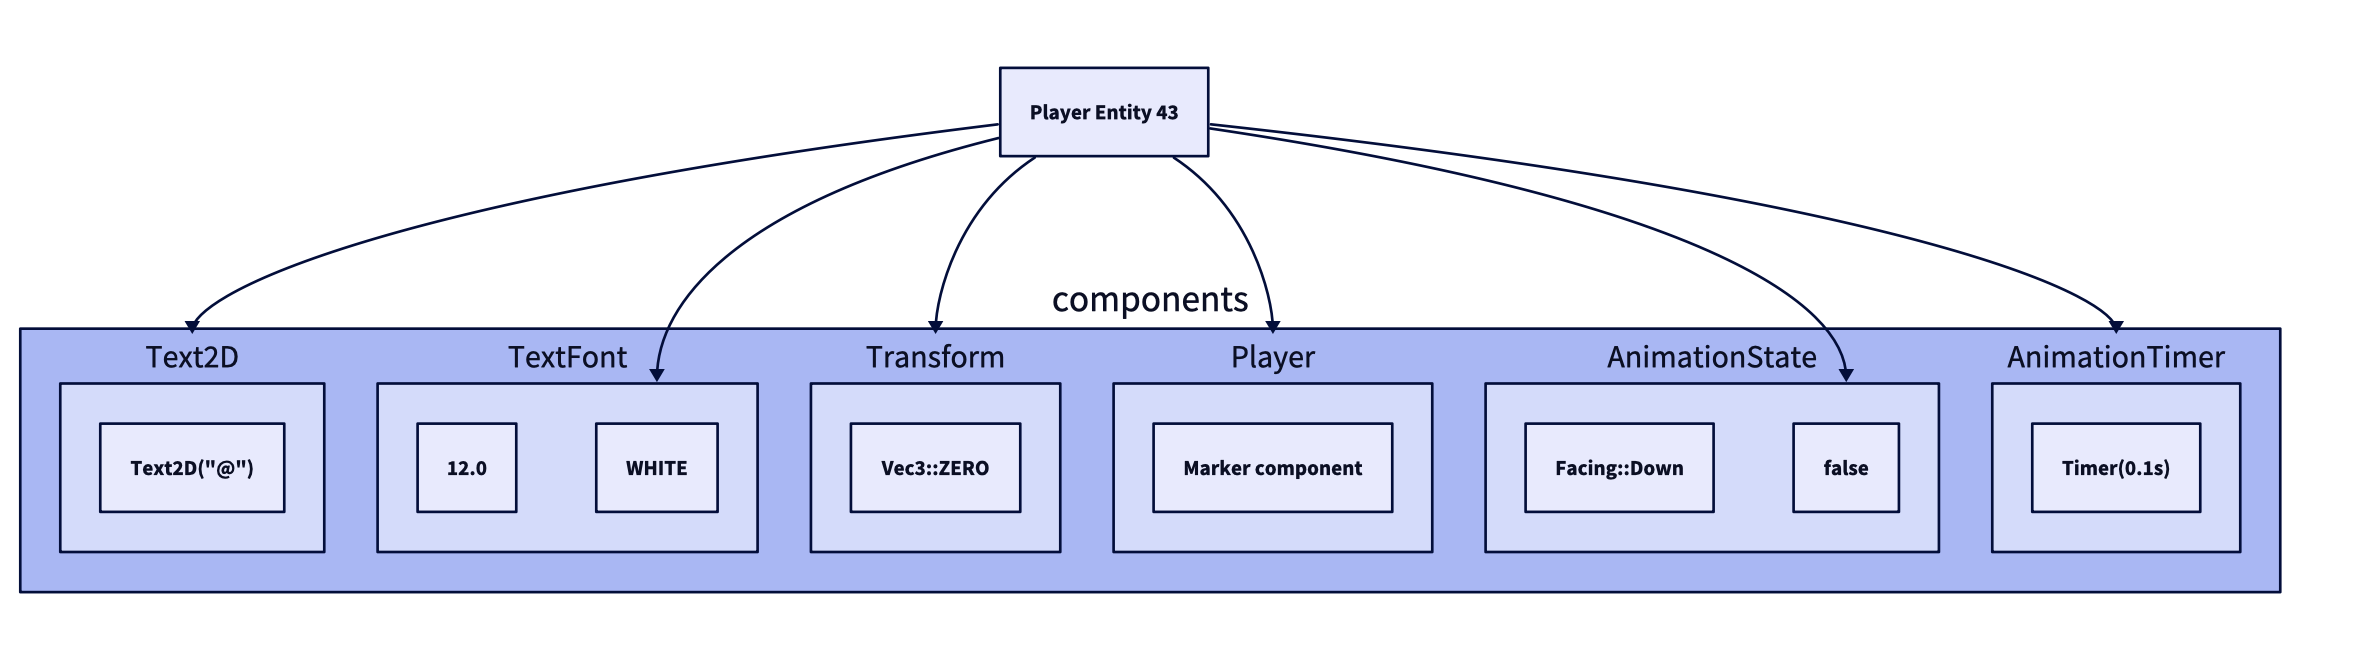
Each bundle produces a new entity with a unique ID and the listed components, which you can picture like this:
|
Entity |
Components it carries |
|---|---|
|
#42 |
|
|
#43 |
|
Once the queue flushes, those entities live in the world, ready for systems to discover them by the tags (components) they carry. We will be using this later when we want to do things like moving or animating them, or making them attack enemies, etc.
Implementing Player Movement
Now let’s create our Update System for player movement! Think about what we need to move a player:
- Keyboard input - to know which keys are pressed
- Time - to make movement smooth regardless of frame rate
- Player position - to actually move the player
In other game engines, you’d spend time manually connecting these systems together. But here’s the magic of Bevy - you just ask for what you need in your function parameters, and Bevy automatically provides it!

Let’s write our move player function.
// Append this code to main.rs
fn move_player(
    // "Bevy, give me keyboard input"
    input: Res<ButtonInput<KeyCode>>,
    // "Bevy, give me the game timer"
    time: Res<Time>,
    // "Bevy, give me the player's position"
    mut player_transform: Single<&mut Transform, With<Player>>,
) {
    let mut direction = Vec2::ZERO;
    if input.pressed(KeyCode::ArrowLeft) {
        direction.x -= 1.0;
    }
    if input.pressed(KeyCode::ArrowRight) {
        direction.x += 1.0;
    }
    if input.pressed(KeyCode::ArrowUp) {
        direction.y += 1.0;
    }
    if input.pressed(KeyCode::ArrowDown) {
        direction.y -= 1.0;
    }

    if direction != Vec2::ZERO {
        let speed = 300.0; // pixels per second
        let delta = direction.normalize() * speed * time.delta_secs();
        player_transform.translation.x += delta.x;
        player_transform.translation.y += delta.y;
    }
}
What’s Res?
Res or Resources are pieces of game-wide information that are not tied to any single entity. For example, Res<Time> gives you the game’s master clock, so every system reads the same “time since last frame” value.
Explain Single<&mut Transform, With>?
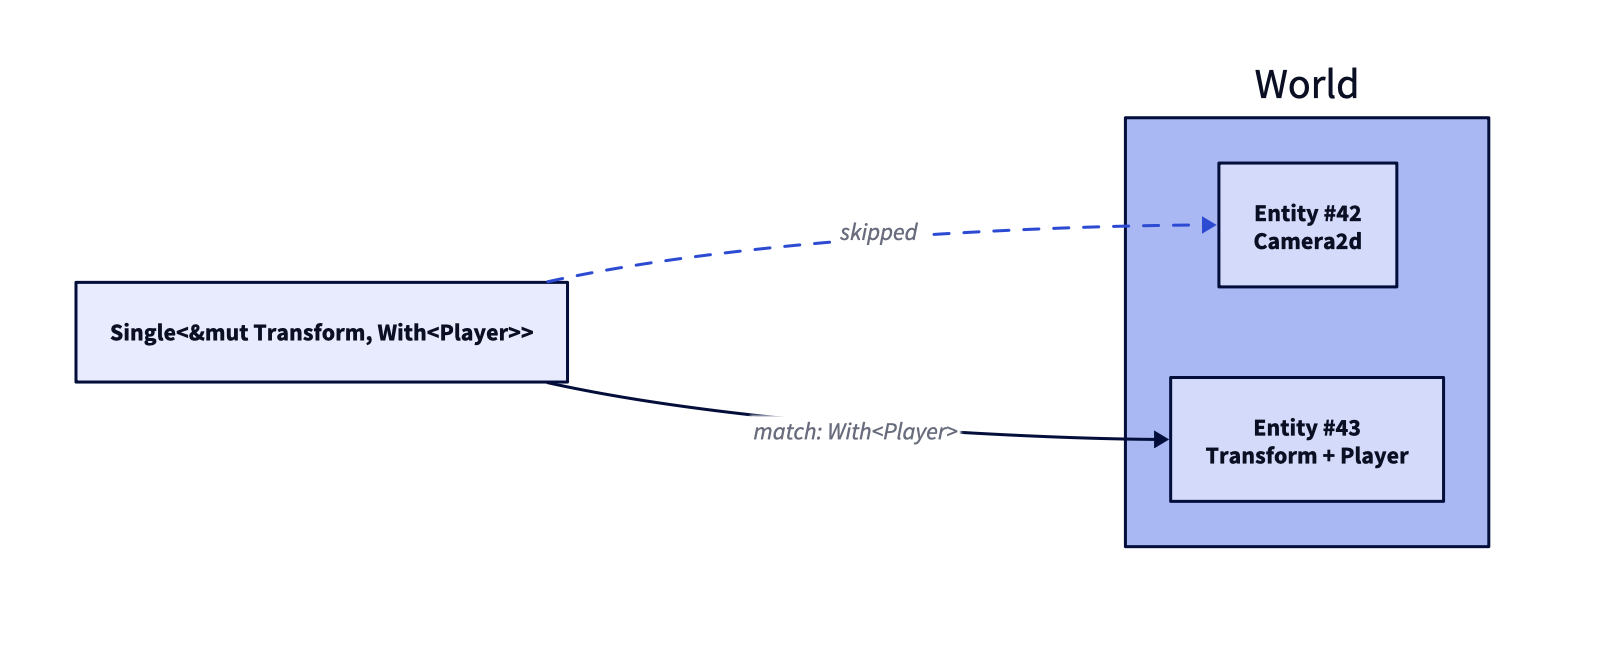
Single<&mut Transform, With<Player>> asks Bevy for exactly one entity that has a Transform component and also carries the Player tag. The &mut Transform part means we intend to modify that transform or player position (Remember, we added transform component in the setup function). If more than one player existed, this extractor would complain, which is perfect for a single-hero game.
What’s Vec2::ZERO?
Vec2::ZERO is a two-dimensional vector with both values set to zero: Vec2 { x: 0.0, y: 0.0 }. We use it as the starting direction before reading keyboard input.
What’s this KeyCode::… pattern?
KeyCode::ArrowLeft, KeyCode::ArrowRight … are enums (will cover enums later) that represent specific keys on the keyboard. Checking input.pressed(KeyCode::ArrowLeft)simply asks Bevy whether that key is held down during the current frame.
We ignore zero direction so the player stands still when no keys are pressed. Once we have input, normalize() converts the vector to length 1 so diagonal movement isn’t faster than straight movement. speed says how many pixels per second to move, and time.delta_secs() returns the frame time—the number of seconds since the previous frame—so multiplying them gives the distance we should travel this update. Finally we add that delta to the player’s transform translation to move the sprite on screen.
Registering the Movement System
// Update main function
fn main() {
    App::new()
        .add_plugins(DefaultPlugins)
        .add_systems(Startup, setup)
        .add_systems(Update, move_player) // Line update alert
        .run();
}

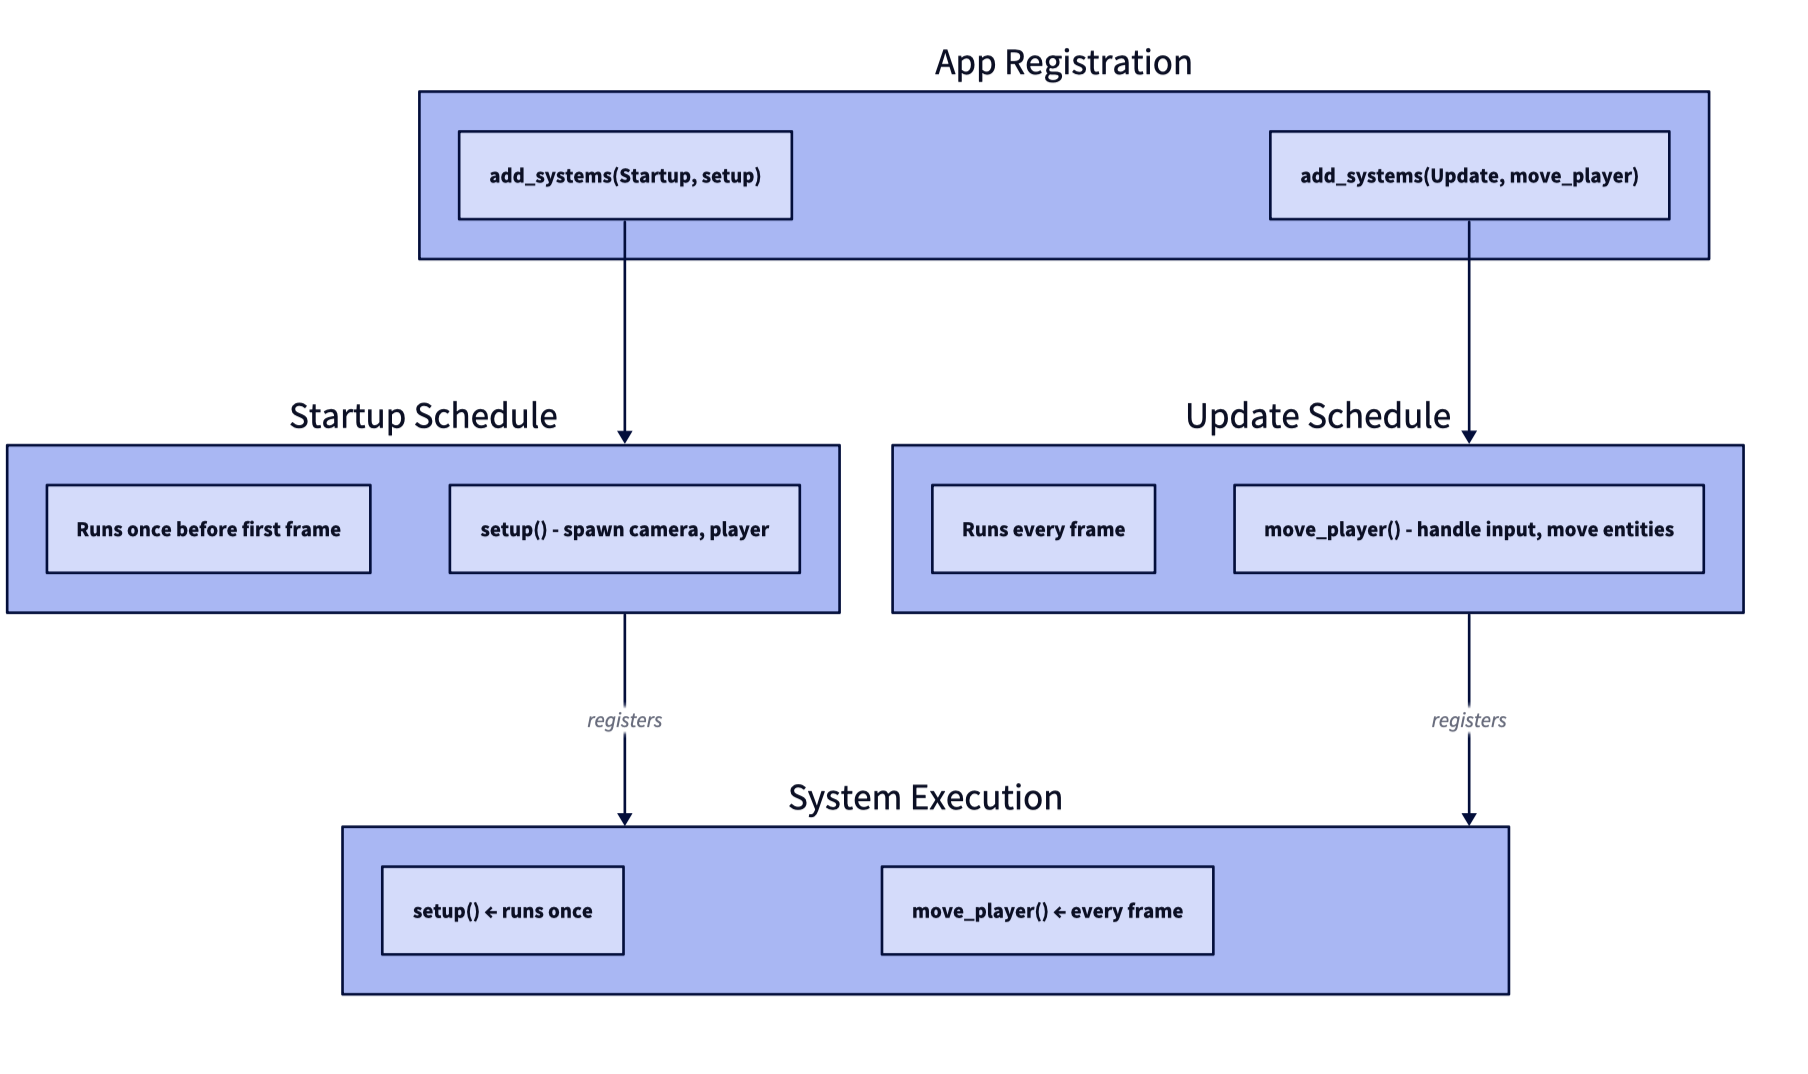
Why is move_player added as Update? What’s Update?
move_player runs every frame, so we plug it into the Update schedule. Update is Bevy’s built-in stage that fires once per game loop after startup is done.
So does systems mean functions we want bevy to execute at a particular time, like initial setup or on every game loop update?
Exactly. A system is just a Rust function you hand to Bevy with a sticky note that says “run me during Startup” or “execute me on every Update,” and the engine dutifully obeys.
Let’s run it.
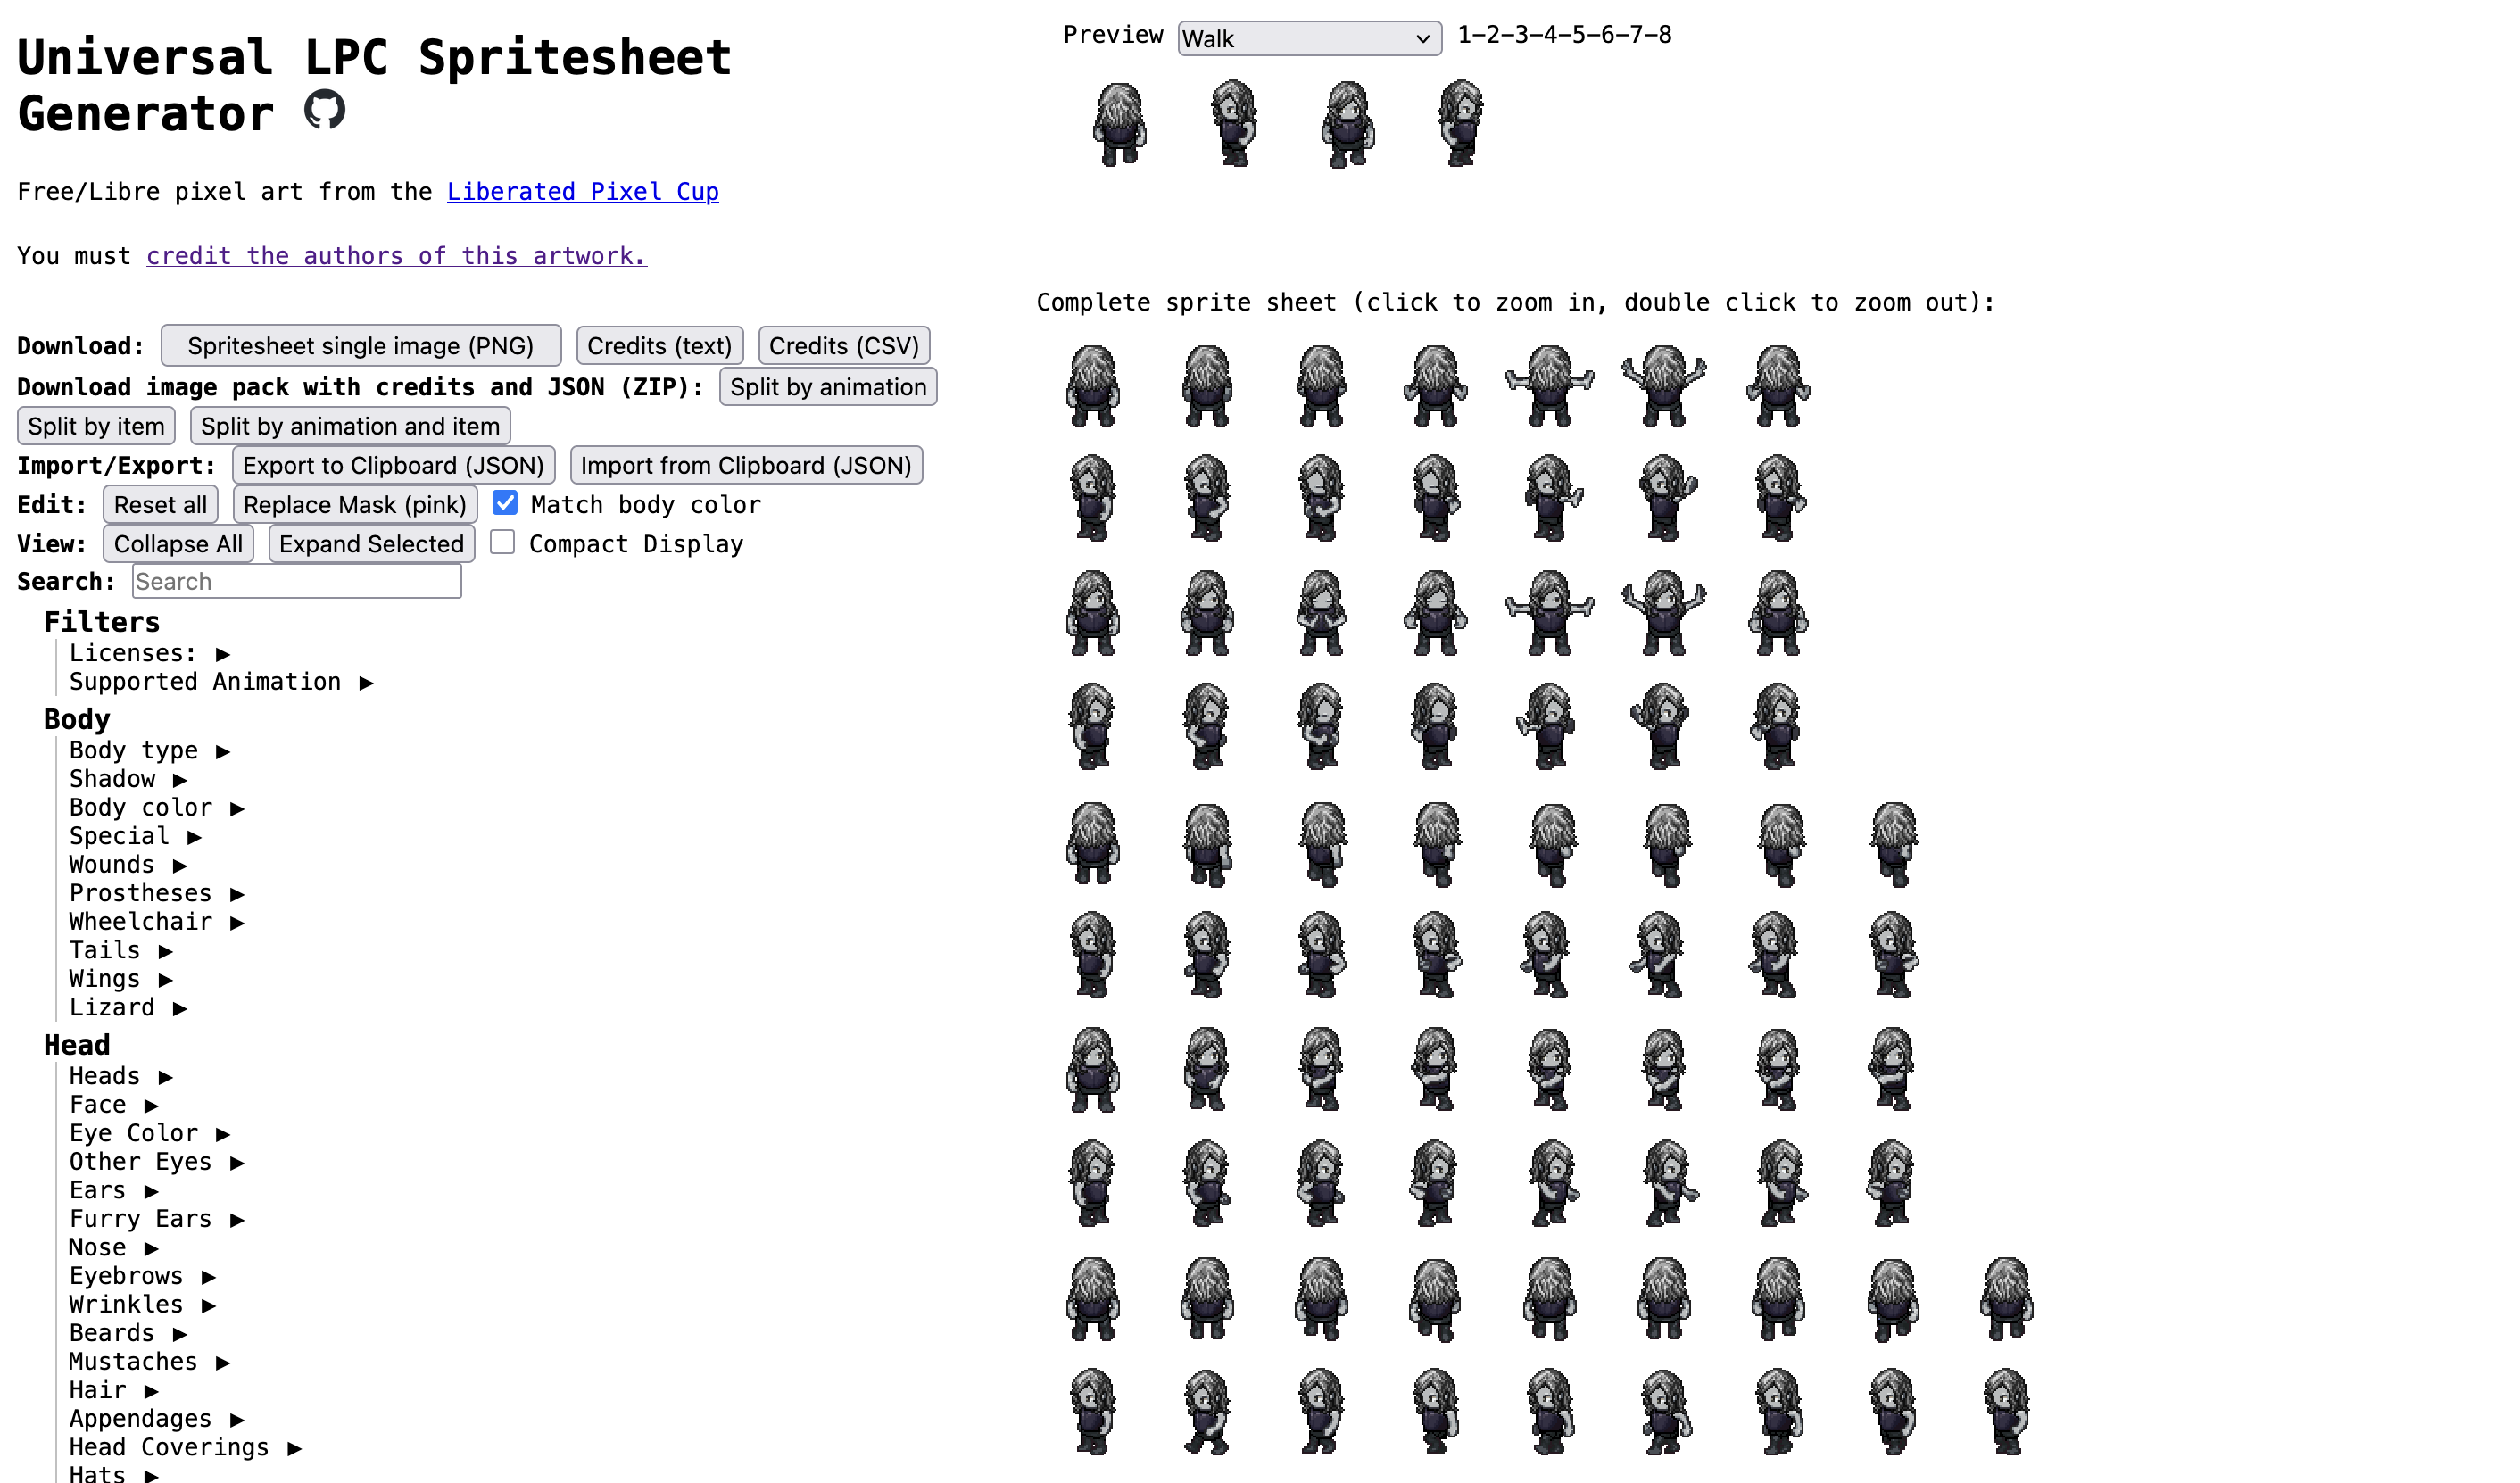
Adding Sprite Graphics
We’ll use the Universal LPC SpriteSheet Generator to give our character some personality. You can remix body parts, clothes, and colors at this link and export a full spritesheet.
For this project the spritesheet is already included in the repo. Drop the provided image files into src/assets so Bevy can find them when the game runs. You will need to create the assets directory inside the src folder.
Refactoring Code
We need to add more code and adding to main.rs will make hard to read and understand.
Update your main.rs file to the following, also create another file player.rs
mod player; pulls in the player.rs module, keeping our main file slim. Splitting code like this makes it easier to grow the project without one big file doing everything.
//main.rs
use bevy::prelude::*;

mod player;

fn main() {
    App::new()
        .insert_resource(ClearColor(Color::WHITE)) // We have updated the bg color to white
        .add_plugins(
            DefaultPlugins.set(AssetPlugin {
                // Our assets live in `src/assets` for this project
                file_path: "src/assets".into(),
                ..default()
            }),
        )
        .add_systems(Startup, setup_camera)
        .run();
}

fn setup_camera(mut commands: Commands) {
    commands.spawn(Camera2d);
}
.insert_resource(ClearColor(Color::WHITE)) drops a global setting into the app so every frame starts with a white background.
AssetPlugin is Bevy’s loader for textures, audio, and other assets. We tweak its file_path so it looks inside src/assets, which is where our sprites live.
Building the Player Module
Now that we have our basic app structure in place, it’s time to bring our character to life! We’ll create a dedicated player.rs module to handle everything related to our little adventurer. This keeps our code organized and makes it easier to add more features later.
This module will hold all the constants, components, and systems that make our player move, animate, and interact with the world.
Add following code in player.rs
// player.rs
use bevy::prelude::*;

// Atlas constants
const TILE_SIZE: u32 = 64; // 64x64 tiles
const WALK_FRAMES: usize = 9; // 9 columns per walking row
const MOVE_SPEED: f32 = 140.0; // pixels per second
const ANIM_DT: f32 = 0.1; // seconds per frame (~10 FPS)


#[derive(Component)]
struct Player; // Moved from main.rs to here
These constants give names to the numbers we reuse for the spritesheet and movement math: tile size, frames per row, walk speed, and how fast the animation advances. Moving the Player marker here keeps all player-specific types in one module.
Defining Player Directions
// Append these lines of code to player.rs
#[derive(Component, Debug, Clone, Copy, PartialEq, Eq)]
enum Facing {
    Up,
    Left,
    Down,
    Right,
}
What’s an enum?
An enum lists a handful of allowed values. Our character only ever faces four directions, so the Facing enum captures those options in one place.
Why can’t I use a struct here?
A struct would need a bunch of booleans like facing_up:true, facing_left:false, and you’d have to keep them in sync. That makes it complicated. Enum guarantees you only pick one direction.
When to decide between using enum and struct?
Use a struct when you need several fields, like a position with x and y, or player stats with health and stamina. Use an enum when you choose one option from a list, like which tool the player wields (sword, bow, wand) or which menu screen is active.
Why the purpose of adding Debug, Clone, Copy, PartialEq, Eq macros?
Debug lets us print the facing for logs, Clone and Copy make it trivial to duplicate the value, and PartialEq/Eq allow equality checks when we compare directions.
Why can’t I copy through simple assignment, why should I add these macros?
By default Rust moves values instead of copying them, so the compiler makes you opt in. Deriving Copy (and Clone as a helper) says “it’s cheap, go ahead and duplicate it.” PartialEq and Eq let us compare two facings directly, which is how we detect when the player changes direction.
What do you mean by rust moves values, instead of copying?
When you assign most values in Rust, the old variable stops owning it or in other words dies. Adding Copy keeps both variables valid.
Why does the old variable stop owning or die when assigned?
Rust enforces that each value has a single owner so memory can be freed safely. We’ll unpack the ownership rules and borrowing in later chapters.
This is a bit going over my head!
Yea, don’t worry, we have many more chapters to go and as you move through them, we will tackle this. It’s alright to not understand these concepts now.
Animation System Components
When we have a spritesheet with multiple frames (like our 9-frame walking animation), we need a way to control how fast those frames play. Without timing control, our character would either be frozen on one frame or cycling through frames so fast it looks like a blur!
Think of it like a flipbook - if you flip the pages too slowly, the animation looks choppy. If you flip too fast, you can’t see what’s happening. The AnimationTimergives us precise control over this timing, ensuring our character’s walking animation looks smooth and natural at just the right speed.
AnimationTimer wraps a Bevy Timer so each player entity knows when to advance to the next animation frame. Each tick represents one slice of time; once the timer hits its interval we move to the next sprite in the sheet.
// Append these lines of code to player.rs
#[derive(Component, Deref, DerefMut)]
struct AnimationTimer(Timer);

#[derive(Component)]
struct AnimationState {
    facing: Facing,
    moving: bool,
    was_moving: bool,
}
What’s Deref, DerefMut macros doing?
Deref lets our wrapper pretend to be the inner Timer when we read from it, and DerefMut does the same for writes. That means we can just call timer.tick(time.delta()) on AnimationTimer without manually pulling out the inner value first.
So we are renaming the Timer to AnimationTimer?
We’re wrapping the timer, not renaming it. Think of AnimationTimer as a little box that holds a Timer, plus a label that says “this one belongs to the player animation.” When we spawn a player we create a fresh Timer and tuck it into that box, so each player could have its own timer if we needed multiple heroes.
So it’s an instance of AnimationTime?
Yes, AnimationTimer is a tuple struct that contains a Timer. We build one when we spawn the player so each entity can carry its own timer data. This pattern shows up whenever you want to attach extra meaning to an existing type without writing a brand-new API.
AnimationState remembers which way the player points, whether they are moving, and whether they just started or stopped. Systems read this to choose animation rows and reset frames when movement changes.
Spawning the Player
We load the spritesheet through the AssetServer, create a texture atlas layout so Bevy knows the grid, and pick the starting frame for a hero facing down. Then we spawn an entity with the sprite, transform at the origin, our marker components, and the timer that will drive animation.
// Append these lines of code to player.rs
fn spawn_player(
    mut commands: Commands,
    asset_server: Res<AssetServer>,
    mut atlas_layouts: ResMut<Assets<TextureAtlasLayout>>,
) {
    // Load the spritesheet and build a grid layout: 64x64 tiles, 9 columns, 12 rows
    let texture = asset_server.load("male_spritesheet.png");
    let layout = atlas_layouts.add(TextureAtlasLayout::from_grid(
        UVec2::splat(TILE_SIZE),
        WALK_FRAMES as u32, // columns used for walking frames
        12,                  // at least 12 rows available
        None,
        None,
    ));

    // Start facing down (towards user), idle on first frame of that row
    let facing = Facing::Down;
    let start_index = atlas_index_for(facing, 0);

    commands.spawn((
        Sprite::from_atlas_image(
            texture,
            TextureAtlas {
                layout,
                index: start_index,
            },
        ),
        Transform::from_translation(Vec3::ZERO),
        Player,
        AnimationState { facing, moving: false, was_moving: false },
        AnimationTimer(Timer::from_seconds(ANIM_DT, TimerMode::Repeating)),
    ));
}
AnimationState { facing, moving: false, was_moving: false } sets the starting direction and flags that the character is idle right now and was idle last frame.
AnimationTimer(Timer::from_seconds(ANIM_DT, TimerMode::Repeating)) creates a repeating stopwatch that fires every ANIM_DT seconds to advance the spritesheet.
What’s an AssetServer?
The AssetServer is Bevy’s file loader and manager that handles loading and caching of game assets like images, sounds, and 3D models.
When you call asset_server.load("path/to/sprite.png"), it doesn’t immediately load the file into memory. Instead, it returns a handle that you can use later. This is called “lazy loading” - the actual file loading happens in the background, and Bevy will notify you when it’s ready.
This approach is efficient because:
- Multiple entities can share the same sprite without loading it multiple times
- Assets are only loaded when actually needed
- Bevy can optimize and batch-load assets for better performance
- If an asset fails to load, it won’t crash your entire game
In our case, asset_server.load("sprites/player.png") requests the spritesheet and returns a handle to track its loading status.
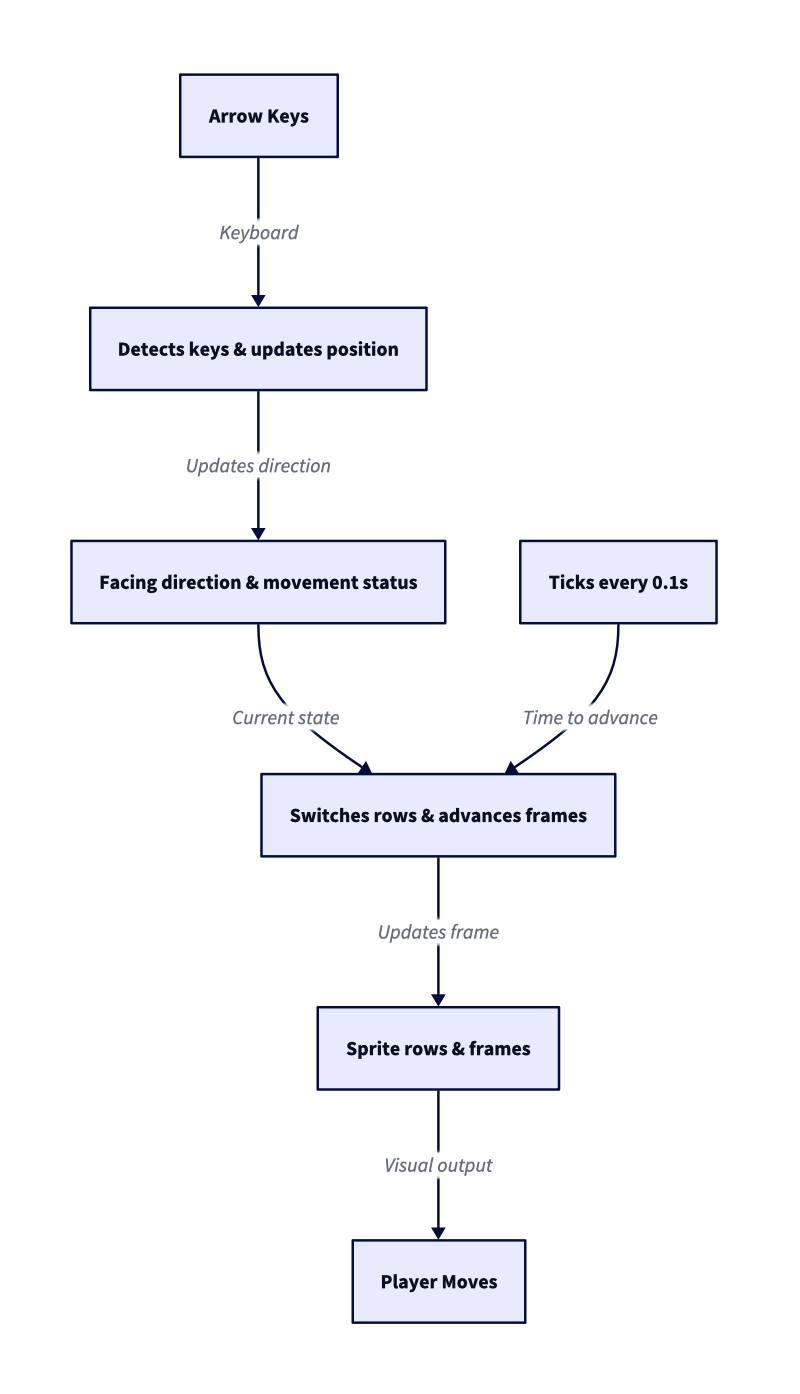
Movement System
Now that we have our player spawned with all the necessary components, we need to update our existing movement system to track which direction the player is facing. This is crucial for the animation system to know which row of the spritesheet to use - each direction (up, down, left, right) corresponds to a different row in our sprite atlas.
This updated system will detect the movement direction and update the AnimationStateaccordingly, so our animation system can pick the correct sprite row for walking animations in each direction.
// Append these lines of code to player.rs
fn move_player(
    input: Res<ButtonInput<KeyCode>>,
    time: Res<Time>,
    mut player: Query<(&mut Transform, &mut AnimationState), With<Player>>,
) {
    let Ok((mut transform, mut anim)) = player.single_mut() else {
        return;
    };

    let mut direction = Vec2::ZERO;
    if input.pressed(KeyCode::ArrowLeft) {
        direction.x -= 1.0;
    }
    if input.pressed(KeyCode::ArrowRight) {
        direction.x += 1.0;
    }
    if input.pressed(KeyCode::ArrowUp) {
        direction.y += 1.0;
    }
    if input.pressed(KeyCode::ArrowDown) {
        direction.y -= 1.0;
    }

    if direction != Vec2::ZERO {
        let delta = direction.normalize() * MOVE_SPEED * time.delta_secs();
        transform.translation.x += delta.x;
        transform.translation.y += delta.y;
        anim.moving = true;

        // Update facing based on dominant direction
        if direction.x.abs() > direction.y.abs() {
            anim.facing = if direction.x > 0.0 { Facing::Right } else { Facing::Left };
        } else {
            anim.facing = if direction.y > 0.0 { Facing::Up } else { Facing::Down };
        }
    } else {
        anim.moving = false;
    }
}
The query asks Bevy for the single entity tagged Player, giving us mutable access to its Transform and AnimationState. We build a direction vector from the pressed keys, normalize it so diagonal input isn’t faster, and move the player by speed × frame time. The facing logic compares horizontal vs vertical strength to decide which way the sprite should look. We record whether the player is moving now so later systems can detect when motion starts or stops.
Animation Implementation
Now we have all the pieces in place - our player can move in different directions, and we’re tracking which way they’re facing. The final piece is the animation system that actually updates the sprite frames to create the walking animation.
This system takes the direction information from our movement system and uses the animation timer to cycle through the sprite frames at the right speed. It handles the complex logic of switching between different animation rows when the player changes direction, and ensures smooth transitions between walking and idle states.

// Append these lines of code to player.rs
fn animate_player(
    time: Res<Time>,
    mut query: Query<(&mut AnimationState, &mut AnimationTimer, &mut Sprite), With<Player>>,
) {
    let Ok((mut anim, mut timer, mut sprite)) = query.single_mut() else {
        return;
    };

    let atlas = match sprite.texture_atlas.as_mut() {
        Some(a) => a,
        None => return,
    };

    // Compute the target row and current position in the atlas (column/row within the 9-column row)
    let target_row = row_zero_based(anim.facing);
    let mut current_col = atlas.index % WALK_FRAMES;
    let mut current_row = atlas.index / WALK_FRAMES;

    // If the facing changed (or we weren't on a walking row), snap to the first frame of the target row
    if current_row != target_row {
        atlas.index = row_start_index(anim.facing);
        current_col = 0;
        current_row = target_row;
        timer.reset();
    }

    let just_started = anim.moving && !anim.was_moving;
    let just_stopped = !anim.moving && anim.was_moving;

    if anim.moving {
        if just_started {
            // On tap or movement start, immediately advance one frame for visible feedback
            let row_start = row_start_index(anim.facing);
            let next_col = (current_col + 1) % WALK_FRAMES;
            atlas.index = row_start + next_col;
            // Restart the timer so the next advance uses a full interval
            timer.reset();
        } else {
            // Continuous movement: advance based on timer cadence
            timer.tick(time.delta());
            if timer.just_finished() {
                let row_start = row_start_index(anim.facing);
                let next_col = (current_col + 1) % WALK_FRAMES;
                atlas.index = row_start + next_col;
            }
        }
    } else if just_stopped {
        // Not moving: keep current frame to avoid snap. Reset timer on transition to idle.
        timer.reset();
    }

    // Update previous movement state
    anim.was_moving = anim.moving;
}


// Returns the starting atlas index for the given facing row
fn row_start_index(facing: Facing) -> usize {
    row_zero_based(facing) * WALK_FRAMES
}

fn atlas_index_for(facing: Facing, frame_in_row: usize) -> usize {
    row_start_index(facing) + frame_in_row.min(WALK_FRAMES - 1)
}

fn row_zero_based(facing: Facing) -> usize {
    match facing {
        Facing::Up => 8,
        Facing::Left => 9,
        Facing::Down => 10,
        Facing::Right => 11,
    }
}
let Ok((mut anim, mut timer, mut sprite)) = query.single_mut() else { return; }; both checks the result and names the pieces we need. If the query succeeds, the code binds anim, timer, and sprite so we can use them later. If it fails (no player, or more than one), we hit the else branch and exit immediately. Rust uses the Result type for this: Ok means “query returned exactly one result,” Err means “something about that query didn’t match.”
After that we match on an Option, which is Rust’s “maybe there is a value” type. Some(atlas) means the texture atlas exists and we can tweak it; None means it hasn’t loaded yet, so we skip and let the next frame try again. It’s the same pattern you’d use when checking a map or cache: only use the value when the lookup returns something.
animate_player pulls the animation state, timer, and sprite handle for the player. It figures out which row of the atlas matches the current facing, snaps to that row when direction changes, and uses the timer to step through columns at a steady pace. When movement stops we reset the timer so the animation rests on the last frame shown. The helper functions map a facing to the correct row and frame index so the math stays readable.
Creating the Player Plugin
// Append these lines of code to player.rs
pub struct PlayerPlugin;

impl Plugin for PlayerPlugin {
    fn build(&self, app: &mut App) {
        app.add_systems(Startup, spawn_player)
            .add_systems(Update, (move_player, animate_player));
    }
}
PlayerPlugin is our “player module” in plug form. In Bevy, a plugin is just a struct that knows how to register systems, resources, and assets. By implementing Plugin for PlayerPlugin, we give Bevy a checklist: whenever this plugin is added to the app, run the code inside to set up everything the player feature needs. This keeps main.rs from becoming a tangle of player-specific calls.
The build method is the checklist. Bevy passes us a mutable App, and we bolt on the systems we care about. spawn_player is scheduled in Startup so the sprite appears as soon as the game launches. move_player and animate_player go into the Update schedule so they execute every frame—handling input and animation in lockstep. With everything declared here, dropping PlayerPlugin into App::new()automatically wires up the entire player flow.
So this build function is an in-built structure, which I have to write?
Yes. The Plugin trait says “any plugin must provide a build(&self, app: &mut App)function.” We implement that trait, so Rust expects us to supply the body. Bevy calls this method when it loads the plugin, which is why we add all our systems inside it.
What’s a trait?
A trait is a contract describing what methods a type must provide. Bevy’s Plugintrait says “give me a build function so I can register your systems.” By implementing that trait for PlayerPlugin, we hook into Bevy’s startup process and inject our own setup code. Traits let different types share behavior, PlayerPluginbehaves like any other Bevy plugin, but it installs our player-specific systems.
Final Integration
// Update the main function in main.rs

use crate::player::PlayerPlugin;

fn main() {
    App::new()
        .insert_resource(ClearColor(Color::WHITE))
        .add_plugins(
            DefaultPlugins.set(AssetPlugin {
                file_path: "src/assets".into(),
                ..default()
            }),
        )
        .add_systems(Startup, setup_camera)
        .add_plugins(PlayerPlugin) // Update this line
        .run();
}
Let’s run it.
cargo run

This post was originally published on my blog.
More chapters to come, stay tuned. Connect with me on LinkedIn, follow me on X for latest updates.
[story continues]
tags