
A few days ago, I released EasyTdd version 0.5.0. In this post, I'll walk through the updates and new features introduced in this version. The highlight of the release is the introduction of the incremental code generator for FluentMocks—a powerful feature implemented with the IIncrementalGenerator technology. FluentMock wraps around the popular Moq.Mock class and automatically generates setup and verify methods for every property and method of the target class, making the testing process more intuitive and readable. This implementation leverages the fluent interface design pattern, enabling method chaining that closely resembles natural language, improving code readability and maintainability. In addition to FluentMock, this update includes several key improvements and bug fixes, such as template enhancements, better file naming, and refined attribute handling, further solidifying EasyTdd’s position as a must-have tool for .NET developers focused on test-driven development. Read on to explore what’s new and how these updates can elevate your TDD experience.
Incremental FluentMock
An Overview
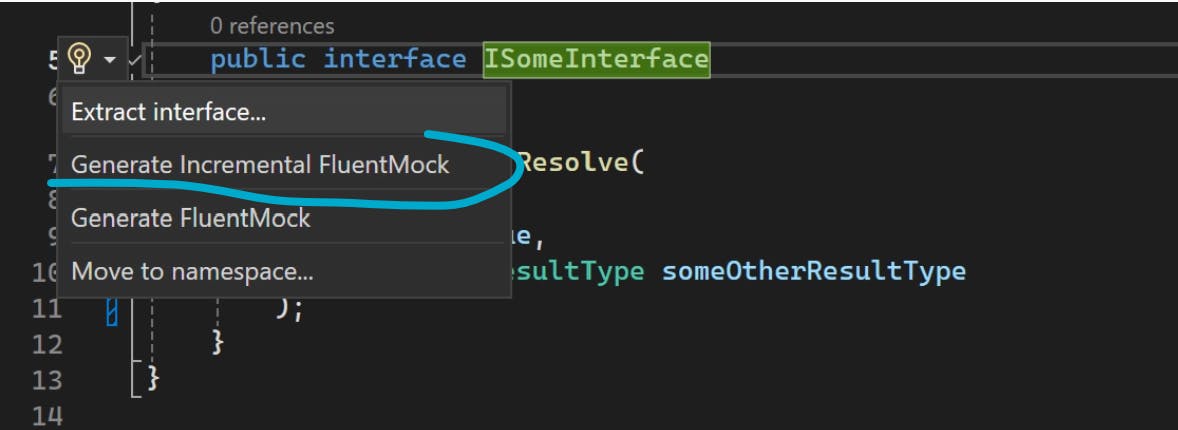
Let’s start by creating a FluentMock. First, install or update to EasyTdd 0.5.0. If you need help, you can follow the installation guide here. After installing, the 'Generate Incremental FluentMock' option will appear in the Quick Action menu when you right-click on an interface or abstract class declaration.:
This action, in the above case, will generate a class SomeInterfaceMock. The code looks as following:
[EasyTdd.Generators.FluentMockFor(typeof(ISomeInterface))]
public partial class SomeInterfaceMock
{
    public static SomeInterfaceMock Create()
    {
        return new SomeInterfaceMock();
    }
}
When to Use FluentMock
FluentMock is designed to simplify the process of creating, setting up, and managing mocks in your testing suite. But when is it most beneficial to use FluentMock over traditional mocking frameworks? Here are a few scenarios where FluentMock shines:
- Centralized Setup Across the Solution: FluentMock enables you to define mock setups in a single place, making it easier to maintain and reuse configurations across multiple tests. This consistency ensures that any change to a mock’s behavior is automatically reflected throughout your entire test suite.
- Reduced Boilerplate Code: Unlike traditional mocks, FluentMock significantly reduces repetitive setup code. This allows you to focus more on the test logic rather than the configuration details, resulting in cleaner and more maintainable tests.
- Improved Readability: By using a fluent interface design pattern, FluentMock provides a more intuitive and readable syntax, resembling natural language. This makes it easier for developers to understand test scenarios at a glance, especially in complex setups.
- Less Code, Fewer Mistakes: With less code required to configure and verify mocks, there’s a lower chance of introducing errors. FluentMock minimizes the verbosity of traditional mock setups, reducing the cognitive load on developers.
- Foundation for Future Features: FluentMock’s streamlined structure lays the groundwork for upcoming features in EasyTdd, such as more automated code generation for other TDD scenarios. This means adopting FluentMock today will ensure a smoother transition to new capabilities as they are released.
Overall, FluentMock offers an ideal solution for developers looking to implement test-driven development (TDD) more efficiently by eliminating unnecessary boilerplate and making tests easier to manage and scale.
It is still the same old Moq.Mock
The FluentMock class is derived from the existing Moq.Mock class, meaning all the standard Moq functionality is still accessible. FluentMock streamlines the most common scenarios, but whenever you need to use the full power of Moq, you can still fall back to the regular Setup, Returns, and Verify methods as needed. Here’s an example:
// create a fluentMock with a basic setup
var mock = SomeInterfaceMock
    .Create()
    .SetupResolve(() => expectedResult0);

// use Moq.Mock regular techniquest for further setup and configuration:
mock
    .Setup(x => x.Resolve(2, It.IsAny<string>(), It.IsAny<SomeOtherResultType>()))
    .Returns(() => expectedResult2)
    .Callback(
        (int id, string value, SomeOtherResultType result) =>
        {
            // callback functionality
        }
    );

// user Moq.Mock regular Verify
mock.Verify();
mock.VerifyNoOtherCalls();
This flexibility ensures that you can leverage the power of FluentMock for simpler scenarios while retaining full control over more complex test configurations using traditional Moq methods.
FluentMock vs. Traditional Moq: Setup Comparison
FluentMock Setup: Compact and Readable
The FluentMock code is automatically generated in the background and is immediately ready to use:
public class UsageTest
{
    [Test]
    public void Test()
    {
        var expectedResult0 = new SomeResultType();
        var expectedResult1 = new SomeResultType();
        var expectedResult2 = new SomeResultType();

        var mock = SomeInterfaceMock
            .Create()
            .SetupResolve(
                () => expectedResult0
            )
            .SetupResolve(
                () => expectedResult1,
                isId: x => x == 1
            )
            .SetupResolve(
                () => expectedResult2,
                isId: x => x == 2
            );

        mock
            .Object
            .Resolve(
                1,
                "Jon",
                new SomeOtherResultType()
            )
            .Should()
            .Be(expectedResult1);

        mock
            .Object
            .Resolve(
                2,
                "Tom",
                new SomeOtherResultType()
            )
            .Should()
            .Be(expectedResult2);

        mock
            .Object
            .Resolve(
                8,
                "Jennifer",
                new SomeOtherResultType()
            )
            .Should()
            .Be(expectedResult0);
    }
}
In the code example above the mock is set up to return expectedResult1 when provided id is 1, return expectedResult2 when provided id is 2, and expectedResult0 in all other cases.
Traditional Moq Setup: Verbose and Detailed
Let's take a look at how the setup would look with a pure Moq.Mock:
var expectedResult0 = new SomeResultType();
var expectedResult1 = new SomeResultType();
var expectedResult2 = new SomeResultType();

var mock = new Mock<ISomeInterface>(MockBehavior.Strict);

mock
    .Setup(
        x =>
            x.Resolve(
                It.IsAny<int>(),
                It.IsAny<string>(),
                It.IsAny<SomeOtherResultType>()
            )
    )
    .Returns(() => expectedResult0);


mock
    .Setup(
        x =>
            x.Resolve(
                1,
                It.IsAny<string>(),
                It.IsAny<SomeOtherResultType>()
            )
    )
    .Returns(() => expectedResult1);

mock
    .Setup(
        x =>
            x.Resolve(
                2,
                It.IsAny<string>(),
                It.IsAny<SomeOtherResultType>()
            )
    )
    .Returns(() => expectedResult2);
I prefer short lines so to look fare I will compare setup in one-liners:
// FluentMock Setup Example:
var mock = SomeInterfaceMock
    .Create()
    // Sets up Resolve to return expectedResult0 for all inputs by default
    .SetupResolve(() => expectedResult0)
    // Sets up Resolve to return expectedResult1 when the 'id' parameter is 1
    .SetupResolve(() => expectedResult1, isId: x => x == 1)
    // Sets up Resolve to return expectedResult2 when the 'id' parameter is 2
    .SetupResolve(() => expectedResult2, isId: x => x == 2);

//vs

// Traditional Moq Setup Example:
var mock = new Mock<ISomeInterface>(MockBehavior.Strict);

mock
    // Sets up Resolve to return expectedResult0 for any combination of parameters
    .Setup(x => x.Resolve(It.IsAny<int>(), It.IsAny<string>(), It.IsAny<SomeOtherResultType>()))
    .Returns(() => expectedResult0);

mock
    // Sets up Resolve to return expectedResult1 when 'id' is 1 and the other parameters are any values
    .Setup(x => x.Resolve(1, It.IsAny<string>(), It.IsAny<SomeOtherResultType>()))
    .Returns(() => expectedResult1);

mock
    // Sets up Resolve to return expectedResult2 when 'id' is 2 and the other parameters are any values
    .Setup(x => x.Resolve(2, It.IsAny<string>(), It.IsAny<SomeOtherResultType>()))
    .Returns(() => expectedResult2);
FluentMock pros: Easy to read, compact, and utilizes method chaining, which closely resembles natural language.
Verification Example: FluentMock vs. Traditional Moq
The same applies to verification. The example below checks that the mock was called with an id value of 1, a name value of Jon, and a SomeOtherResult with an id value of 100:
mock
    .VerifyResolve(
        x => x == 1,
        x => x == "Jon",
        x => x.Id == 100
    );

//vs

mock
    .Verify(
        x => x.Resolve(
            1,
            "Jon",
            It.Is<SomeOtherResultType>(
                x => x.Id == 100
            )
        )
    );
Reusable FluentMock Setups
The FluentMock approach also offers a convenient place to have setups for a specific interface in one place. For example if I have an interface INameLookup:
public interface INameLookup
{
    public string Lookup(int id);
}
In many testing scenarios, it is enough that the service returns something relevant to the provided input. I might want to create a lightweight fake implementation with the help of FluentMock:
[EasyTdd.Generators.FluentMockFor(typeof(INameLookup))]
public partial class NameLookupMock
{
    public static NameLookupMock Create()
    {
        var mock = new NameLookupMock();

        return mock.SetupLookup((int id) => $"name_of_{id}");
    }
}
Whenever INameLookup is needed in a test, the NameLookupMock.Create() can be used, which produces the expected results.
One more example could be with a repository:
public interface IOrderRepository
{
    Task<Order> Get(int id);
}
And the mock:
[EasyTdd.Generators.FluentMockFor(typeof(IOrderRepository))]
public partial class OrderRepositoryMock
{
    public static OrderRepositoryMock Create()
    {
        var mock = new OrderRepositoryMock();

        return mock.SetupGet((int id) => OrderBuilder.Random().WithId(id));
    }
}
Pretty cheap fake, when specific values are not required but calling code needs a repository which returns something on each call.
Different ways to set up
I will explore every possible use case in detail in a separate blog series, but for now, I'll quickly highlight the added value. Below I will provide a list of setups with descriptions of them:
 SomeInterfaceMock
    .Create()
    // setup to return expectedResult0 on every Resolve call
    .SetupResolve(() => expectedResult0)
    // setup to return expectedResult1 when id parameter value is 1
    .SetupResolve(() => expectedResult1, isId: x => x == 1)
    // setup to return expectedResult2 when Id value of someOtherResult parameter is 100
    .SetupResolve(() => expectedResult2, isSomeOtherResult: x => x.Id == 100)
    // setup to return dynamic value depending on the input
    .SetupResolve(
        (int id, string name, SomeOtherResultType someOtherResultType) =>
            new SomeResultType
            {
                Id = id,
                Name = $"name of {id}"
            }
    )
    // setup to throw an exception when input name is "Ted"
    .SetupResolve(() => throw new Exception("Something went wrong"), isName: x => x == "Ted");
Similar goes for verification:
// verifies if Resolve was called with specific parameters
mock
    .VerifyResolve(
        x => x == 1,
        x => x == "Jon",
        x => x.Id == 100
    );

// verifies if Resolve was called with value "John"
mock
    .VerifyResolve(
        isValue: x => x == "John"
    );

// verifies if Resolve was called with value "John" exactly twice
mock
    .VerifyResolve(
        isValue: x => x == "John",
        times: () => Times.Exactly(2)
    );

// verifies if Resolve was called at least once
mock
    .VerifyResolve();
Configuration
The default placement, naming, and location of the generated FluentMock may not suit everyone's preferences and requirements. Fortunately, all of these aspects can be easily customized to better align with your needs and tastes. Now, I will provide the settings one by one. Settings for the incremental FluentMock, as well as for all other tools, are located in the settings.json file under the IncrementalTestDoubleForAbstract section. Here are the descriptions:
-
ClassSuffix: The default value is
Mock. This value determines the suffix added to the target class's corresponding fluent mock class name. In the previous example, forISomeInterface, the fluentMock class name wasSomeInterfaceMock. -
NameInMenu: The default value is
Generate Incremental FluentMock. This setting allows you to modify the name displayed in the Quick Actions menu. By default, it isGenerate Incremental FluentMock, but you can rename it to whatever you prefer. -
AssemblySpecificTargetProjectSuffix: The default value is
TestDoubles. This setting instructs EasyTdd to place the generated builder in a project corresponding to the project of the target class. It searches for a project with the same name as the target class’s project, but with the predefined suffix appended. For example, ifISomeInterfaceis in the projectEasyTdd.CodeSource.CodeProject1, the corresponding project for the fluent mock would beEasyTdd.CodeSource.CodeProject1.TestDoubles. This can be customized to suit individual preferences and requirements, such as using a different suffix for the test doubles project. Within the test doubles project, EasyTdd maintains the original folder hierarchy. -
TargetProjectNameForAssembliesWithoutSpecificTargetProject: The default value is
null. This setting specifies a project name where a test double will be placed when the project of a target class doesn't have a corresponding test double project. For example, if you want to place all test doubles from all projects into a single test doubles project calledEasyTdd.CodeSource.TestDoubles, you would set this setting toEasyTdd.CodeSource.TestDoubles. In this case, you can leaveAssemblySpecificTargetProjectSuffixwith its default value. EasyTdd will first try to find a project with the predefined suffix and, if it doesn’t find one, it will fall back to the value inTargetProjectNameForAssembliesWithoutSpecificTargetProject. If EasyTdd doesn't locate the project specified inTargetProjectNameForAssembliesWithoutSpecificTargetProject, it will place the test double class next to the target class. -
Folder: The default value is
Mocks. This setting allows you to organize test doubles, such as builders and mocks, into corresponding folders. For example, if you choose to have a single project for all test doubles, setTargetProjectNameForAssembliesWithoutSpecificTargetProjecttoEasyTdd.CodeSource.TestDoublesandFoldertoMocks. In this case, the fluent mock forEasyTdd.CodeSource.CodeProject1\Services\ISomeInterface.cswill be placed inEasyTdd.CodeSource.TestDoubles\Mocks\CodeProject1\Services\SomeInterfaceMock.cs. -
FileTemplates: This section contains settings for the specific files that will be generated.
-
NameTemplate: The default value is
{{className}}.csfor the EasyTdd-generated part, and{{className}}.g.csfor the EasyTdd.Generators-generated part. Here,classNameis a template variable that refers to the name of the FluentMock class. -
ContentTemplateFile: The default value for the EasyTdd-generated part is
DefaultTemplates\incremental.fluentmock.tpl. The default value for the EasyTdd.Generators part isDefaultTemplates\moq.incremental.fluentmock.g.tpl. -
Recreate: The
Recreatesetting determines how files are generated. If set totrue, the files are generated by the incremental generator (EasyTdd.Generators). If set tofalse, they are generated by the EasyTdd Visual Studio extension. The files generated by EasyTdd are intended for modifications, such as fluent mock setups. In contrast, the files generated by EasyTdd.Generators will be regenerated whenever changes are made to the target class.
-
-
ToolingNamespaces: By default, this contains a list of namespaces to support the tooling used in the default fluent mock template. EasyTdd automatically adds target class-related namespaces to the generated class, but it is not aware of the namespaces required by the tooling in the template. This setting allows you to specify those additional namespaces manually. By default, the
MoqandSystemnamespaces are added to support functionality provided in the templates.
Feel free to update the templates to match your taste and needs. Remember to copy and paste them outside of the DefaultTemplates folder, as the templates in this folder are overridden with each new release. It is even possible to use some other mocking library in the background like FakeItEasy or some other.
Other updates and fixes in the 0.5.0
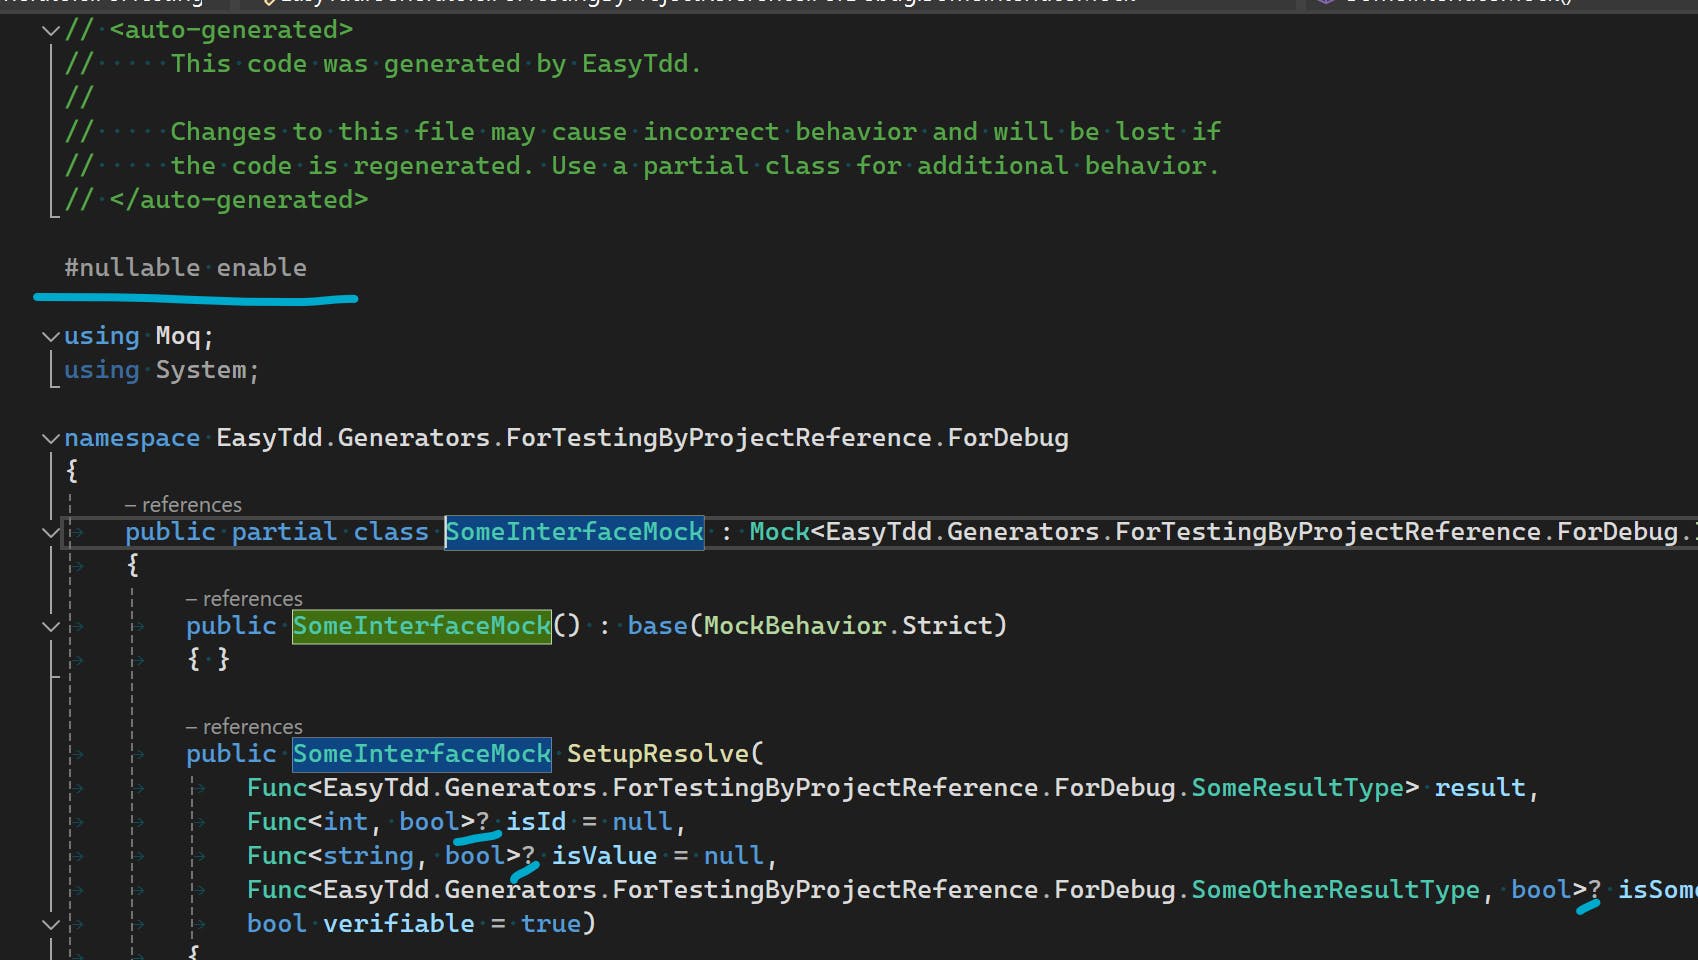
Nullable Support
With the latest release templates now are aware if nullable is enabled for the project. Templates are updated accordingly and now generated code reflects that:
Unified generated file naming
Now, the file names are consistent whether a builder or a FluentMock is generated by the incremental generator or created as a regular class. Now in both cases the file which is a subject for regeneration is suffixed with .g. In above case it will be SomeInterfaceMock.g.cs and SomeInterfaceMock.cs.
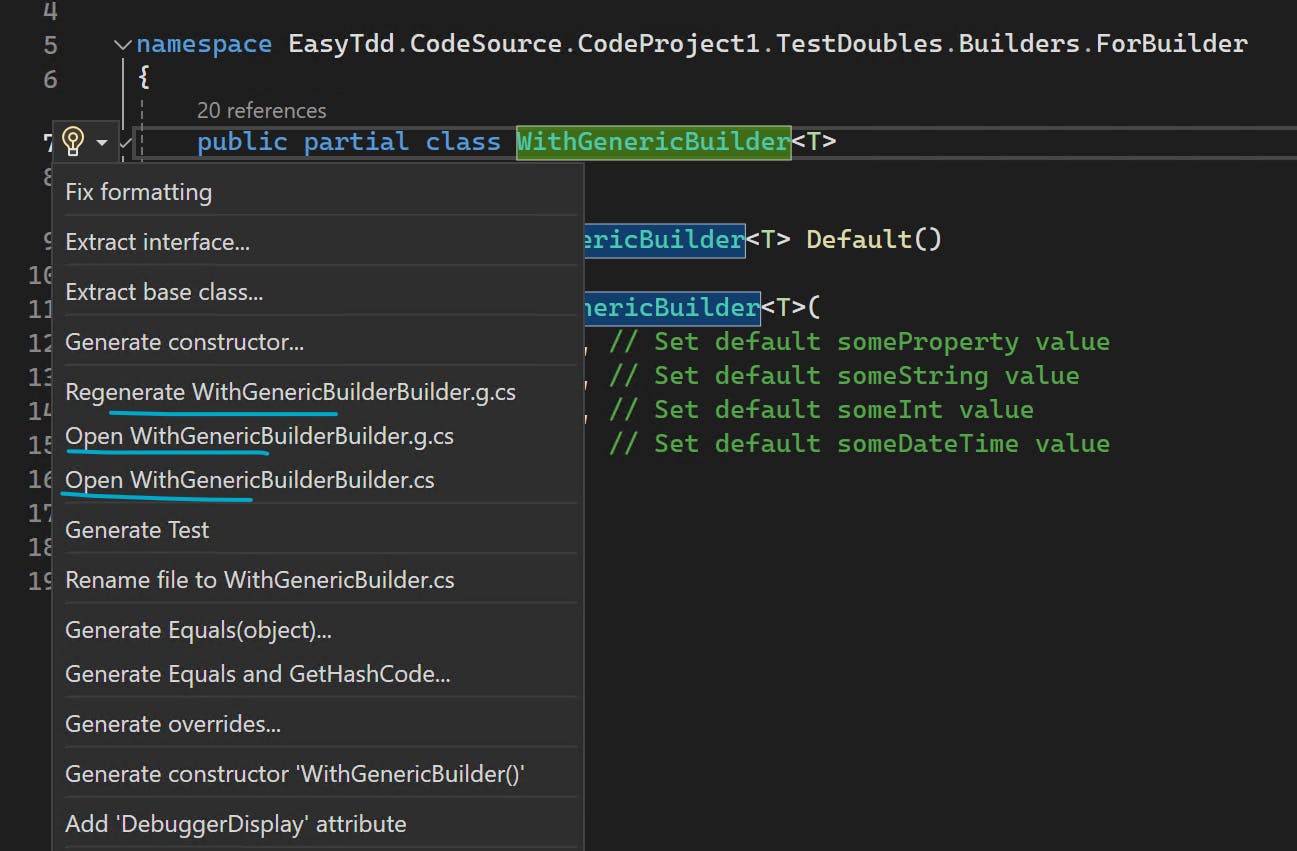
Added links to a menu to all generated files
When non incremental build or fluentMock was created two files were generated and Quick Actions menu showed a link to only one. Now both files are shown:
Added Build(int count) to the builder template to build multiple objects
Now, each builder has a Build(int count, Func<int, TBuilder, TBuilder>? adjust = null) method, and multiple objects can be built by adjusting each with the adjust method:
var values = WithGenericBuilder<int>
    .Default()
    .Build(
        10,
        (index, builder) => builder
            .WithSomeInt(index)
            .WithSomeString($"name of {index}")
    )
    .ToList();
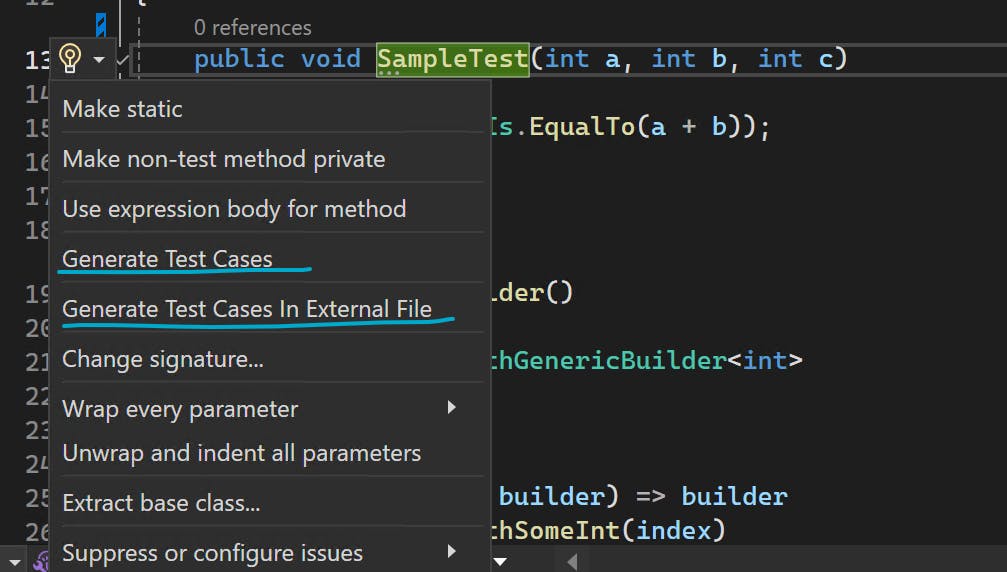
Updated test case generation to not require test attributes on the test
Now test attribute is not required for a test to generate test cases. It is enough for a method to be public and EasyTdd adds all required attributes:
And the result:
[TestCaseSource(typeof(SampleTestCases))]
public void SampleTest(int a, int b, int c)
{
    Assert.That(c, Is.EqualTo(a + b));
}
Awareness of methods and properties of the base class
Now, the test generator, builder, and FluentMock generators recognize the properties and methods of the base class and generate the corresponding members accordingly.
Summary
With the release of EasyTdd version 0.5.0, FluentMock is poised to make unit testing even more powerful and accessible for .NET developers. Its intuitive syntax, reduced boilerplate, and the ability to handle complex setups and verifications with ease make it a great addition to any test-driven development toolkit. This release also introduces several other important enhancements, including improved support for nullable reference types, a unified naming convention, and refined templates, ensuring a smoother experience for both new and existing users.
If you’re already using EasyTdd, give FluentMock a try and let me know your experience in the comments below or reach out to me on LinkedIn. For new users, now is a great time to explore EasyTdd! Try it out with FluentMock, Incremental Builder, and other test-driven development-enhancing features that make creating test doubles and managing test cases a breeze.
Stay tuned for future posts where I’ll dive deeper into specific scenarios and share tips on getting the most out of EasyTdd. Make sure to subscribe or follow for updates so you don’t miss out on the next article. Until then, happy testing!
[story continues]
tags