Overview
Helm is the package manager for Kubernetes, like apt, yum, or Homebrew for traditional operating systems. It simplifies the deployment and management of applications on Kubernetes clusters by packaging all necessary components into a single, manageable unit.
Why Helm?
- Simplifies Kubernetes Deployments: Helm packages, known as charts, bundle together all the Kubernetes manifests (like deployments, services, etc.) needed to deploy an application, making the deployment process straightforward and repeatable.
- Manages Dependencies: Helm charts can include other charts, allowing complex applications to manage their dependencies effectively.
- Version Control for Deployments: Helm tracks versions of deployments, enabling rollbacks to previous states if needed.
What Is It Made of?
- Chart: A Helm chart is a bundle containing all information necessary to create an instance of a Kubernetes application. It includes resource definitions and configuration files.
- Config: The configuration contains customizable parameters that merge with a chart to create a release. These parameters allow the same chart to be used in different environments or configurations.
- Release: A release is an instance of a chart running in a Kubernetes cluster combined with a specific configuration.
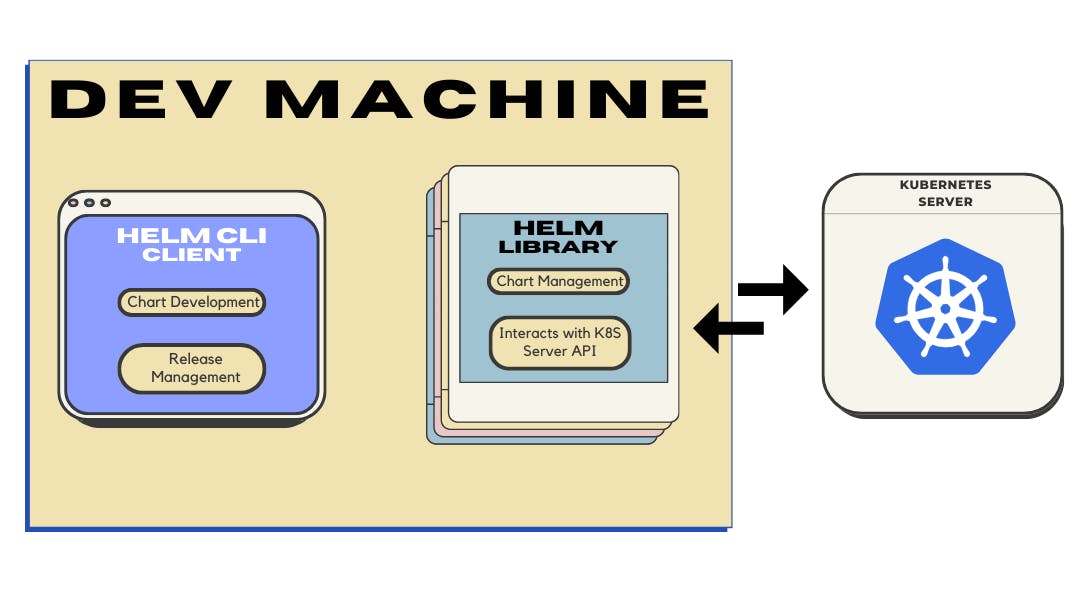
Helm Architecture Diagram
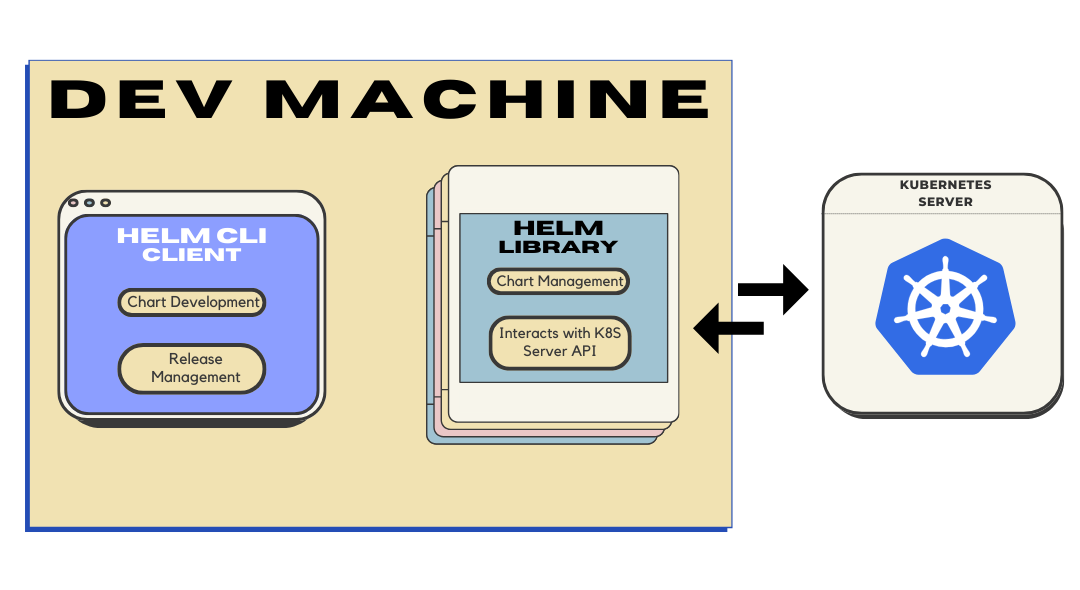
Helm Client:
- Chart Development: Local chart development and managing repositories.
- Release Management: Manages releases/repos and requests chart installation or release upgrade/uninstallation through Helm Library.
Helm Library:
- Chart Management: Handles combining charts and configurations to create releases and installing/upgrading/uninstalling charts.
- Interacts with Kubernetes: Interfaces with the Kubernetes API server.
Creating a Chart
Creating a Helm chart involves setting up a predefined directory structure with at least two files: Chart.yaml for metadata about the chart and values.yaml for default configuration values.
Structure: A basic chart directory will have the following layout:
Chart.yaml: Contains metadata about the chart such as name, version, and description.
values.yaml: Specifies default configuration values for the chart.
templates/: This directory contains template files that generate Kubernetes manifest files based on the values provided.
Templating: Helm uses a templating engine to substitute values in the chart templates, creating Kubernetes manifests tailored to specific deployments. This allows for dynamic adjustment of resources, labels, and configurations without altering the original chart files.
Practice
Scenario:
A startup, "DevOps Solutions" adopts Helm to streamline their Kubernetes deployments. You're a consultant tasked with creating a basic Helm Chart for n8n. It should be customizable for different environments using values.
- Clone the repo.
git clone https://github.com/perplexedyawdie/helm-learn.git
- Change directory to
creating-charts
cd helm-learn/creating-charts
- Spin up the environment using docker-compose.
docker compose up -d --build
- SSH into the
ubuntucontainer.
ssh -o StrictHostKeyChecking=no -o NoHostAuthenticationForLocalhost=yes root@localhost -p 2222
# password: test123
- Generate a chart directory along with sample files.
helm create my-n8n
- View the structure of the generated directory.
tree .

# Output should look similar to this
#`-- my-n8n
#    |-- Chart.yaml
#    |-- charts
#    |-- templates
#    |   |-- NOTES.txt
#    |   |-- _helpers.tpl
#    |   |-- deployment.yaml
#    |   |-- hpa.yaml
#    |   |-- ingress.yaml
#    |   |-- service.yaml
#    |   |-- serviceaccount.yaml
#    |   `-- tests
#    |       `-- test-connection.yaml
#    `-- values.yaml
- We'll only be using
Chart.yaml,values.yaml,my-n8n/templates/NOTES.txtandmy-n8n/templates/_helpers.tplso we can remove the rest since we'll be adding our own manifest files.
rm -rf my-n8n/templates/*.yaml my-n8n/templates/tests
- Update the appVersion in Chart.yaml to "1.27.2" & clear the contents of my-n8n/templates/NOTES.txt file then update with the following.
nano my-n8n/Chart.yaml
# appVersion: "1.27.2"

nano my-n8n/templates/NOTES.txt
# Welcome to n8n.
# Wait a few minutes until the status changes to RUNNING.
# After it is ready, access it from: http://localhost:2223
- Update the
values.yamlfile with the following data.
# Default values for my-n8n.
# This is a YAML-formatted file.
# Declare variables to be passed into your templates.

replicaCount: 1

image:
  repository: n8nio/n8n
  pullPolicy: IfNotPresent
  # Overrides the image tag whose default is the chart appVersion.
  tag: "1.27.2"

containerPorts:
 - name: http
   port: 5678

service:
  type: NodePort
  port: 30200

livenessProbe:
  httpGet:
    path: /
    port: http
readinessProbe:
  httpGet:
    path: /
    port: http

autoscaling:
  enabled: false
  minReplicas: 1
  maxReplicas: 100
  targetCPUUtilizationPercentage: 80
  # targetMemoryUtilizationPercentage: 80

# Additional volumes on the output Deployment definition.
volumes:
- name: n8n-data

persistence:
   claimName: n8n-data

# Additional volumeMounts on the output Deployment definition.
volumeMounts:
 - name: n8n-data
   mountPath: "/home/node/.n8n"
- Create the
deployment.yaml,service.yamland,pvc.yamlfiles inside themy-n8n/templatesfolder.
# my-n8n/templates/pvc.yaml
apiVersion: v1
kind: PersistentVolumeClaim
metadata:
  name: n8n-data
spec:
  accessModes:
    - ReadWriteOnce
  resources:
    requests:
      storage: 1Gi # Adjust the size as per your requirement
# my-n8n/templates/deployment.yaml

apiVersion: apps/v1
kind: Deployment
metadata:
  name: n8n
spec:
  replicas: 1
  selector:
    matchLabels:
      app: n8n
  template:
    metadata:
      labels:
        app: n8n
    spec:
      containers:
      - name: n8n
        image: n8nio/n8n
        ports:
        - name: http
        - containerPort: 5678
        volumeMounts:
        - name: n8n-data
          mountPath: /home/node/.n8n
      volumes:
      - name: n8n-data
        persistentVolumeClaim:
          claimName: n8n-data
# my-n8n/templates/service.yaml

apiVersion: v1
kind: Service
metadata:
  name: n8n
spec:
  type: NodePort
  ports:
  - port: 5678
    targetPort: 30200
    protocol: TCP
  selector:
    app: n8n
- Now, let's parameterize these using the go-template language to convert them to templates. Helm will fetch the appropriate values from the
values.yamlfile to generate the manifest that will be deployed on K8S.
# my-n8n/templates/pvc.yaml
apiVersion: v1
kind: PersistentVolumeClaim
metadata:
  name: {{ .Values.persistence.claimName }}
spec:
  accessModes:
    - ReadWriteOnce
  resources:
    requests:
      storage: 1Gi # Adjust the size as per your requirement
# my-n8n/templates/deployment.yaml

apiVersion: apps/v1
kind: Deployment
metadata:
  name: {{ printf "%s-%s" .Release.Name .Chart.Name  }}
spec:
  replicas: 1
  selector:
    matchLabels:
      app: n8n
  template:
    metadata:
      labels:
        app: n8n
    spec:
      containers:
      - name: n8n
        image: {{ printf "%s:%s" .Values.image.repository .Values.image.tag  }}
        ports:
        {{- range .Values.containerPorts }}
        - name: {{ .name }}
          containerPort: {{ .port }}
        {{- end }}
        volumeMounts:
        {{- range .Values.volumeMounts }}
        - name: {{ .name }}
          mountPath: {{ .mountPath }}
        {{- end }}
      volumes:
      {{- range .Values.volumes }}
      - name: {{ .name }}
        persistentVolumeClaim:
          claimName: {{ $.Values.persistence.claimName }}
      {{- end }}
# my-n8n/templates/service.yaml

apiVersion: v1
kind: Service
metadata:
  name: {{ printf "%s-%s" .Release.Name .Chart.Name  }}
spec:
  type: {{ .Values.service.type }}
  ports:
  - port: 5678
    targetPort: 5678
    nodePort: {{ .Values.service.port }}
    protocol: TCP
  selector:
    app: n8n
- Ensure that you're in the directory that contains the chart
my-n8nthen run the linter.
helm lint my-n8n
- Install the chart.
helm install my-n8n ./my-n8n
- Wait until the deployment is complete, you can continually check using the following command.
kubectl get all
- After the status has changed to running, you should be able to access it in your browser from: http://localhost:2223
Recap
Great effort! You just learned how to create and configure a Helm chart and then deploy it to a Kubernetes cluster!
[story continues]
tags