Hey Everyone 👋, first things first, this project is part of the JavaScript30 challenge from Wes Bos.
For those of you who don’t know JavaScript30 is a challenge from Wes Bos where you have to build 30 simple projects in Vanilla JavaScript in 30 days.
Check out 👉 this to learn more.
Starter Files
If you want to get a feel of how our finished project will look like, go here
Now before going further, set up your environment and download the starter files from this repository.
For your ease I have provided the HTML CSS files below 👇, but you still need to download sound files
<!DOCTYPE html>
<html lang="en">
<head>
  <meta charset="UTF-8">
  <title>JS Drum Kit</title>
  <link rel="stylesheet" href="style.css">
</head>
<body>

  <div class="keys">
    <div data-key="65" class="key">
      <kbd>A</kbd>
      <span class="sound">clap</span>
    </div>
    <div data-key="83" class="key">
      <kbd>S</kbd>
      <span class="sound">hihat</span>
    </div>
    <div data-key="68" class="key">
      <kbd>D</kbd>
      <span class="sound">kick</span>
    </div>
    <div data-key="70" class="key">
      <kbd>F</kbd>
      <span class="sound">openhat</span>
    </div>
    <div data-key="71" class="key">
      <kbd>G</kbd>
      <span class="sound">boom</span>
    </div>
    <div data-key="72" class="key">
      <kbd>H</kbd>
      <span class="sound">ride</span>
    </div>
    <div data-key="74" class="key">
      <kbd>J</kbd>
      <span class="sound">snare</span>
    </div>
    <div data-key="75" class="key">
      <kbd>K</kbd>
      <span class="sound">tom</span>
    </div>
    <div data-key="76" class="key">
      <kbd>L</kbd>
      <span class="sound">tink</span>
    </div>
  </div>

  <audio data-key="65" src="sounds/clap.wav"></audio>
  <audio data-key="83" src="sounds/hihat.wav"></audio>
  <audio data-key="68" src="sounds/kick.wav"></audio>
  <audio data-key="70" src="sounds/openhat.wav"></audio>
  <audio data-key="71" src="sounds/boom.wav"></audio>
  <audio data-key="72" src="sounds/ride.wav"></audio>
  <audio data-key="74" src="sounds/snare.wav"></audio>
  <audio data-key="75" src="sounds/tom.wav"></audio>
  <audio data-key="76" src="sounds/tink.wav"></audio>

</body>
</html>
html {
  font-size: 10px;
  background: url('./background.jpg') bottom center;
  background-size: cover;
}

body,html {
  margin: 0;
  padding: 0;
  font-family: sans-serif;
}

.keys {
  display: flex;
  flex: 1;
  min-height: 100vh;
  align-items: center;
  justify-content: center;
}

.key {
  border: .4rem solid black;
  border-radius: .5rem;
  margin: 1rem;
  font-size: 1.5rem;
  padding: 1rem .5rem;
  transition: all .07s ease;
  width: 10rem;
  text-align: center;
  color: white;
  background: rgba(0,0,0,0.4);
  text-shadow: 0 0 .5rem black;
}

.playing {
  transform: scale(1.1);
  border-color: #ffc600;
  box-shadow: 0 0 1rem #ffc600;
}

kbd {
  display: block;
  font-size: 4rem;
}

.sound {
  font-size: 1.2rem;
  text-transform: uppercase;
  letter-spacing: .1rem;
  color: #ffc600;
}
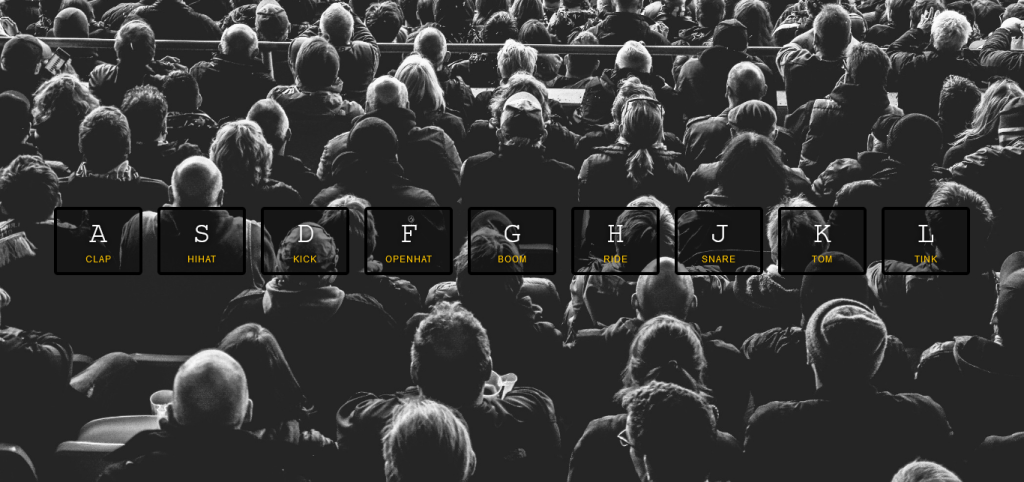
Once you’ve copy-pasted these files in your local development environment, your HTML file will look like this 👇
This is great because we don’t have to start from scratch now and can focus on the most essential part of the project, i.e., JavaScript Logic.
But before moving towards JavaScript, we have to first understand how our HTML file has been set up –
HTML File Structure
- All the individual keys are wrapped inside individual divs which is further wrapped inside another div.
- Apart from CSS classes, there is another attribute attached to these divs called “data-key” with a code number.
- For those of you who don’t know, data-* is an HTML attribute used to store custom data private to the page or application. This attribute then can be used with JavaScript to provide a better experience to the user.
- In this tutorial, the data-* attribute is used to store the codes attached to the particular keys of your keyboard, i.e., data-key=”65″ or “83” or whatever.
- There is another element in the above code which most of you might not know, i.e.,
<kbd></kbd> - It represents a span of inline text which represents user input from the keyboard, voice input, or any other text entry device.
- And finally, we can see the <audio> elements that hold our sound files for the project
JavaScript Logic
Now comes my favorite part, JavaScript logic which will finally make our project come alive.
We mainly have 3 objectives with the JavaScript part –
- Play the sound when the user presses the key
- Transition the key which has been pressed
- End the transition
Let’s look at each of them one by one
Play Sound and Transition
To make this happen, we will first –
- Create a function called playSound(), you can choose whatever name you like.
- Then create variables that hold audio files and divs of different keys.
- And then check if there is an audio file present with key user pressed, if no then return nothing, if yes, then play it.
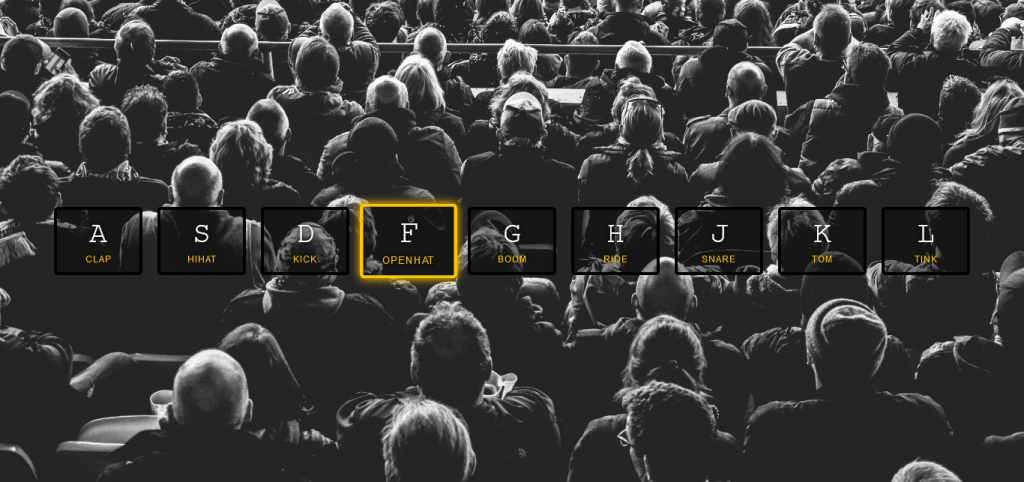
- And also add the class name ‘playing’ which contains the transition effect of the active state of the key(check the image below)
function playSound(e) {
    const audio = document.querySelector(`audio[data-key="${e.keyCode}"]`); // selects the audio file present with the pressed key
    const key = document.querySelector(`div[data-key="${e.keyCode}"]`); // stores the div element of the pressed key in the variable
    if (!audio) return; // If no audio then nothing return

    key.classList.add('playing'); // Add class 'playing' to the key variable
    audio.currentTime = 0; // Set current time position to 0 seconds
    audio.play(); // Play the audio file
  }
Our playSound() function is complete, but the problem is that our website now looks like this 👇
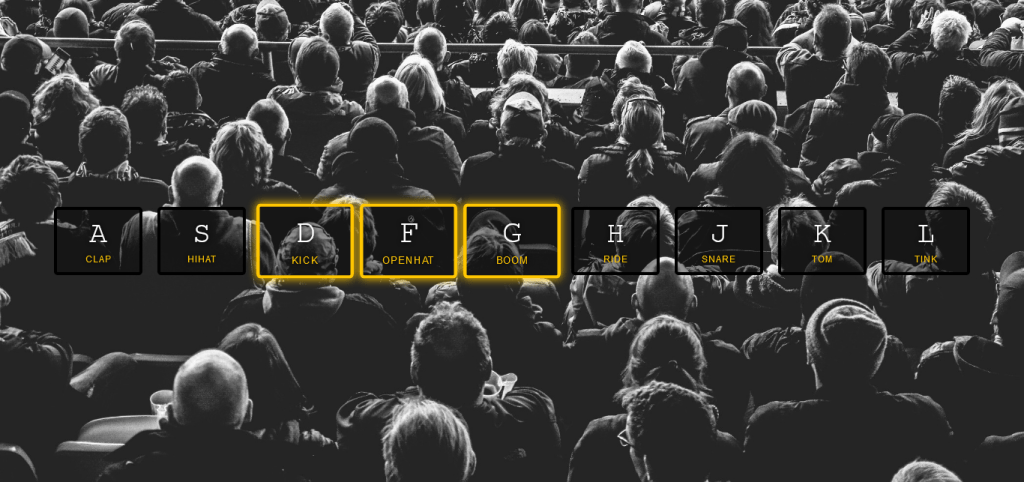
Once the key is pressed, the transition is attached permanently, to tackle this issue, we’ll create another function removeTransition()
function removeTransition(e) {
    if (e.propertyName !== 'transform') return; // Our statement will return nothing if there is not any property with the property name of 'transform'
    e.target.classList.remove('playing'); // If there is 'transform' property, 'playing' class will be removed from the element
  }
Our work is mostly finished, we just have to attach these functions to their respective ‘event listeners’ so that the functions invoke themselves once the event fires.
window.addEventListener('keydown', playSound); // This event listener ensure that playSound() calls itself if any key is pressed in the browser window
playSound() is done, but removeTransition is tricky so be attentive
const keys = Array.from(document.querySelectorAll('.key')); // All the keys are selected
  keys.forEach(key => key.addEventListener('transitionend', removeTransition)); // A forEach method is run which invokes the removeTransition() when the 'transitionend' event is fired after pressing an key
Conclusion
Congratulations, you have made it this far and your project should be up and running fine most probably at this time.
If not, then check everything again or comment down below your problem, I will very much be happy to solve them.
If you want more posts just like this one, check out my site - clearprogrammer.com
Happy Coding 🙂
[story continues]
tags