
Creating a dynamic photo collection app that spans different industries is an exciting opportunity in web development. These apps, also known as lookbooks, can be used in fields like fashion, real estate, and travel to showcase visual content effectively.
Recently, I developed a comprehensive lookbook using Django and Cloudinary. You can get a thorough understanding of its functionalities by watching a video walkthrough and reading a detailed description. Additionally, we'll highlight some noteworthy features that developers may find intriguing.
You can fork the app from
App Description
Here’s what the app offers:
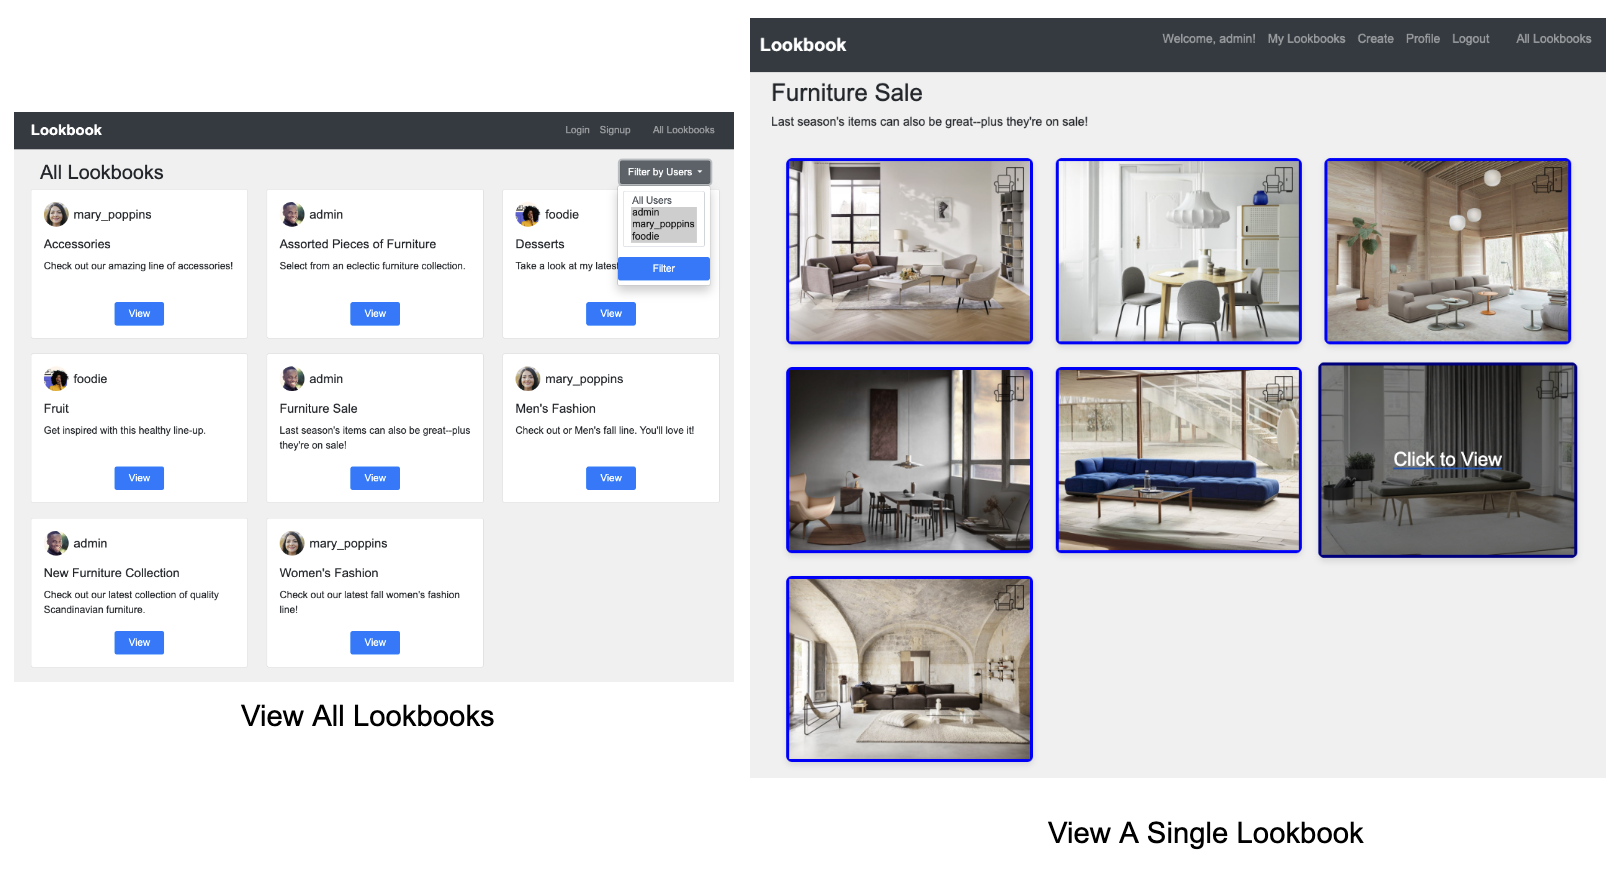
Homepage Navigation
- View all lookbooks.
- Filter lookbooks by the user.
- See user profile pictures on their lookbooks.
User Account Features
- Sign up and log in to create a profile with a bio and profile picture.
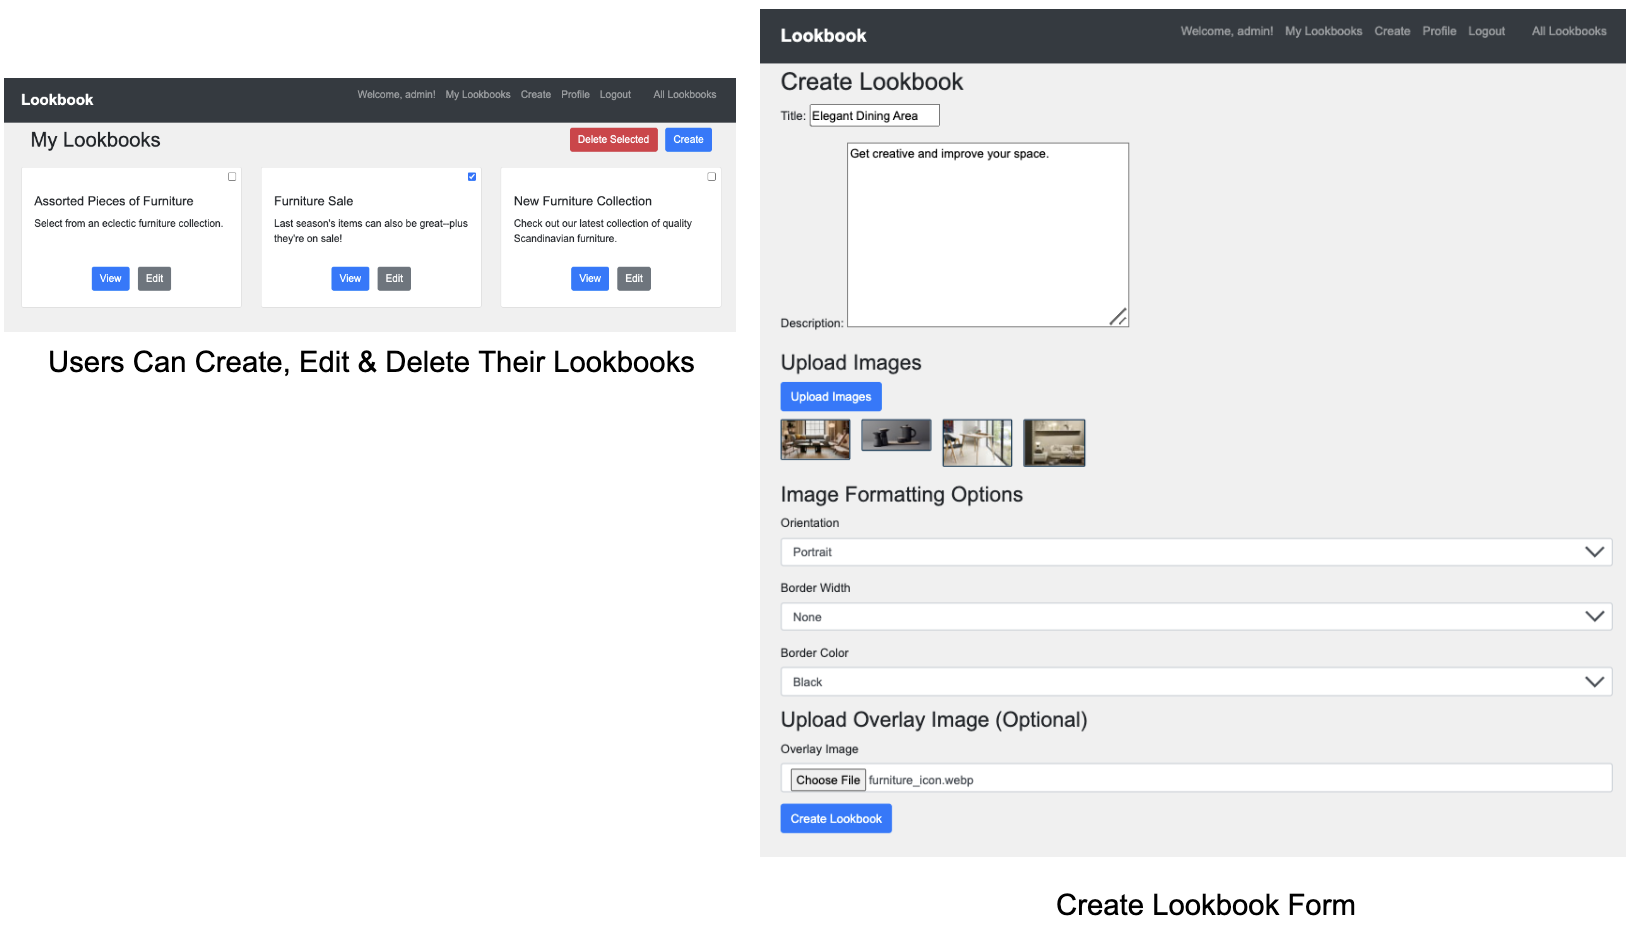
- Create, edit, and delete lookbooks.
- Upload and customize images using Cloudinary.
Noteworthy Features
This lookbook application integrates several advanced features for managing and displaying user-generated content. Below are some highlights that developers might find particularly interesting.
Integrating Cloudinary for Image Management
One of the standout features of this application is the integration of Cloudinary for managing images. Cloudinary's powerful image management, transformation and delivery capabilities make it an ideal choice for applications dealing with a lot of visual content. This includes:
-
CloudinaryField usage:
Using
CloudinaryFieldin Django models simplifies image storage and management. It integrates seamlessly with Django's ORM and forms, and automatically uploads images to Cloudinary when the form is saved. (See Dynamic Form Handling.)
# models.py

from cloudinary.models import CloudinaryField

class Lookbook(models.Model):
    overlay_image = CloudinaryField('overlay_images')
-
Transformations and overlays:
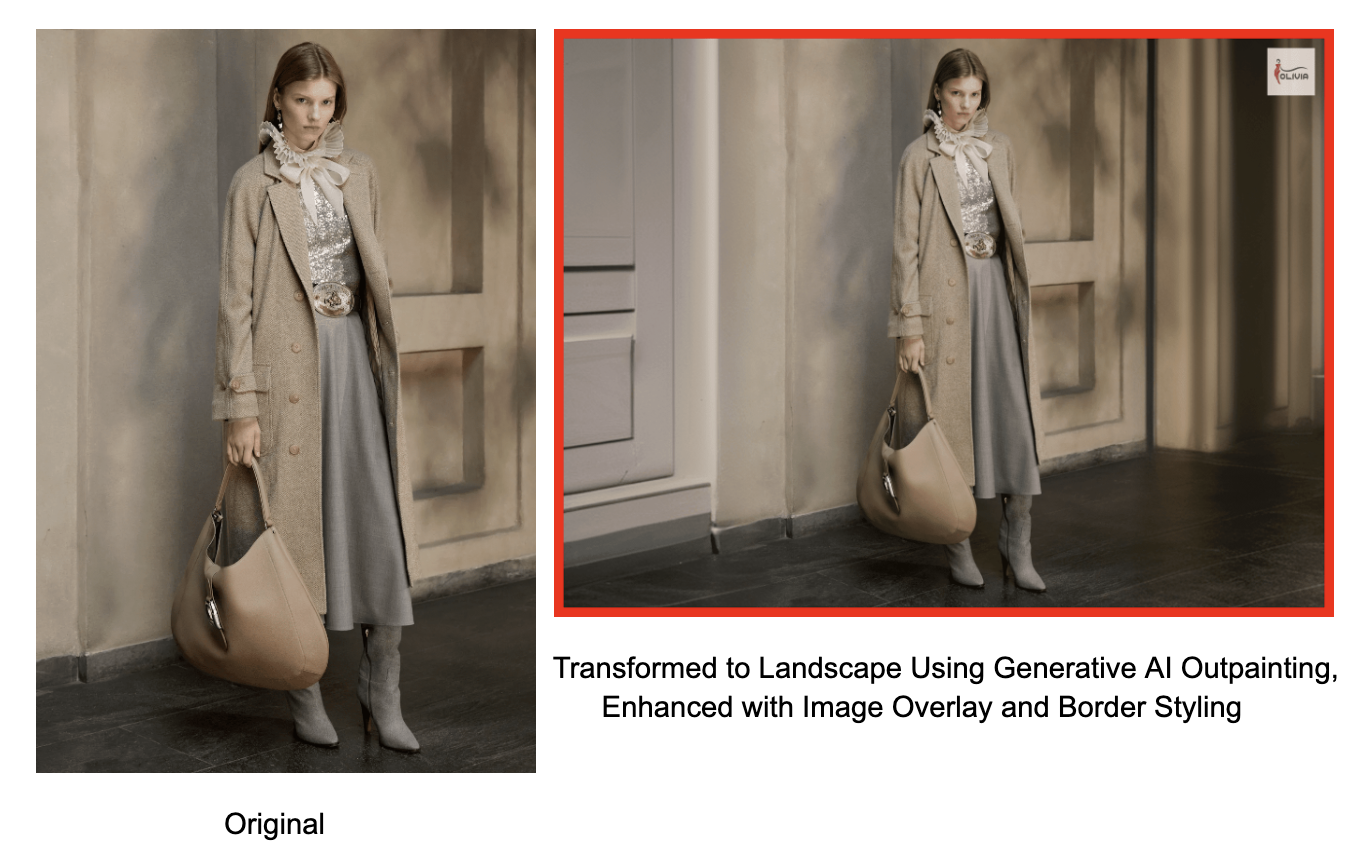
The application utilizes Cloudinary’s AI-powered capabilities to automatically enhance lookbook images. Users can customize their lookbooks by choosing image overlays, image orientation and border styling. AI paints out the images to fit the selected orientation, ensuring they’re displayed correctly without manual adjustments. These features are supported by utility functions designed for efficient image processing.
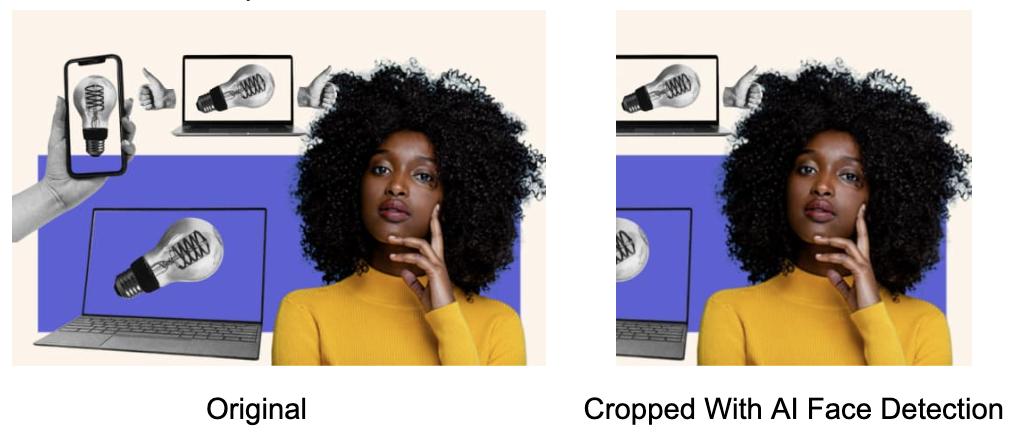
In addition, when handling user-generated profile images, AI-based transformations optimize and uniformly crop and center the images, regardless of the original content.
Here’s an example of an original and transformed profile picture, along with the code to generate it. Notice how the crop honors the face’s placement in the center.
Click the links to open the images in a browser tab and see their URLs.
profile_url = CloudinaryImage(public_id).build_url(quality='auto', width=600, height=600, crop='auto', gravity='face')
-
Easy retrieval and display:
Images stored in Cloudinary can be easily retrieved using their URLs, simplifying the process of displaying images in templates. For example, when displaying all images in a lookbook.When a user selects a lookbook to view, its ID is passed to the
displayfunction in theviews.pyfile. The display function then retrieves a list of all images linked to that lookbook. The transformed delivery URLs of these images, stored in the Lookbook model, are sent to the template for rendering.
# views.py

def display(request, lookbook_id):
   lookbook = get_object_or_404(Lookbook, pk=lookbook_id)
   images = lookbook.images.all()
   return render(request, 'display.html', {'photos': images, 'lookbook': lookbook})
<!-- templates/display.html -->

{% for photo in photos %}
   <div class="gallery-col">
      <div class="gallery-image">
          <!-- Display transformed image -->
          <img src="{{ photo.transformed_image }}" alt="Image" class="img-fluid">
          <div class="gallery-overlay">
             <!-- Link to view in a new browser tab -->
             <a href="{{ photo.transformed_image }}" target="_blank"><h5>Click to View</h5></a>
          </div>
      </div>
   </div>
{% endfor %}
- Scalability and reliability:
Cloudinary handles large volumes of images and high traffic, providing a scalable solution that grows with your application. Its infrastructure ensures high availability and reliability.
User-Generated Content Management
A focus in this app is user personalization and the ability for users to manage their own content. Here’s how that’s implemented:
-
User associations:
Users are linked to their content using a ForeignKey relationship:
# models.py

from django.contrib.auth.models import User

class Lookbook(models.Model):
    user = models.ForeignKey(User, on_delete=models.CASCADE)
-
Profiles:
Another way user-generated content is personalized is through the integration of user profiles. Every user has a corresponding Profile that includes a bio and image. The profile is connected to its user and their lookbooks, enabling profile images to be displayed on the appropriate lookbooks. Here’s the code:
#models.py

class Profile(models.Model):
   user = models.OneToOneField(User, on_delete=models.CASCADE)
   profile_picture = CloudinaryField('profile_pictures')
   profile_url = models.URLField(blank=True, null=True, default='https://res.cloudinary.com/yelenik/image/upload/avatar')
   bio = models.TextField(blank=True)
   my_lookbooks = models.ManyToManyField(Lookbook, blank=True)
<!-- templates/all_lookbooks.html -->

def __str__(self):
       return self.user.username
div class="row">
   {% for lookbook in lookbooks %}
       <div class="col-md-4">
           <div class="card mb-4">
               <div class="card-body all">
                   <div class="d-flex align-items-center mb-3">
                       <img src="{{ lookbook.user.profile.profile_url }}" alt="{{ lookbook.user.username }}" class="rounded-circle mr-2" style="width: 40px; height: 40px;">
                       <h5 class="mb-0">{{ lookbook.user.username }}</h5>
                   </div>
                   <h5 class="card-title">{{ lookbook.title }}</h5>
                   <p class="card-text">{{ lookbook.description }}</p>
                   <a href="{% url 'display' lookbook.id %}" class="btn btn-primary card-btn">View</a>
               </div>
           </div>
       </div>
   {% empty %}
       <div class="col">
           <p>No lookbooks found.</p>
       </div>
   {% endfor %}
</div>
Dynamic Form Handling
Forms are essential for handling user inputs in any web application. This app uses LookbookForm and LookbookImageForm to manage lookbook creation and image uploads. These forms include custom save methods to handle specific logic, such as ensuring that image uploads are handled automatically via the CloudinaryImage field type.
# forms.py

class LookbookForm(forms.ModelForm):
    class Meta:
        model = Lookbook
        fields = ['title', 'description', 'overlay_image']

    def save(self, commit=True):
        instance = super().save(commit=False)
        if commit:
            instance.save()
        return instance
Utility Function for Image Processing
Remember how users can customize lookbooks by choosing formatting options? Well, they can also update these customized lookbooks. This makes it crucial to handle the bulk of image-processing tasks within utility functions, ensuring the codebase remains maintainable and consistent.
Functions likegenerate_transformation_options, get_public_id_from_url, and create_transformed_url are reused within the application, ensuring consistency during both creation and editing processes. These functions use Cloudinary’s AI-based transformations to generate modified copies of lookbook images based on user choices and updates.
Here’s an example of an original and transformed lookbook image, along with the code to generate it below:
Click the links to open the images in a browser tab and see their URLs.
# utils.py

def generate_transformation_options(lookbook):

   # Determine width and height based on orientation
   if lookbook.orientation == 'portrait':
       width, height = 400, 500
   elif lookbook.orientation == 'landscape':
       width, height = 800, 600
   else:  # square
       width, height = 800, 800

   # Initialize transformation list if not already present
   transformation_options = {                    }

   if 'transformation' not in transformation_options:
       transformation_options['transformation'] = []

   # Apply border style if border width is not '0px'
   if lookbook.border_width != '0px':
       transformation_options['border'] = f'{lookbook.border_width}_solid_{lookbook.border_color}'

   # Define base transformation options
   all_transformation = [
       {'quality': 'auto',
       'width': width,
       'height': height,
       'crop': 'pad',
       'background': 'gen_fill:ignore-foreground_true'}
   ]
   transformation_options['transformation'].insert(0, all_transformation)

   # Apply overlay image if provided
   if lookbook.overlay_image:
       overlay_transformation = [
           {'overlay': lookbook.overlay_image, 'gravity': 'north_east', 'width': 100, 'flags': 'layer_apply', 'x': 20, 'y': 20, 'opacity': 80}
       ]
       transformation_options['transformation'].insert(1, overlay_transformation)

   # Add scale transformation to make the width 800
   transformation_options['transformation'].insert(2, {'width': 800, 'crop': 'scale'})
   return transformation_options

def create_transformed_url(public_id, transformation_options):
   return CloudinaryImage(public_id).build_url(**transformation_options)
Efficient Data Querying and Filtering
Efficient data retrieval and filtering are vital for application performance. The lookbook app uses the Django ORM to fetch and filter lookbooks based on user selections. Take a look at the all_lookbooks function:
# views.py

def all_lookbooks(request):
    users = User.objects.all()
    user_ids = request.GET.getlist('user_ids')
    if not user_ids or 'all' in user_ids:
        user_ids = [str(user.id) for user in users]
    lookbooks = Lookbook.objects.filter(user__id__in=user_ids).order_by('title')
    return render(request, 'all_lookbooks.html', {'lookbooks': lookbooks, 'users': users, 'selected_user_ids': user_ids})
Robust URL Routing
A clear and intuitive URL routing scheme is essential for easy navigation within the application. The urls.py file defines clear URL patterns for accessing different views. In addition, it incorporates Django's built-in authentication views, simplifying user authentication management.
# urls.py

from django.urls import path
from lookbook_app import views
from django.contrib.auth import views as auth_views

urlpatterns = [
    path('admin/', admin.site.urls),
    path('accounts/login/', auth_views.LoginView.as_view(), name='login'),
    path('accounts/logout/', auth_views.LogoutView.as_view(), name='logout'),
    path('signup/', views.signup, name='signup'),
    path('create_lookbook/', views.create_lookbook, name='create_lookbook'),
    path('display/<int:lookbook_id>/', views.display, name='display'),
    path('profile/', views.profile, name='profile'),
    path('my_lookbooks/', views.my_lookbooks, name='my_lookbooks'),
    path('all_lookbooks/', views.all_lookbooks, name='all_lookbooks'),
    path('', views.all_lookbooks, name='all_lookbooks'),
    path('edit_lookbook/<int:lookbook_id>/', views.edit_lookbook, name='edit_lookbook'),
]
Conclusion
This lookbook app demonstrates how Django and Cloudinary can create a robust platform for user-generated content. With features like Cloudinary integration, dynamic forms, and efficient querying, this project is an excellent example for developers interested in advanced web application techniques. Explore the project in
[story continues]
tags