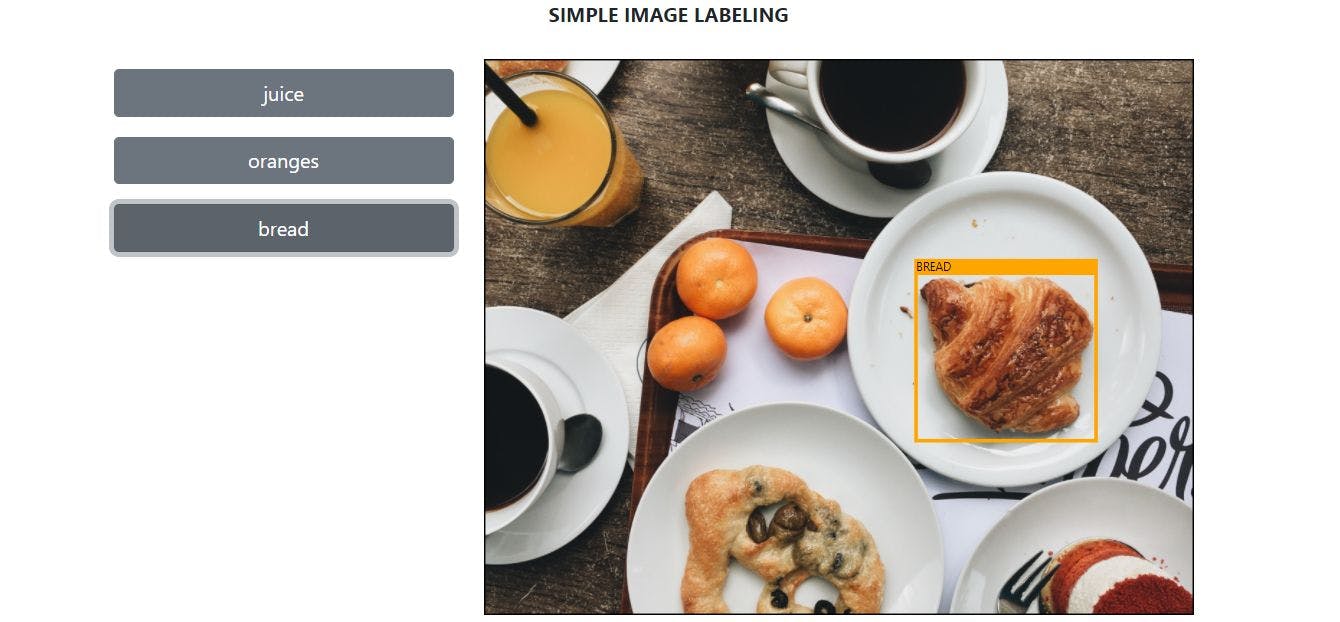
The function of this simple app is to indicate the object’s location in the image whenever the user clicks any of the labeled buttons.
To begin with, first, I created a simple design layout. (Bootstrap 5 was installed).
const ImageDetector = () =>{
 return(
    <>
        <div className="row container">
            <p className="text-center"><strong>SIMPLE IMAGE LABELING</strong></p>
            <div className="row mt-2 mb-3">
                <div className="col-4">
                    {/*buttons here*/}
                </div>
                <div className="col-8">
                    <img
                    id="image"
                    src={`/img/foods.jpg`}
                    alt="photo"
                    className="w-100"
                    />
                </div>
            </div>
        </div>
    </>
 )
}
export default ImageDetector;
I declared a variable containing an array of objects.
const objects = [
        {
            "object": "juice",
            "x":1,
            "y":1,
            "w":230,
            "h":250
        },
        {
            "object": "oranges",
            "x":200,
            "y":230,
            "w":320,
            "h":230
        },
        {
            "object": "bread",
            "x":600,
            "y":280,
            "w":250,
            "h":250
        },
    ];
After declaration, I fetched the values from that variable, objects, and converted them into buttons.
                <div className="col-4">
                    {objects.map(item=>(
                        <button
                        className={"btn btn-secondary col-12 my-2"}
                        key={item.object}
                        >
                        {item.object}
                        </button>
                    ))}
                </div>
To display the square or rectangle shape, I declared width and height variables to get the natural width and height of the image.
const [width, setWidth] = useState(0);
const [height, setHeight] = useState(0);

useEffect(()=>{
    const image = document.querySelector<HTMLImageElement>('#image');
    if(image !== null){
        let linkSource = image.src;
        const imageCopy = document.createElement("img");
        imageCopy.src = linkSource;
        setWidth(imageCopy.width);
        setHeight(imageCopy.height);
    }
},[]);
Then, I inserted <svg/> below the <img/> and put them inside a <div/> then made its position relative. I defined the css style of the <svg/> to overlay the <img/>. The preserveAspectRatio and viewBox in <svg/> will help retain the x and y positions of rect and text elements even when the screen size changes.
<div className="col-8">
    <div style={{"position":"relative"}}>
        <img
        id="image"
        src={`/img/foods.jpg`}
        alt="photo"
        className="w-100"
        />
        <svg
        preserveAspectRatio="none"
        className="image-map"
        viewBox={`0,0,${width},${height}`}
        <rect className="selected-object" rect>
        <rect className="wrap-text" ></rect>
        <text className="object-name"> </text>
        </svg>
    </div>
</div>

<style jsx>
    {`
        .image-map {
            position: absolute;
            top: 0;
            left: 0;
            width: 100%;
            height: 100%;
            -webkit-user-select: none;
            -moz-user-select: none;
            -ms-user-select: none;
            -o-user-select: none;
            user-select: none;
        }
        .selected-object{
            position: absolute;
            top: 0;
            left: 0;
        }
    `}
</style>
I inserted variables to set values of the x,y,w,h in svg’s rect and text elements.
const [xPosition, setXPosition] = useState(0);
const [yPosition, setYPosition] = useState(0);
const [objWidth, setObjWidth] = useState(0);
const [objHeight, setObjHeight] = useState(0);
const [selectedItem, setSelectedItem] = useState("");
Created handleClick() so when the user clicks a button the rect svg will appear.
const handleClick = ( object:string ) =>{
    objects.map(item =>{
        if(item.object === object){
            setXPosition(item.x);
            setYPosition(item.y);
            setObjWidth(item.w);
            setObjHeight(item.h);
            setSelectedItem(object.toUpperCase());
        }
    });
}
<div className="col-4">
    {objects.map(item=>(
        <button
        className={"btn btn-secondary col-12 my-2"}
        key={item.object}
        onClick={() => handleClick(item.object)}
        >
        {item.object}
        </button>
    ))}
</div>
Then I set the values of rect and text elements and edited my style css.
<rect className="selected-object"
x={xPosition}
y={yPosition}
width={objWidth}
height={objHeight}></rect>
<rect className="wrap-text"
x={xPosition}
y={yPosition}
width={objWidth}
height="20"></rect>
<text className="object-name"
x={xPosition}
y={yPosition+15}>{selectedItem}</text>
<style jsx>
    {`
        .image-map {
            position: absolute;
            top: 0;
            left: 0;
            width: 100%;
            height: 100%;
            -webkit-user-select: none;
            -moz-user-select: none;
            -ms-user-select: none;
            -o-user-select: none;
            user-select: none;
        }

        .selected-object{
            position: absolute;
            top: 0;
            left: 0;
            fill: transparent;
            stroke: #ff9e0d;
            stroke-width: 5px;
        }
        .wrap-text{
            fill: #ff9e0d;
        }
        .object-name{
            z-index:999;
        }
    `}
</style>
And it’s done. You can now run your simple app.
[story continues]
tags