TimescaleDB is a PostgreSQL extension for high-performance real-time analytics on time-series and event data.
It is basically a custom Postgres.
Important: This post uses Terraform to create and destroy resources on an AWS account. Make sure that you destroy the resources as soon and as long as you don’t need them any more. Otherwise, you will be charged more than you might want.
How do you set up a TimescaleDB on AWS?
Unfortunately, you can’t use, at the time of this writing (Jul 2025), the managed AWS RDS Service. Neither the AWS RDS Custom Service.
Subscribe to Hosted TimescaleDB Services
If you want to use TimescaleDB you have some options by companies that offer it as a hosting service.
- TigerData Cloud
- Aiven.io
- ScaleGrid
- and more
Set it Up Manually on your AWS Account
This requires that you are more competent in terms of devops, but it allows you more flexibility.
This is the option I am going to go with in this blog post.
Here is an architecture diagram for the demo project I will develop to demonstrate how I can set up TimescaleDB on AWS.
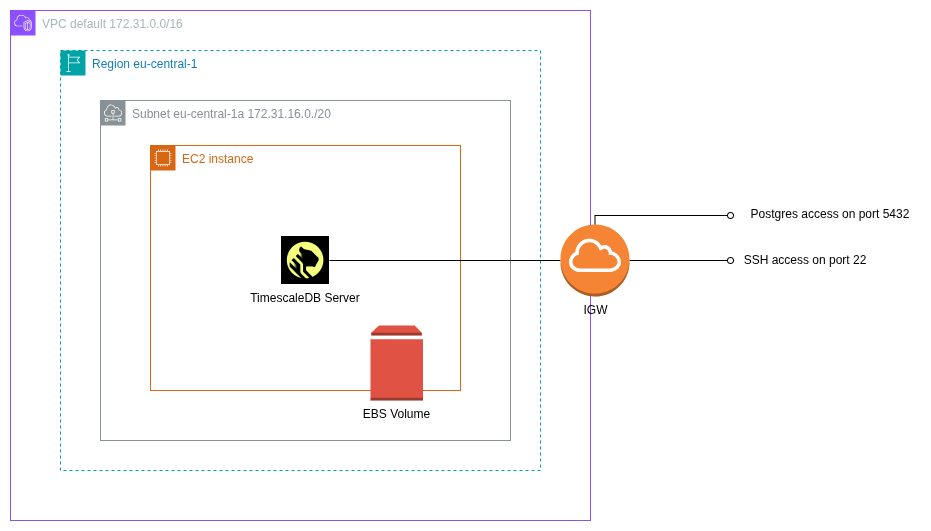
- I will need access to the EC2 machine in order to install TimescaleDB Server. That’s why the SSH access on port
22. That’s the easiest way to install the software on the EC2 machine. In subsequent blog posts, I will present other ways to install third-party software like TimescaleDB without requiring ssh access. - I will need access to the database server via
psqlfrom a remote machine. That’s why I will need to open the port5432. However, again, if it were a real production environment, it would make it more secure if direct access to the database was only possible from within the VPC and not from the public internet. This is another topic for another blog post.
TimescaleDB on my AWS Account
Project Setup
Third-party Tools
These are the tools and their version at the time of writing: (BTW, I am using asdf as my third-party tools version manager)
Git - Don’t Go Without
I don’t go without git. I also create a .gitignore file. Initially, I have the following folders and files ignored:
.env
.env.*
.envrc
*.pem
*.pem.pub

terraform/.terraform
*.tfstate
*.tfstate.backup
Folder For Terraform Files
I like to create the folder terraform and put everything inside

So, all the Terraform related files will be inside this terraform sub-folder.
Also, when I will be telling you about shell commands that I execute, like terraform validate, they will be executed from within this sub-folder, which I will indicate with the terraform > prefix at the beginning.
Main Terraform Setup
The main.tf file declares the version of Terraform and AWS Provider I will work with.
terraform {
  required_providers {
    aws = {
      source  = "hashicorp/aws"
      version = "6.0.0"
    }
  }

  required_version = "~>1.12.0"
}
Backend To Save Terraform State
I will leave the default backend (local). However, you might want to use other backends in your own projects.
I define the backend inside the file backend.tf
terraform {
  backend "local" {
    path = "terraform.tfstate"
  }
}
Initialize
With the main.tf and backend.tf in place, I fire the terraform init.
terraform > terraform init
AWS Region
I will use Europe/Frankfurt, which is eu-central-1. I will set it as default value for the variable region inside terraform/variables.tf (file link here). But since this is declared as input variable, you can pass whichever value you want.
AWS Provider
I set up the AWS provider configuration as follows (inside the file providers.tf):
# Without +alias+ this is the default +aws+ provider
#
provider "aws" {
  region = var.region
  default_tags {
    tags = {
      project     = var.project
      terraform   = "1"
      environment = var.environment
      tf_repo     = var.repository_url
      tf_folder   = "terraform/${var.environment}"
    }
  }
}
This introduces the following three input variables:
projectenvironmentrepository_url
which I have to declare inside the variables.tf file. I will also set some default values. Set your own values to match your settings:
variable "project" {
  description = "The name of the project."
  type        = string
  default     = "setting_up_timescaledb_on_aws"
}

variable "environment" {
  description = "The environment for the deployment (e.g., development, staging, production)."
  type        = string
  default     = "development"
}

variable "repository_url" {
  description = "The GitHub repository URL for the project."
  type        = string
  default     = "https://github.com/pmatsinopoulos/setting_up_timescaledb_on_aws"
}
VPC
I will use the default VPC in the region selected. There is always a default VPC. It has plenty of IP addresses (172.31.0.0/16 - 65,536 addresses).
Since the VPC already exists and I will not create it, I just need to create a data source reference. I will put that inside the data.tf file:
data "aws_vpc" "timescaledb_vpc" {
  id = var.vpc_id
}
I am using an input variable to reference the VPC by its id. Which means that I need the input variable definition inside the variables.tf file:
variable "vpc_id" {
  description = "The ID of the VPC where the EC2 instance will be launched in."
  type        = string
}
VPC - Subnet
The default VPC in each region is coming with 3 default subnets each one created in one of the Availability Zones:
eu-central-1aeu-central-1beu-central-1c
I will use the subnet deployed into eu-central-1a. I will pass its id via a variable
variable "subnet_id" {
  description = "The ID of the subnet where the EC2 instance will be launched in."
  type        = string
}
I declare the data source for the subnet inside the data.tf file, in which I declare resources that I reference rather than create.
data "aws_subnet" "timescaledb_subnet" {
  id = var.subnet_id
}
SSH Access Security Group
I will need two security groups, one to allow incoming SSH traffic on port 22. And another one for postgres traffic on port 5432.
Here is how I set up the SSH one. I write its configuration inside the file security_groups.tf.
resource "aws_security_group" "ssh" {
  name        = "${var.project}-${var.environment}-security-group-ssh"
  description = "Allow SSH traffic from anywhere to anywhere"
  vpc_id      = data.aws_vpc.timescaledb_vpc.id
  ingress {
    description = "SSH from anywhere"
    from_port   = 22
    to_port     = 22
    protocol    = "tcp"
    cidr_blocks = ["0.0.0.0/0"]
  }
  tags = {
    "Name" = "${var.project}-${var.environment}-security-group-ssh"
  }
}
This is opening the incoming traffic from any IP address over the port 22.
Postgres Access Security Group
In the same file, I create another security group that will allow me to send postgres traffic over the port 5432.
resource "aws_security_group" "postgres" {
  name        = "${var.project}-${var.environment}-security-group-postgres"
  description = "Allow postgres traffic from anywhere"
  vpc_id      = data.aws_vpc.timescaledb_vpc.id
  ingress {
    description = "postgres from anywhere"
    from_port   = 5432
    to_port     = 5432
    protocol    = "tcp"
    cidr_blocks = ["0.0.0.0/0"]
  }
  tags = {
    "Name" = "${var.project}-${var.environment}-security-group-postgres"
  }
}
SSH Key Pair
I will need to create an ssh key pair (private-public) and upload the public part of it on AWS key pairs.
I use ssh-keygen to create the key pair. But you can use any method described here. Please, note that the EC2 instance that I will create to install the TimescaleDB server is going to be a Linux/Ubuntu server. Hence, I follow the instructions to create an ssh key pair that is compatible with Linux/Ubuntu.
This is how I generate the key on my Linux client:
ssh-keygen -m PEM -f timescaledb.pem
Note that when I am being asked for a passphrase, I leave it empty.
This generates two files locally:
timescaledb.pemtimescaledb.pem.pub
Important: The .gitignore file should include the entry *.pem to make sure the private part of the key is not checked in.
Important: I use the following command to change the access mode of the private key file. This will make sure that the file is only readable by me.
terraform > chmod 400 "timescaledb.pem"
Now I need to declare the resource so that the public key is uploaded to AWS key pairs. I do that inside the file ec2_key_pair.tf
# This imports the public part of an OpenSSH key.
# The key has been generated using `ssh-keygen` in PEM format.
# Example:
#
# ssh-keygen -m PEM
#
# The key has been generated without a passphrase.
#
resource "aws_key_pair" "timescaledb" {
  key_name   = "${var.project}-${var.environment}-timescaledb"
  public_key = file("${path.module}/timescaledb.pem.pub")

  tags = {
    "Name" = "${var.project}-${var.environment}-timescaledb"
  }
}
EC2 Instance
I am now ready to code for the EC2 instance resource that I will use to run my TimescaleDB server.
I write this inside the file ec2_instance.tf.
data "aws_ami" "timescaledb" {
  most_recent = true

  filter {
    name   = "block-device-mapping.delete-on-termination"
    values = ["true"]
  }

  filter {
    name   = "is-public"
    values = ["true"]
  }


  filter {
    name   = "name"
    values = ["ubuntu/images/hvm-ssd-gp3/ubuntu-noble-24.04-amd64-server*"]
  }

  filter {
    name   = "root-device-type"
    values = ["ebs"]
  }

  owners = ["099720109477"] # Canonical
}

resource "aws_instance" "timescaledb" {
  ami               = data.aws_ami.timescaledb.id
  instance_type     = var.timescaledb_server_instance_type
  availability_zone = "${var.region}${var.timescaledb_server_availability_zone}"
  subnet_id         = var.subnet_id
  vpc_security_group_ids = [
    data.aws_security_group.timescaledb_vpc_default_security_group.id,
    aws_security_group.ssh.id,
    aws_security_group.postgres.id,
  ]
  key_name                    = aws_key_pair.timescaledb.key_name
  associate_public_ip_address = true

  tags = {
    "Name" = "${var.project}-${var.environment}-timescaledb"
  }
}

output "ec2_timescaledb_public_ip" {
  value       = aws_instance.timescaledb.public_ip
  description = "The public IP address of the EC2 Timescale DB Machine"
}

output "ssh_connect" {
  value       = "ssh -i ${path.module}/timescaledb.pem -o IdentitiesOnly=yes ubuntu@${aws_instance.timescaledb.public_ip}"
  description = "SSH command to connect to the Timescale DB EC2 instance"
}
The data “aws_ami” “timescaledb” { … } block is used to select the AMI that will be used to launch the EC2 instance described in the following resource “aws_instance” “timescaledb” { … }
You can see how the resource block is referencing the data block:
...
ami               = data.aws_ami.timescaledb.id
...
Inside the resource block, I am setting the very minimum properties so that can I launch the EC2 instance as I want it.
Outputs:
I also make sure that I export two outputs:
ec2_timescaledb_public_ip: the public IP of the EC2 machine.ssh_connect: the command to use locally if I want to SSH to the EC2 machine.
Values to terraform Input Variables
Most of the terraform commands that I will need in this project will require me to have a method to pass values to the input variables that they don’t have a default value.
There are plenty of ways you can pass values to Terraform input variables. For this particular demo, I prefer the method of environment variables.
So, I make sure that the terminal shell that I use to execute the terraform commands is set with correct values for the environment variables that terraform needs.
The tool that is helping me do that is direnv. I have created the terraform/.envrc file with the following contents:
See terraform/.envrc.sample and create your own terraform/.envrc.
export AWS_PROFILE=...<put here the name of the AWS profile you have configured>...
export TF_VAR_subnet_id=...<put here the sunet id from your VPC>...
export TF_VAR_vpc_id=...<put here the id of your VPC>...
Note that terraform/.envrc is being git ignored and it is not checked-in. This is to avoid checking in sensitive secret information. I have the file terraform/.envrc.sample which is checked-in and is a template to tell the reader how the actual terraform/.envrc file should be structured.
AWS_PROFILE
The aws provider needs a way to connect to my AWS account. One way that I like very much to use is AWS CLI Profiles. And the AWS_PROFILE is holding the name of the profile that I have configured on my local machine and that I want to use for this project.
If you want to use this method, follow the instructions here and here.
Checkpoint 1
I will now double-check that everything works OK up until this point.
I run
terraform > terraform validate
It needs to print
Success! The configuration is valid.
And then I will actually create the resources.
Important! This is the point where costs will be incurred in your AWS Account.
terraform > terraform apply
I am being presented with the plan and prompt to reply with yes, if I want to apply the plan:
Terraform will perform the following actions:

  # aws_instance.timescaledb will be created
  + resource "aws_instance" "timescaledb" {
      ...
    }

  # aws_key_pair.timescaledb will be created
  + resource "aws_key_pair" "timescaledb" {
      ...
    }

  # aws_security_group.postgres will be created
  + resource "aws_security_group" "postgres" {
      ...
    }

  # aws_security_group.ssh will be created
  + resource "aws_security_group" "ssh" {
      ...
    }

Plan: 4 to add, 0 to change, 0 to destroy.

Changes to Outputs:
  + ec2_timescaledb_public_ip = (known after apply)
  + ssh_connect               = (known after apply)

Do you want to perform these actions?
  Terraform will perform the actions described above.
  Only 'yes' will be accepted to approve.

  Enter a value:
I reply with yes and it is taking about 2 minutes for everything to be ready.
Then I use the AWS Management Console to check upon the state of the new EC2 Instance. I am waiting for it to become Running:

Then I use the ssh_connect output to connect to the instance using ssh command. From the terraform folder again, I execute the command: (The shell first executes the command terraform output ssh_connect and then takes its output and executes again).
terraform > $(terraform output -raw ssh_connect)
After I reply with yes to save the remote key to known hosts, I am inside the EC2 machine with an ssh shell:
Welcome to Ubuntu 24.04.2 LTS (GNU/Linux 6.8.0-1030-aws x86_64)

 ...

To run a command as administrator (user "root"), use "sudo <command>".
See "man sudo_root" for details.

ubuntu@ip-172-31-25-169:~$
EBS Volume - Data Storage
So far, so good.
But the EC2 instance doesn’t have TimescaleDB installed.
Also, it doesn’t have a specific instance-independent storage to save the actual database data.
I want:
- Every time the EC2 instance is created (or recreated) to have the TimescaleDB installed AND
- Make sure that, if the EC2 instance is created (or recreated), the TimescaleDB data created from previous instance runs, it survives and continues to exist; i.e. I want make sure that I don’t lose my data every time the EC2 instance, for any reason, it is destroyed and then created from the beginning.
Outline Of Steps
In order to satisfy these requirements:
- I will create the AWS EBS volume (using the resource
”aws_ebs_volume”), then - I will attach it to the EC2 instance (using the resource
”aws_volume_attachment“, then - I will automatically connect to the EC2 instance and
- create a file system device to represent the attached EBS volume
- create the
/datadirectory and mount it to the device created - install Postgres and configure TimescaleDB extension
- configure Postgres to use the
/datafolder for storing data.
AWS EBS Volume Resource
This is the resource configuration for the AWS EBS volume:
file: terraform/ec2_volume.tf
resource "aws_ebs_volume" "timescaledb_volume" {
  availability_zone = "${var.region}${var.timescaledb_server_availability_zone}"
  size              = 64
  type              = "gp3"
  encrypted         = false
  final_snapshot    = false

  tags = {
    Name = "${var.project}-${var.environment}-timescaledb-volume"
  }
}
Note: the final_snapshot has been set to false. You may want to turn this to true to allow for AWS to create a snapshot when you destroy this volume, just in case you want to recover old data. But setting to true will incur costs.
This is quite minimum and many values are hard-coded. For example, the size is set to 64 GiB. And the type is set to gp3. Apparently, go ahead and set your own values.
If I terraform apply, Terraform is going to create an AWS EBS Volume which will be standing alone, not attached to any EC2 instance.

Attach New Volume to EC2 Instance
This is how I am attaching the new volume to the EC2 instance:
file: terraform/ec2_volume.tf
resource "aws_volume_attachment" "timescaledb_volume_attachment" {
  device_name = "/dev/sdd"
  volume_id   = aws_ebs_volume.timescaledb_volume.id
  instance_id = aws_instance.timescaledb.id
}
It’s quite simple, isn’t it.
But then, one might ask, how did I come up with the value ”/dev/sdd” for the device_name?
Explain /dev/sdd
If I look at the details of the AMI that I use, I get this picture with regards to block devices that come with it:
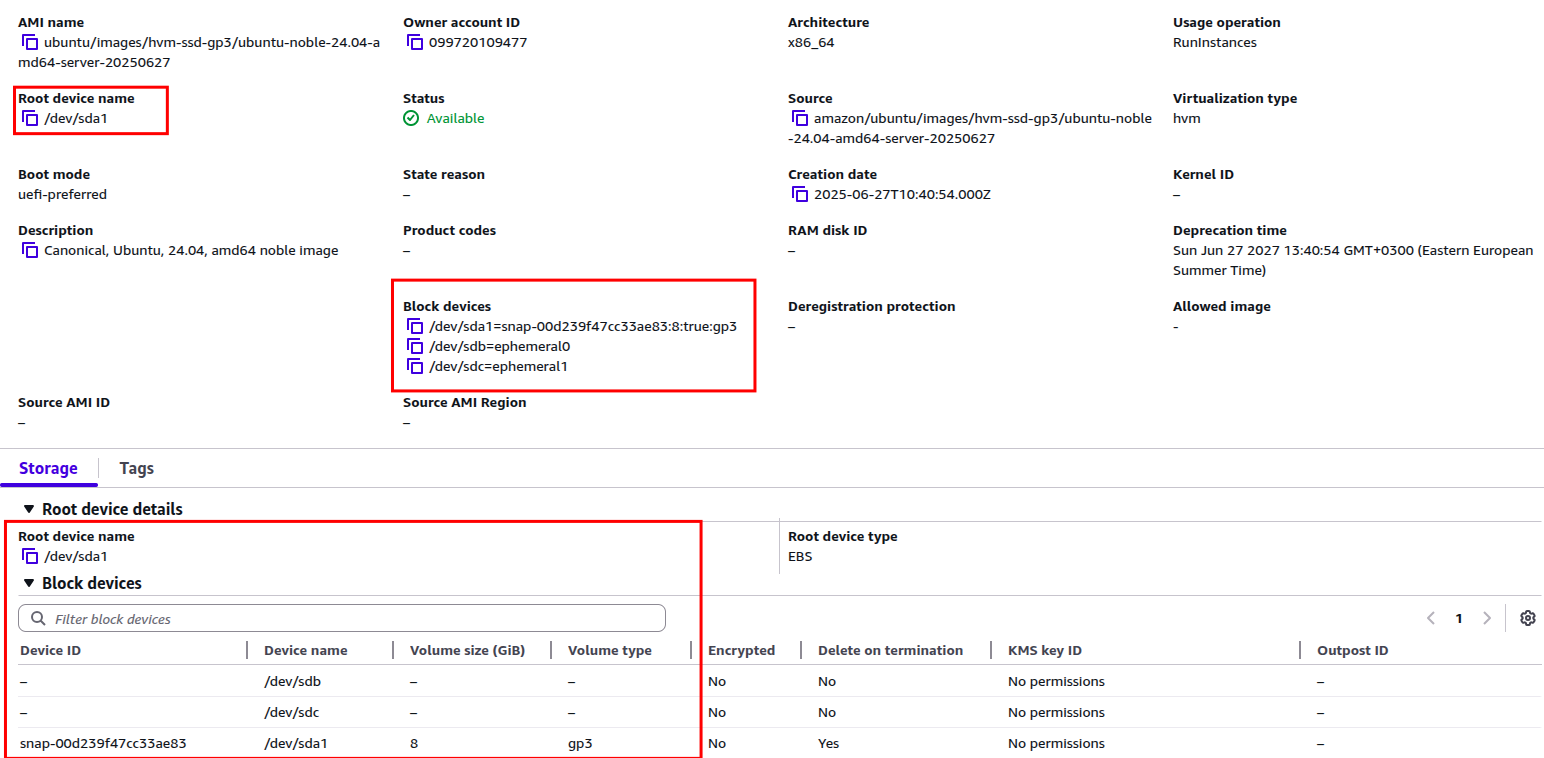
There are 3 devices that AMI offers to EC2 instances launched with this AMI. Only one of the 3 devices, the one with name /dev/sda1 , is used as the 8GiB root device. This is where the EC2 instance is boot from. The devices /dev/sdb and /dev/sdc are ephemeral virtual devices which are not yet used by the EC2 Instance.
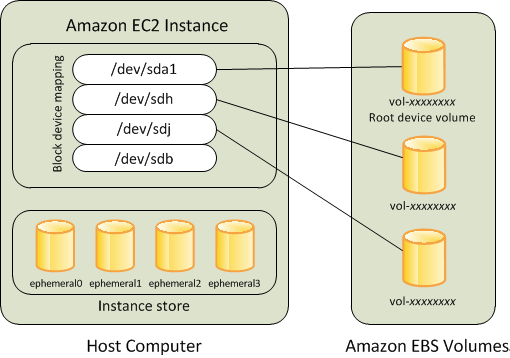
This is another picture (taken from AWS documentation) of what’s going on with storage in this EC2 instance:
And if I look at the “Storage” tab on the instance details, I will see this:
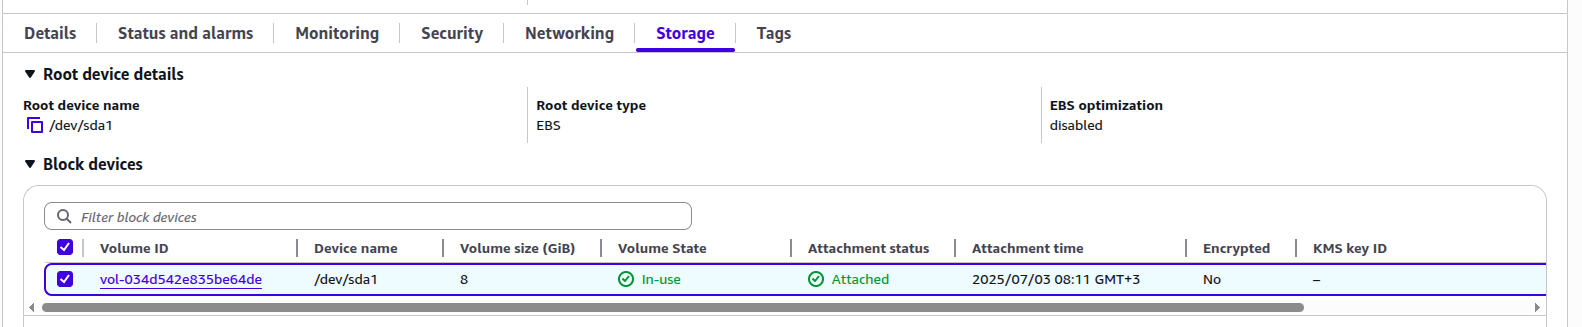
So, the EC2 instance uses the /dev/sda1 device.
But how do I finally choose the name /dev/sdd for the new volume that I am attaching? The AWS documentation on device naming has the details.
According to the documentation and the AMI virtualization type I am here:

Since /dev/sdb and /dev/sdc are already taken , I am going with /dev/sdd.
Note that I am not interested in mounting the /dev/sdb and /dev/sdc ephemeral devices. So, I just leave them unmounted.
Hence, after I terraform apply the new resource timescaledb_volume_attachment, the “Storage” tab on the instance picture will be:

I can see the new volume attached using the device name /dev/sdd.
Prepare To Store Data
But even if the EBS volume is attached to the EC2 machine, this doesn’t mean that it is ready to write data on it.
If I ssh to the new EC2 instance and do the following command:
$ lsblk
I will see something like this:
NAME         MAJ:MIN RM  SIZE RO TYPE MOUNTPOINTS
loop0          7:0    0 27.2M  1 loop /snap/amazon-ssm-agent/11320
loop1          7:1    0 73.9M  1 loop /snap/core22/2010
loop2          7:2    0 50.9M  1 loop /snap/snapd/24718
nvme0n1      259:0    0    8G  0 disk
├─nvme0n1p1  259:1    0    7G  0 part /
├─nvme0n1p14 259:2    0    4M  0 part
├─nvme0n1p15 259:3    0  106M  0 part /boot/efi
└─nvme0n1p16 259:4    0  913M  0 part /boot
nvme1n1      259:5    0   64G  0 disk
The last entry nvme1n1 of size 64G corresponds to the newly attached AWS EBS volume. But, it doesn’t have any partition (like the nvme0n1 does for example).
I need to format and create the logical partitions. Then we will have to mount a directory on it.
I have several ways to do that with Terraform. I chose to go with terraform_data resource.
I create the file prepare_ebs_volume.tf with the following content:
file: terraform/prepare_ebs_volume.tf
resource "terraform_data" "prepare_ebs_volume_for_writing" {
  depends_on = [aws_volume_attachment.timescaledb_volume_attachment]

  triggers_replace = {
    volume_attachment = aws_volume_attachment.timescaledb_volume_attachment.id
  }

  connection {
    type        = "ssh"
    user        = "ubuntu"
    host        = aws_instance.timescaledb.public_ip
    private_key = file("${path.module}/timescaledb.pem")
  }

  provisioner "remote-exec" {
    inline = concat(
      [
        "sudo file -s /dev/nvme1n1 | grep -q '/dev/nvme1n1: data$' && sudo mkfs -t xfs /dev/nvme1n1",
        "sudo mkdir /data",
        "sudo mount /dev/nvme1n1 /data",
        "sudo cp /etc/fstab /etc/fstab.bak",
        "echo \"UUID=$(sudo blkid -s UUID -o value /dev/nvme1n1) /data xfs defaults,nofail 0 2\" | sudo tee -a /etc/fstab"
      ]
    )
  }
}
- the
depends_onis critical in order to make sure that resources are created in correct order, but - the
triggers_replaceis critical to trigger reconstructions/recreations when the resource already exists. And for this particular case, if the EBS volume is reattached (see for example later on the case in which EC2 instance is destroyed and recreated again), we want this provisioner to fire again. mkfscreates a files system of typexfson the new volume. Note, that I callmkfsonly if there is not file system already on the volume, in order to avoid overwriting any existing data.mkdircreates the/datadirectory. This is where the Postgres/TimescaleDB will be writing data. See later on.mountmounts the volume to the directory/data.- the
echo….updates the/etc/fstabfile so that when the instance is ever rebooted to have the volume mounted to/dataautomatically.
Note: If you want to read more about this process read the official AWS documentation here.
I do terraform apply and then I ssh to the EC2 instance.
The command lsblk now prints:
NAME         MAJ:MIN RM  SIZE RO TYPE MOUNTPOINTS
loop0          7:0    0 27.2M  1 loop /snap/amazon-ssm-agent/11320
loop1          7:1    0 73.9M  1 loop /snap/core22/2010
loop2          7:2    0 50.9M  1 loop /snap/snapd/24718
nvme0n1      259:0    0    8G  0 disk
├─nvme0n1p1  259:1    0    7G  0 part /
├─nvme0n1p14 259:2    0    4M  0 part
├─nvme0n1p15 259:3    0  106M  0 part /boot/efi
└─nvme0n1p16 259:4    0  913M  0 part /boot
nvme1n1      259:5    0   64G  0 disk /data
Look how the nvme1n1. Instead of just disk it shows /data.
Bingo! If you go back and read the Outline of Steps above, you will see that I have taken these two steps already:
- create a file system device to represent the attached EBS volume
- create the
/datadirectory and mount it to the device created
Next two steps:
Install Postgres and TimescaleDB extension
I will now add two more terraform_data blocks that will take care of installing Postgres and TimescaleDB extension and configuring it to store data into the /data folder (which now resides in the new EBS volume).
I name the file install_and_setup_timescaledb.tf.
file: terraform/install_and_setup_timescaledb.tf.
locals {
  db_name                   = "events_server_${var.environment}"
  path_to_postgres_data_dir = "/data/postgresql/${var.postgresql_version}/main"
}

resource "terraform_data" "install_and_setup_timescaledb" {
  depends_on = [terraform_data.prepare_ebs_volume_for_writing]

  triggers_replace = {
    volume_attachment  = aws_volume_attachment.timescaledb_volume_attachment.id
    postgresql_version = var.postgresql_version
  }

  connection {
    type        = "ssh"
    user        = "ubuntu"
    host        = aws_instance.timescaledb.public_ip
    private_key = file("${path.module}/timescaledb.pem")
  }

  provisioner "file" {
    source      = "${path.module}/install_postgres.sh"
    destination = "/home/ubuntu/install_postgres.sh"
  }

  provisioner "file" {
    source      = "${path.module}/install_timescaledb.sh"
    destination = "/home/ubuntu/install_timescaledb.sh"
  }

  provisioner "remote-exec" {
    inline = concat(
      [
        "sudo chmod u+x /home/ubuntu/install_postgres.sh",
        "sudo ./install_postgres.sh ${var.postgresql_version} ${var.timescaledb_server_port}  ${local.db_name} ${var.timescaledb_version}",

        "sudo chmod u+x /home/ubuntu/install_timescaledb.sh",
        "sudo ./install_timescaledb.sh ${var.postgresql_version} ${var.timescaledb_version} ${local.db_name}"
      ]
    )
  }
}

resource "terraform_data" "postgres_password" {
  depends_on = [terraform_data.install_and_setup_timescaledb]

  triggers_replace = {
    volume_attachment  = aws_volume_attachment.timescaledb_volume_attachment.id
    postgresql_version = var.postgresql_version
  }

  connection {
    type        = "ssh"
    user        = "ubuntu"
    host        = aws_instance.timescaledb.public_ip
    private_key = file("${path.module}/timescaledb.pem")
  }

  provisioner "remote-exec" {
    inline = concat(
      [
        "echo '**************** remote-exec: Setting the postgres user password...'",
        "sudo -u postgres psql -c \"ALTER USER postgres WITH PASSWORD '${var.timescaledb_server_postgres_password}';\""
      ]
    )
  }
}

output "psql_connect" {
  value       = "psql -h ${aws_instance.timescaledb.public_ip} -U postgres -d ${local.db_name} -p ${var.timescaledb_server_port}"
  description = "Command to connect to the PostgreSQL database using psql."
}
Dependency: I put a dependency of the first resource to the previous one, i.e. of the install_and_setup_timescaledb to the terraform_data.prepare_ebs_volume_for_writing. Hence, the remote-exec calls are going to be executed after that block’s commands do.
Triggers Replace: However, besides the order of creation which is specified with the dependends_on block, I also use the triggers_replace block to specify that I want this block to be recreated under these two conditions:
- Every time the attachment of the EBS volume is recreated.
- Every time the version of the Postgres server changes.
Two bash Scripts
I use two bash scripts:
- Bash script to install Postgres:
install_postgres.sh. - Bash script to install TimescaleDB:
install_timescaledb.sh.
Note that both scripts are also called when upgrading Postgres version.
Installing Postgres
The file install_postgres.sh has the following contents:
file terraform/install_postgres.sh.
#!/bin/bash

set -e # e: exit if any command has a non-zero exit status
set -x # x: all executed commands are printed to the terminal
set -u # u: all references to variables that have not been previously defined cause an error

NEW_VERSION=$1
PORT=$2
DB_NAME=$3
TIMESCALEDB_VERSION="${4}*"

# Create the PostgreSQL data directory
sudo mkdir -p /data/postgresql

# Update the package list
sudo DEBIAN_FRONTEND=noninteractive apt update -y

# Install postgres common tools
sudo DEBIAN_FRONTEND=noninteractive apt install -y postgresql-common apt-transport-https net-tools

# Enable the PostgreSQL APT repository
sudo DEBIAN_FRONTEND=noninteractive /usr/share/postgresql-common/pgdg/apt.postgresql.org.sh -y

# Let's now install on top of any existing
CURRENT_CLUSTER=$(sudo pg_lsclusters -h 2>/dev/null | grep "${PORT}" | awk '{print $1"-"$2}' || true)

INSTALL="yes"
OLD_VERSION=""
OLD_NAME="main"
if [ -n "$CURRENT_CLUSTER" ]; then
  echo "Found existing PostgreSQL cluster:"
  echo "$CURRENT_CLUSTER"
  echo

  OLD_VERSION=$(echo $CURRENT_CLUSTER | cut -d'-' -f1)
  OLD_NAME=$(echo $CURRENT_CLUSTER | cut -d'-' -f2)

  # Skip if this is the same version and name we're about to install
  if [ "$OLD_VERSION" = "$NEW_VERSION" ] && [ "$OLD_NAME" = "main" ]; then
      echo "Skipping cluster $OLD_VERSION/$OLD_NAME as it matches the target version and name"
      INSTALL="no"
      continue
  fi

  echo "************************ stopping and disabling $OLD_VERSION/$OLD_NAME ************************"
  sudo systemctl stop postgresql@$OLD_VERSION-$OLD_NAME || true
  sudo systemctl status postgresql@$OLD_VERSION-$OLD_NAME --no-pager || true
  sudo systemctl disable postgresql@$OLD_VERSION-$OLD_NAME || true
  sudo pg_ctlcluster stop $OLD_VERSION $OLD_NAME || true
  sudo pg_lsclusters -h
else
  echo "No existing PostgreSQL clusters found on port ${PORT}. Proceeding with installation."
  echo

  INSTALL="yes"
fi

echo "****************** INSTALL: $INSTALL"
if [ "$INSTALL" = "yes" ]; then
  sudo DEBIAN_FRONTEND=noninteractive apt install -y postgresql-$NEW_VERSION postgresql-client-$NEW_VERSION postgresql-contrib-$NEW_VERSION
  sudo DEBIAN_FRONTEND=noninteractive apt install -y postgresql-server-dev-$NEW_VERSION
  # When I install postgresql for the first time, the cluster is already created.
  # But when I install a new version while another already exists, the cluster is not created.
  if sudo pg_lsclusters -h 2>/dev/null | grep -q "^${NEW_VERSION}[[:space:]]\+main[[:space:]]"; then
    echo "Cluster $NEW_VERSION/main already exists"
  else
    echo "Creating cluster $NEW_VERSION/main"
    sudo pg_createcluster $NEW_VERSION main
    sudo pg_ctlcluster start $NEW_VERSION main
    sudo pg_lsclusters -h
  fi
  sudo systemctl start postgresql@${NEW_VERSION}-main
  sudo systemctl enable postgresql@$NEW_VERSION-main
else
  echo "Skipping installation of PostgreSQL ${NEW_VERSION} as it is already installed."
fi

# Show final status

echo "Current PostgreSQL clusters:"
sudo pg_lsclusters -h

sudo systemctl status postgresql@${NEW_VERSION}-main --no-pager

if [ -n "$OLD_VERSION" ]; then
  echo "Stopping and disabling old PostgreSQL cluster $OLD_VERSION/$OLD_NAME"
  sudo pg_ctlcluster stop $OLD_VERSION $OLD_NAME || true
else
  echo "No old PostgreSQL cluster to stop."
fi

# Stop postgres from running
sudo systemctl stop postgresql@${NEW_VERSION}-main

# Change where PostgreSQL stores its data
ORIGINAL_DATA_DIR="/var/lib/postgresql/${NEW_VERSION}/main"

if [ -d "${ORIGINAL_DATA_DIR}" ];then
  if [ -d "/var/lib/postgresql/${NEW_VERSION}/main.bak" ]; then
    rm -f -R /var/lib/postgresql/${NEW_VERSION}/main.bak
  fi
  sudo mv ${ORIGINAL_DATA_DIR} /var/lib/postgresql/${NEW_VERSION}/main.bak
fi

NEW_PATH_TO_POSTGRES_DATA_DIR="/data/postgresql/${NEW_VERSION}/main"

sudo mkdir -p ${NEW_PATH_TO_POSTGRES_DATA_DIR}
sudo chown -R postgres:postgres /data/postgresql
if [ -n "$(sudo ls -A ${NEW_PATH_TO_POSTGRES_DATA_DIR} 2>/dev/null)" ]; then
  echo "The new PostgreSQL data directory is not empty. We will not initialize it."
else
  echo "Initializing new PostgreSQL data directory at ${NEW_PATH_TO_POSTGRES_DATA_DIR}"
  sudo -u postgres /usr/lib/postgresql/${NEW_VERSION}/bin/initdb -D ${NEW_PATH_TO_POSTGRES_DATA_DIR}
fi
sudo sed -i "s|data_directory = '${ORIGINAL_DATA_DIR}'|data_directory = '${NEW_PATH_TO_POSTGRES_DATA_DIR}'|g" /etc/postgresql/${NEW_VERSION}/main/postgresql.conf

# Set the port to whatever we specify as port in the terraform variables
sudo sed -i "s|port = .*|port = ${PORT}|g" /etc/postgresql/${NEW_VERSION}/main/postgresql.conf

# Allow remote connections
sudo sed -i "s|#listen_addresses = 'localhost'|listen_addresses = '*'|g" /etc/postgresql/${NEW_VERSION}/main/postgresql.conf
sudo sed -i "s|host    all             all             127.0.0.1/32            scram-sha-256|host    all             all             0.0.0.0/0            scram-sha-256|g" /etc/postgresql/${NEW_VERSION}/main/pg_hba.conf

# upgrade from previous version if needed
LAST_CLUSTER=$(echo "$CURRENT_CLUSTER" | tail -n 1)
if [ -n "$LAST_CLUSTER" ]; then
    OLD_VERSION=$(echo $LAST_CLUSTER | cut -d'-' -f1)
    OLD_NAME=$(echo $LAST_CLUSTER | cut -d'-' -f2)
    if [ "$OLD_VERSION" = "$NEW_VERSION" ] && [ "$OLD_NAME" = "main" ]; then
      echo "...no need to upgrade data, we are on the same cluster version and name"
    else
      echo "We need to upgrade the data of the last cluster ${OLD_VERSION}-${OLD_NAME}"
      # We will need to install timescale db for the new version, otherwise the pg_upgrade will fail
      # ---------------------------------------------------------------------------------------------
      sudo apt install timescaledb-2-postgresql-${NEW_VERSION}="${TIMESCALEDB_VERSION}" timescaledb-2-loader-postgresql-${NEW_VERSION}="${TIMESCALEDB_VERSION}" timescaledb-toolkit-postgresql-${NEW_VERSION} -y

      sudo sed -i "s|#shared_preload_libraries = ''|shared_preload_libraries = 'timescaledb'|g" /data/postgresql/${NEW_VERSION}/main/postgresql.conf

      # Tune TimescaleDB
      sudo timescaledb-tune --yes
      # --------------- end of installing timescale db for the new version -----------------------------

      (cd /tmp && sudo -u postgres /usr/lib/postgresql/${NEW_VERSION}/bin/pg_upgrade \
        --old-datadir=/data/postgresql/$OLD_VERSION/$OLD_NAME \
        --new-datadir=/data/postgresql/$NEW_VERSION/main \
        --old-bindir=/usr/lib/postgresql/$OLD_VERSION/bin \
        --new-bindir=/usr/lib/postgresql/$NEW_VERSION/bin)
    fi
fi

# Restart PostgreSQL to apply changes
sudo systemctl restart postgresql@${NEW_VERSION}-main

# Wait for PostgreSQL to start
sleep 10

# Create the database
sudo -u postgres psql -c "create database ${DB_NAME};" || echo "Database ${DB_NAME} already exists, skipping creation."
I believe that the comments in-between the lines of bash script statements are enough to understand what is going on.
Note that the script makes sure that:
- it can be used to upgrade from one Postgres version to another. Downgrades don’t work though.
- It makes sure that it upgrades the data too.
Installing TimescaleDB
The file install_timescaledb.sh has the following contents:
file: terraform/install_timescaledb.sh.
#!/bin/bash

set -e # e: exit if any command has a non-zero exit status
set -x # x: all executed commands are printed to the terminal
set -u # u: all references to variables that have not been previously defined cause an error

POSTGRESQL_VERSION=$1
TIMESCALEDB_VERSION="${2}*"
DB_NAME=$3
# Set TimescaleDB repository at system repositories so that we can install TimescaleDB
echo "deb https://packagecloud.io/timescale/timescaledb/ubuntu/ $(lsb_release -c -s) main" | sudo tee /etc/apt/sources.list.d/timescaledb.list
wget --quiet -O - https://packagecloud.io/timescale/timescaledb/gpgkey | sudo gpg --dearmor --yes -o /etc/apt/trusted.gpg.d/timescaledb.gpg
sudo DEBIAN_FRONTEND=noninteractive apt update -y

sudo systemctl stop postgresql@${POSTGRESQL_VERSION}-main || true

# Install TimescaleDB and TimescaleDB Toolkit all TimescaleDB postgres related packages
sudo apt install timescaledb-2-postgresql-${POSTGRESQL_VERSION}="${TIMESCALEDB_VERSION}" timescaledb-2-loader-postgresql-${POSTGRESQL_VERSION}="${TIMESCALEDB_VERSION}" timescaledb-toolkit-postgresql-${POSTGRESQL_VERSION} -y

sudo sed -i "s|#shared_preload_libraries = ''|shared_preload_libraries = 'timescaledb'|g" /data/postgresql/${POSTGRESQL_VERSION}/main/postgresql.conf

# Tune TimescaleDB
sudo timescaledb-tune --yes

sudo systemctl restart postgresql@${POSTGRESQL_VERSION}-main

# Create the extensions for TimescaleDB and TimescaleDB Toolkit
sudo -u postgres psql -d ${DB_NAME} -c "CREATE EXTENSION IF NOT EXISTS timescaledb CASCADE;"
sudo -u postgres psql -d ${DB_NAME} -c "CREATE EXTENSION IF NOT EXISTS timescaledb_toolkit CASCADE;"
Again, this script is idempotent, and allows for upgrades of the timescale db.
It installs the TimescaleDB extension and the TimescaleDB Toolkit.
Also, it sets some common default values for TimescaleDB configuration.
Setting the Password
The second terraform_data resource is about setting the password for postgres user. I have it in a separate block, because it is using sensitive data and if I put it on the first block, Terraform would hide all output from that block (Postgres installation and setup commands) which I wouldn’t want.
Important! This scripts introduces more variables. My variables.tf needs to have these too:
variable "postgresql_version" {
  description = "The PostgreSQL version to install on the TimescaleDB server."
  type        = string
  default     = "16"
}

variable "timescaledb_version" {
  description = "The TimescaleDB version to install on the TimescaleDB server."
  type        = string
  default     = "2.19.3"
}

variable "timescaledb_server_port" {
  description = "Port for the TimescaleDB server."
  type        = number
  default     = 5432
}

variable "timescaledb_server_postgres_password" {
  description = "The password for the PostgreSQL user on the TimescaleDB server."
  type        = string
  sensitive   = true
}
Note: At the time of this writing, the latest Postgres version was 17, but, in the file above I choose to install version 16, to start with. Later in the post below, you will see how I choose to upgrade to 17, in order to demonstrate the Postgres upgrade process.
Important! Look also at the .envrc file (or other file that you keep your environment variables that set values to the Terraform input variables), you need to add the TF_VAR_timescaledb_server_postgres_password=…
...
export TF_VAR_timescaledb_server_postgres_password='...<put your postgres password here>...'
If I do terraform apply, at the end, I have my TimescaleDB ready.
I use this to connect (from terraform folder):
$ (terraform output -raw psql_connect)
And then I key in the postgres user password and I am on a psql terminal.
Look at the output of some commands.
Check that Extensions are Installed
I connect to the events_server_development database and I issue the command to get the extensions installed:
postgres=# \c events_server_development
SSL connection (protocol: TLSv1.3, cipher: TLS_AES_256_GCM_SHA384, compression: off)
You are now connected to database "events_server_development" as user "postgres".
events_server_development=# select * from pg_extension;
  oid  |       extname       | extowner | extnamespace | extrelocatable | extversion |                                                                                 extconfig                                                                                 |                                                              extcondition
-------+---------------------+----------+--------------+----------------+------------+---------------------------------------------------------------------------------------------------------------------------------------------------------------------------+-----------------------------------------------------------------------------------------------------------------------------------------
 13610 | plpgsql             |       10 |           11 | f              | 1.0        |                                                                                                                                                                           |
 17140 | timescaledb_toolkit |       10 |         2200 | f              | 1.21.0     |                                                                                                                                                                           |
 16385 | timescaledb         |       10 |         2200 | f              | 2.19.3     | {16406,16407,16429,16443,16442,16462,16461,16477,16476,16502,16518,16519,16536,16535,16555,16556,16611,16624,16651,16664,16674,16684,16688,16704,16715,16731,16740,16739} | {"","WHERE id >= 1","","","","","","","","","","","","","","WHERE id >= 1000"," WHERE key <> 'uuid' ","","","","","","","","","","",""}
(3 rows)
Creating a Table and A Row
I am creating a table and inserting a row.
postgres=# \c events_server_development
psql (16.9 (Ubuntu 16.9-0ubuntu0.24.04.1), server 17.5 (Ubuntu 17.5-1.pgdg24.04+1))
SSL connection (protocol: TLSv1.3, cipher: TLS_AES_256_GCM_SHA384, compression: off)
You are now connected to database "events_server_development" as user "postgres".
events_server_development=# create table events (id bigint not null, type varchar not null, created_at timestamp default curren
t_timestamp not null, primary key(id));
CREATE TABLE
Time: 37,602 ms
events_server_development=# insert into events (id, type) values (1, 'product_sold');
INSERT 0 1
Time: 31,945 ms
events_server_development=# select * from e  vents;
 id |     type     |         created_at
----+--------------+----------------------------
  1 | product_sold | 2025-07-06 12:37:03.418051
(1 row)

Time: 31,053 ms
So, I have created the table events and I have added 1 row into it.
Let’s now see some scenarios under which we would like to keep our data intact.
What if EC2 Instance is Upgraded?
The current EC2 instance type is t3.xlarge. What If I want to scale up to t3.2xlarge for example.
I update the default value of the variable timescaledb_server_instance_type to t3.2xlarge and I do terraform apply.
The plan presented is very simple:
  # aws_instance.timescaledb will be updated in-place
  ~ resource "aws_instance" "timescaledb" {
        id                                   = "i-069be2f31daf52118"
      ~ instance_type                        = "t3.xlarge" -> "t3.2xlarge"
      ~ public_dns                           = "ec2-63-178-242-62.eu-central-1.compute.amazonaws.com" -> (known after apply)
      ~ public_ip                            = "63.178.242.62" -> (known after apply)
        tags                                 = {
            "Name" = "setting_up_timescaledb_on_aws-development-timescaledb"
        }
        # (35 unchanged attributes hidden)

        # (9 unchanged blocks hidden)
    }

Plan: 0 to add, 1 to change, 0 to destroy.
Only a change of the instance type.
I apply and then I connect to TimescaleDB with psql. It works. My data are still there.
What if EC2 Instance is Replaced?
I do terraform taint aws_instance.timescaledb to mark the EC2 instance as something that needs to be destroyed and created again by Terraform.
Then I do terraform apply. I see that I am being presented with a plan to
- destroy and create the EC2 instance
- destroy and recreate the EBS volume attachment.
- destroy and recreate the
terraform_dataprepare_ebs_volume_for_writing. - destroy and recreate the
terraform_datainstall_and_setup_timescaledb.
It seems that this is exactly what I want. New EC2 instance and the EBS volume to be detached from the old and attached to the new. Plus, installation of postgres on the new machine.
I proceed.
Then I test that I can connect with psql and that I can find my data in place.
Boom! Data there! All good!
What if the EBS Volume is Scaled Up?
I go to the ec2_volume.tf file and I increase the storage size from 64 to 128.
Then I do terraform apply.
I am being presented with a simple plan that the EBS volume will be updated in-place.
I then connect to the database and I can still see my data intact.
What If Postgres Version is Upgraded?
I change the default value of the postgresql_version variable from 16 to 17. Thanks to the triggers_replace of the resources install_and_setup_timescaledb and postgres_password, these resources will be recreated/replaced.
After I do terraform apply I then connect to the Postgres server. I can still see my events table and events record.
What If TimescaleDB Version is Upgraded?
This is not supported by the current script. Upgrading the TimescaleDB minor and/or major version is a quite involved process which is described here: Upgrade TimescaleDB.
What Could Be Improved?
This setup is good to start, but it has plenty of room for improvement in terms of production readiness
- One can implement a read-replica of the main database. The read-replica could be used to scale the server horizontally, by serving the read requests.
- Automated backups and quick restore from backups should be set up.
- Cloudwatch alarms should be implemented on
- CPU
- Memory
- Free Storage
- Allow direct access only from within VPC.
- Implement a Multi-AZ deployment and automatic switch over from master to stand-by server on another zone.
- Use of AWS Systems Manager to install Postgres and TimescaleDB and manage upgrades.
- Have a Terraform provider that would allow setting TimescaleDB specific parameters.
- Attach the same Elastic IP, in case one wants to expose the same public IP.
Closing Thoughts
Running your own, self-hosted TimescaleDB on AWS is quite possible. The above work demonstrates that. However, it needs more work if this was to become a real production environment.
gm! I am Panos Matsinopoulos, humble software reader, writer, classical music and V8 engine lover. I work for Talent Protocol, where we make builders get the recognition they deserve.
[story continues]
tags