
When it comes to managing access control within AWS's Elastic Kubernetes Service (EKS), IAM Roles for Service Accounts (IRSA) plays a crucial role. In this post, we will not only understand what IRSA is and how it operates but also walk through practical examples to demonstrate its implementation. As a bonus we will also look at the example where we setup the IRSA cross AWS Accounts i.e to talk to AWS Services in Account B from the Pod Running in EKS Cluster in Account A.
Prerequisites
The following are the prerequisites for this post to follow along -
- EKS Cluster with OIDC Provider: We have explained How to create an EKS Cluster using Terraform in detail in the linked blog. Please follow along and deploy the EKS Cluster, you can also directly use this README to deploy the EKS Cluster.
- AWS CLI to retrieve EKS Cluster Kubeconfig
- Install kubectl compatible with the EKS version you are installing.
- Basic understanding of AWS IAM and EKS
- Most importantly you need to have basic understanding of Kubernetes
What is IRSA?
IAM Roles for Service Accounts (IRSA) is an EKS feature that permits you to associate an AWS Identity and Access Management (IAM) role with a Kubernetes service account. The Kubernetes service account then equips the pods that utilize it with AWS permissions. As such, these pods can access AWS services securely.
Before IRSA, developers were compelled to directly store AWS credentials in the application or use environment variables linked to Kubernetes Secrets. Both these methods could potentially lead to security risks. IRSA, however, allows developers to adopt the security best practice of granting least privilege access.
How Does IRSA Work?
Here is a brief workflow of how IRSA operates:

- An IAM Role gets associated with a Kubernetes Service Account via an IAM OIDC provider that the EKS cluster trusts.
- When your application intends to make an AWS API call, it leverages an AWS SDK. The SDK identifies the OIDC token and calls the AWS STS
AssumeRoleWithWebIdentityoperation with this token. - AWS STS responds with temporary role credentials, which the SDK uses to call the AWS service.
- If the IAM Role has the necessary permissions, the AWS service processes the request.
This entire process ensures that your application does not have to deal with AWS credentials directly, and no IAM roles are shared among applications.
Implementing IRSA within same AWS Account
Let's now look at an example where we set up an IRSA in an AWS EKS environment such that the pods can talk to AWS Services like S3 within the same AWS Account.
Step 0: Create EKS Cluster with OIDC Provider
Assuming you have followed our earlier blog on How to create an EKS Cluster using Terraform and have the EKS Cluster up and running.
Step 1: Retrieve OIDC Provider ID from your EKS Cluster
Firstly, retrieve the OIDC provider ID from your EKS cluster. This can be achieved using the AWS CLI command:
aws eks describe-cluster --name mgmt --region us-east-1 --query "cluster.identity.oidc.issuer" | awk -F'/' '{print $NF}' | tr -d '"'
This command will retrieve the OIDC issuer ID, which is required in the steps below to configure the IAM Role.
Step 2: Create an IAM Role and Trust Relationship
Create an IAM Role using the following AWS CLI command:
aws iam create-role --role-name <IAM_ROLE_NAME> --assume-role-policy-document file://trust.json
In the above command, trust.json is the trust relationship policy document that contains the OIDC provider as a trusted entity. It may look like this:
{
  "Version": "2012-10-17",
  "Statement": [
    {
      "Effect": "Allow",
      "Principal": {
        "Federated": "arn:aws:iam::<AWS_ACCOUNT_ID>:oidc-provider/oidc.eks.<REGION>.amazonaws.com/id/<EKS_OIDC_ID>"
      },
      "Action": "sts:AssumeRoleWithWebIdentity",
      "Condition": {
        "StringEquals": {
          "oidc.eks.<REGION>.amazonaws.com/id/<EKS_OIDC_ID>:sub": "system:serviceaccount:<NAMESPACE>:<SERVICE_ACCOUNT_NAME>"
        }
      }
    }
  ]
}
Replace AWS_ACCOUNT_ID with the AWS Account Number where your EKS Cluster is running.
Replace REGION with AWS region where your EKS Cluster is running.
Replace EKS_OIDC_ID with OIDC Issuer ID retrieved in Step 1 above.
Replace NAMESPACE with namespace where your pod/service account is.
Replace SERVICE_ACCOUNT_NAME with the name of the service account you want to use associate with a pod.
Attach AmazonS3FullAccess permissions to the IAM Role -
aws iam attach-role-policy --role-name <IAM_ROLE_NAME> --policy-arn arn:aws:iam::aws:policy/AmazonS3FullAccess
Step 3: Associate the IAM Role with Kubernetes Service Account
You can create a new service account or modify an existing one using the kubectl command, with the eks.amazonaws.com/role-arn annotation pointing to the IAM role:
kubectl annotate serviceaccount -n <NAMESPACE> <SERVICE_ACCOUNT_NAME> eks.amazonaws.com/role-arn=arn:aws:iam::<AWS_ACCOUNT_ID>:role/<IAM_ROLE_NAME>
Make sure the ServiceAccount you create or annotate is the one you configured for in Step 2 above.
Step 4: Update Your Application to Use AWS SDK
Assuming you already have an application pod configured with AWS SDK. Now you just need to make sure that your Pod or Deployment is using the ServiceAccount configured earlier. We have shown an example of sample Deployment which you can observe must be deployed in the same NAMESPACE as your ServiceAccount which you configured with IRSA in the steps above.
apiVersion: apps/v1
kind: Deployment
metadata:
  name: example-deployment
  namespace: <NAMESPACE>
  ...
spec:
  selector:
    ...
  template:
    metadata:
      ...
    spec:
      serviceAccountName: <SERVICE_ACCOUNT_NAME>
      containers:
      - name: example-container
        image: example/image:latest
        ports:
        - containerPort: 8080
Running Example for IRSA within same account
Assuming you have the EKS Cluster running and your AWS CLI is configured to talk to the AWS Account where your EKS Cluster is running. If not please follow the our earlier blog on How to create an EKS Cluster using Terraform and have the EKS Cluster up and running OR you can also directly use this README to deploy the EKS Cluster.
-
Retrieve Kubeconfig and configure your terminal to talk to AWS EKS Cluster as follows, this should update the current kubeconfig context to point to the cluster -
export EKS_CLUSTER_NAME=<your eks cluster name> export EKS_AWS_REGION=<aws region where you created eks cluster> aws eks update-kubeconfig --region ${EKS_AWS_REGION} --name ${EKS_CLUSTER_NAME} # validate kubecontext as below, should point to your cluster kubectl config current-context -
Create a namespace
irsa-testand service account in that namespace namedirsa-testas follows -# create namespace kubectl create namespace irsa-test # create serviceaccount kubectl create serviceaccount --namespace irsa-test irsa-test
- Retrieve OIDC Issuer Id from the EKS Cluster
export EKS_CLUSTER_NAME=<your eks cluster name>
export EKS_AWS_REGION=<aws region where you created eks cluster>

export OIDC_ISSUER_ID=$(aws eks describe-cluster --name ${EKS_CLUSTER_NAME} --region ${EKS_AWS_REGION} --query "cluster.identity.oidc.issuer" | awk -F'/' '{print $NF}' | tr -d '"')
- Create IAM Role with attached AWS managed
AmazonS3FullAccesspolicy and configureTrustRelationshipfor ServiceAccount nameirsa-testin namespaceirsa-testas follows -
export AWS_ACCOUNT_ID="$(aws sts get-caller-identity --query Account --output text)"
export EKS_AWS_REGION="<replace with aws region where you created eks cluster>"
export EKS_OIDC_ID=$(echo $OIDC_ISSUER_ID)
export NAMESPACE="irsa-test"
export SERVICE_ACCOUNT_NAME="irsa-test"

cat > trust.json << EOF
{
  "Version": "2012-10-17",
  "Statement": [
    {
      "Effect": "Allow",
      "Principal": {
        "Federated": "arn:aws:iam::${AWS_ACCOUNT_ID}:oidc-provider/oidc.eks.${REGION}.amazonaws.com/id/${EKS_OIDC_ID}"
      },
      "Action": "sts:AssumeRoleWithWebIdentity",
      "Condition": {
        "StringEquals": {
          "oidc.eks.${REGION}.amazonaws.com/id/${EKS_OIDC_ID}:sub": "system:serviceaccount:${NAMESPACE}:${SERVICE_ACCOUNT_NAME}"
        }
      }
    }
  ]
}
EOF

# create IAM role and attach trust policy
aws iam create-role --role-name irsa-test --assume-role-policy-document file://trust.json

# remove trust.json file
rm trust.json

# attach AmazonS3FullAccess Permissions policy to the iam role
aws iam attach-role-policy --role-name irsa-test --policy-arn arn:aws:iam::aws:policy/AmazonS3FullAccess
- Annotate ServiceAccount
irsa-testin namespaceirsa-testwith IAM Role as follows -
export AWS_ACCOUNT_ID="$(aws sts get-caller-identity --query Account --output text)"
export NAMESPACE="irsa-test"
export SERVICE_ACCOUNT_NAME="irsa-test"

# annotate service account
kubectl annotate serviceaccount --namespace ${NAMESPACE} ${SERVICE_ACCOUNT_NAME} eks.amazonaws.com/role-arn=arn:aws:iam::${AWS_ACCOUNT_ID}:role/irsa-test
- Deploy a pod using the
irsa-testservice account inirsa-testnamespace as follows -
kubectl apply -f - <<EOF
apiVersion: apps/v1
kind: Deployment
metadata:
  name: irsa-test
  namespace: irsa-test
  labels:
    app: aws-cli
spec:
  selector:
    matchLabels:
      app: aws-cli
  template:
    metadata:
      labels:
        app: aws-cli
    spec:
      serviceAccountName: irsa-test
      containers:
      - name: aws-cli
        image: amazon/aws-cli
        command: [ "/bin/sh", "-c", "--" ]
        args: [ "while true; do sleep 39000; done;" ]
EOF
- Make sure the pod is running, using irsa-test serviceAccount and irsa-test serviceAccount is annotated with IAM Role you created above as follows -
# check pod is running
kubectl get po -n irsa-test irsa-test

# check pod is deployed with irsa-test serviceaccount
kubectl get deploy -n irsa-test irsa-test -o jsonpath='{.spec.template.spec.serviceAccountName}'

# check service account is annotated with IAM Role
kubectl get sa -n irsa-test irsa-test -o jsonpath='{.metadata.annotations}'
- Exec into the pod deployed above and create an s3 bucket and validate s3 bucket is created successfully as follows, this will prove that your pod is configured for IRSA successfully -
# exec into the pod
export POD_NAME=$(kubectl get po -n irsa-test | grep irsa-test | awk -F ' ' '{print $1}')
kubectl exec -it -n irsa-test ${POD_NAME} -- bash

# run following commands inside the pod
export BUCKET_NAME="irsa-test-sample-$(date +%s)"

# create s3 bucket
aws s3api create-bucket --bucket ${BUCKET_NAME} --region us-west-2 --create-bucket-configuration LocationConstraint=us-west-2

# validate s3 bucket is created, there shouldn't be any error message on stdout
aws s3api head-bucket --bucket ${BUCKET_NAME} --region us-west-2

# delete s3 bucket, there shouldn't be any errors on stdout
aws s3 rm s3://${BUCKET_NAME} --region us-west-2 --recursive
aws s3api delete-bucket --bucket ${BUCKET_NAME} --region us-west-2

# validate s3 bucket is deleted, you should see 404 error message on stdout
aws s3api head-bucket --bucket ${BUCKET_NAME} --region us-west-2
Implementing IRSA cross AWS Accounts
Let's now look at an example where we set up an IRSA in an AWS EKS environment such that the pods can talk to AWS Services like S3 in different AWS Account than the one where EKS Cluster is running.
We already saw how to setup IRSA within the same AWS Account in the section above, this section will take it forward from there. Let's call the AWS Account we tested above as Account1 and the Account2 will be another AWS Account we now want to create resources in.
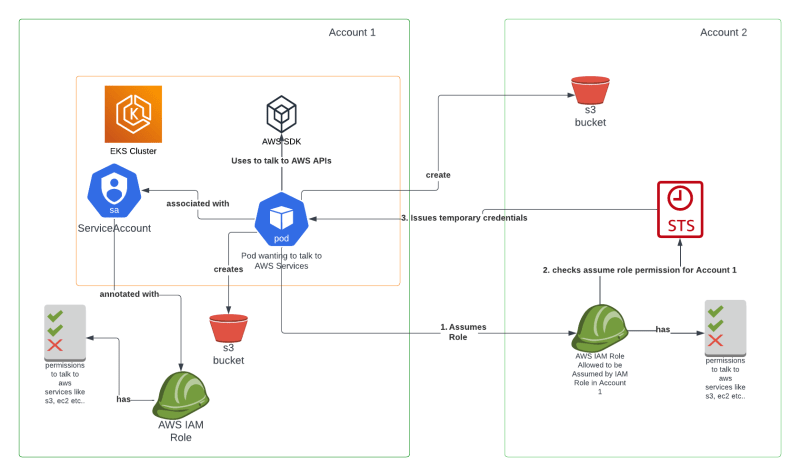
Step 0: AWS CLI is configured to talk to Account 2
Make sure your AWS CLI is now configured to talk to Account 2, this is needed to perform the steps below.
Step 1: Create IAM Role In Account 2 with AmazonS3FullAccess and permissions to be Assumed by IAM Role created in Account 1 earlier
Create IAM Role in AWS Account 2, make sure -
aws iam create-role --role-name <IAM_ROLE_NAME> --assume-role-policy-document file://trust.json
In the above command, trust.json is the trust relationship policy document that allows IAM Role created in Account 1 in section above to assume IAM Role in Account1.
{
    "Version": "2012-10-17",
    "Statement": [
        {
            "Effect": "Allow",
            "Principal": {
                "AWS": "arn:aws:iam::<ACC1_NUMBER>:role/<ACC1_IAM_ROLE_NAME>"
            },
            "Action": "sts:AssumeRole"
        }
    ]
}
Attach AmazonS3FullAccess permissions to the Account2 IAM Role -
aws iam attach-role-policy --role-name <IAM_ROLE_NAME> --policy-arn arn:aws:iam::aws:policy/AmazonS3FullAccess
Step 2: Edit TrustRelationship in Account1 IAM Role to AssumeRole of Account2
Make sure your AWS CLI is now configured to talk to Account 1.
Add an inline policy with STS permissions in IAM Role created earlier in Account 1 for IRSA such that it can Assume IAM Role created above in Account 2, as follows -
{
    "Effect": "Allow",
    "Principal": {
        "AWS": "arn:aws:iam::<ACC2_NUMBER>:role/<ACC2_IAM_ROLE_NAME>"
    },
    "Action": "sts:AssumeRole"
}
In summary, in Step1 you allowed Account2's IAM Role to be assumed by Account1's IRSA IAM Role and in Step2 you allowed Account1's IAM Role to have permissions to assume IAM Role in Account2. That's all you need. Now the pod running in your EKS Cluster should be able to assume IAM Role in Account2 and as per permissions it should be able to perform any s3 operations. Please see the running example below to validate the Cross Account IRSA setup.
Running Example Cross Account IRSA
Assuming you have the setup from the Running Example for IRSA within same account section earlier. If not, please read and follow the section earlier before proceeding with the examples below -
-
Make sure your AWS CLI is now configured to talk to the AWS Account2 where you want your pod running in AWS Account1 to create resources.
-
Create IAM Role with
AmazonS3FullAccesspermissions inAccount2andTrustRelationshipto allow this IAM Role to be assumed byirsa-testIAM Role created earlier as follows -
export AWS_ACCOUNT1_ID="AWS Account1 Number"

cat > trust.json << EOF
{
    "Version": "2012-10-17",
    "Statement": [
        {
            "Effect": "Allow",
            "Principal": {
                "AWS": "arn:aws:iam::${AWS_ACCOUNT1_ID}$:role/irsa-test"
            },
            "Action": "sts:AssumeRole"
        }
    ]
}
EOF

# create IAM role and attach trust policy
aws iam create-role --role-name irsa-test --assume-role-policy-document file://trust.json

# remove trust.json file
rm trust.json

# attach AmazonS3FullAccess Permissions policy to the iam role
aws iam attach-role-policy --role-name irsa-test --policy-arn arn:aws:iam::aws:policy/AmazonS3FullAccess
-
Login to AWS Account1, go to IAM Role
irsa-testand create aninlinepolicy with permissions to allow Account1 to talk to Account2 as below -
{
	"Effect": "Allow",
	"Principal": {
		"AWS": "arn:aws:iam::<ACC2_NUMBER>:role/irsa-test"
	},
	"Action": "sts:AssumeRole"
}
Replace ACC2_NUMBER with AWS Account2's number.
-
Assuming your kubeconfig is still pointing to the EKS Cluster created earlier, also the
irsa-testpod is still running. Make sure to exit from the interactive terminal ofirsa-testpod, if it's still active from earlier session. -
Exec into the
irsa-testpod and assume the IAM Role in Account2 and retrieve the credentials, configure AWS CLI to now talk to Account2. Create s3 bucket and validate that it gets created in Account2 as follows -
# exec into the irsa-test pod
export POD_NAME=$(kubectl get po -n irsa-test | grep irsa-test | awk -F ' ' '{print $1}')
kubectl exec -it -n irsa-test ${POD_NAME} -- bash

# Account2's number
export AWS_ACCOUNT2_NUMBER=<replace with Account2 number>

# retrieve Account2's credentials
aws sts assume-role --role-arn "arn:aws:iam::${AWS_ACCOUNT2_NUMBER}:role/irsa-test" --role-session-name "create-bucket-session"

# copy AccessKeyId, SecretAccessKey and SessionToken from the output and set following environment variables
ASSUME_ROLE_OUTPUT=$(aws sts assume-role --role-arn "arn:aws:iam::${AWS_ACCOUNT2_NUMBER}:role/irsa-test" --role-session-name "create-bucket-session")

export AWS_ACCESS_KEY_ID=$(echo $ASSUME_ROLE_OUTPUT | grep -o '"AccessKeyId": "[^"]*"' | cut -d'"' -f4)
export AWS_SECRET_ACCESS_KEY=$(echo $ASSUME_ROLE_OUTPUT | grep -o '"SecretAccessKey": "[^"]*"' | cut -d'"' -f4)
export AWS_SESSION_TOKEN=$(echo $ASSUME_ROLE_OUTPUT | grep -o '"SessionToken": "[^"]*"' | cut -d'"' -f4)

# set bucket name
BUCKET_NAME="cross-irsa-test-$(date +%s)"

# make sure you are logged into AWS Account2 now
aws sts get-caller-identity --query Account --output text

# create s3 bucket
aws s3api create-bucket --bucket ${BUCKET_NAME} --region us-west-2 --create-bucket-configuration LocationConstraint=us-west-2

# validate s3 bucket is created, there shouldn't be any error message on stdout
aws s3api head-bucket --bucket ${BUCKET_NAME} --region us-west-2

# delete s3 bucket, there shouldn't be any errors on stdout
aws s3 rm s3://${BUCKET_NAME} --region us-west-2 --recursive
aws s3api delete-bucket --bucket ${BUCKET_NAME} --region us-west-2

# validate s3 bucket is deleted, you should see 404 error message on stdout
aws s3api head-bucket --bucket ${BUCKET_NAME} --region us-west-2
This proves that now Pod running inside an EKS Cluster in Account1 can talk AWS Services in Account 2.
Cleanup
DO NOT FORGET TO DELETE THE INFRASTRUCTURE YOU ARE CREATING.
PLEASE FOLLOW THE CLEANUP STEPS TO CLEAN EKS CLUSTER IN THE BLOG LINKED ABOVE OR FOLLOW THIS README.
To clean the IAM Role created simply log into the AWS Console of Account1 and Account2 and delete the irsa-test IAM Roles you created in sections earlier.
NOTE: if you don't cleanup the infrastructure you created and don't need anymore, you will have unexpected cloud costs in your AWS bill.
Conclusion
IAM Roles for Service Accounts (IRSA) is a significant advancement for AWS EKS, offering a more secure way to access AWS resources from your applications. By integrating this feature into your applications, you can maintain granular control over access to AWS services and better adhere to the security best practices of least privilege and role segregation.
Remember, each new AWS feature such as IRSA offers opportunities to enhance the security and capability of your applications, allowing you to deliver robust, scalable, and secure applications on the AWS platform.
Author Notes
Feel free to reach out with any concerns or questions you have. I will make every effort to address your inquiries and provide resolutions. Stay tuned for the upcoming blog in this series dedicated to Platformwale (Engineers who work on Infrastructure Platform teams).
Originally published at https://platformwale.blog on Aug 2, 2023.
[story continues]
tags