Below I will show you how we can simply optimise and edit images in our media library, thus dramatically reducing the time required for our website to load. Our optimised version of the image will only be created at the moment of the first user request.
The Case
Imagine that in our media library momentarily we have one image.
name: grumpy_cat.jpgurl: media.YOUR__WEBSITE.com/grumpy_cat.jpgwidth: 2500pxsize: 2mb
We would like to use our picture in the following places:
- As a blog list item (Recommended image width 150px)
- As a featured image in a blog post page (Recommended image width 760px)
- As part of the mobile version of the blog post page (Recommended image width 200px)
Below I will describe issues of the two most common ways of handling this task:
The css way
- We can easily implement image modification with using css, but it doesn’t resolve the issue of loading time, because even though our image is displayed small but the file is still the same size.
The hard coded way
- Why don’t we create three different sizes of the image and upload it to the media library? This solution is better, but think about what happens when we don’t have one post but thousands of posts.
The Solution — Make it easier
- We can implement the css functions into an image modification process (crop, cover, etc.), we can create smaller, more optimised pictures with the real width that we wish to display it in. (In our case the three new images: 150px, 760px, 200px )
- We can automate image uploading into our media library
- The optimised version of the image will only be created at the moment of the first user request
Sounds good right?
Definitions
Storage Server
- Our media library, where we can handle our images (In our case it’s an AWS S3 Bucket)
- In this tutorial we are using the following url as our media library domain: media.YOUR__WEBSITE.com
Image Processor Service
- Of the endpoint of our API, which in our case does all the resource heavy file actions
- The API url is api.YOUR__WEBSITE.com
Client
- A user who send’s a request to our media library
Task
--key-value
key value pattern between the original image path and the file extension
media.YOUR__WEBSITE.com/grumpy_cat--width-100.jpg
In this tutorial we are using AWS S3 as the Storage Server and NodeJs express Application as our Image Processor Service. These can be replaced with your personal preferences. You can use your local file server or other file storage provider (Azure, Google Cloud, etc.) instead of S3. You can also replace NodeJs with an image processor written in a different programming language or you can use a serverless function provider, for example AWS LAMBDA.
The process
First Part — Setting up AWS S3 bucket
The first thing we are going to do, is to set up our bucket and configure it.
- To redirect all 404 requests to our Image Processor Service
- Add permissions to upload and fetch objects using AWS SDK
1 . Register on AWS and create a new bucket
In this tutorial I will not give you all the details, if you need more information I recommend the following article
https://docs.aws.amazon.com/quickstarts/latest/s3backup/step-1-create-bucket.html
2. Select Your bucket
3. Configure Bucket Permissions and CORS parameters
Bucket permissions and the CORS settings are instrumental in order to be able to upload optimised images from our image processor service using AWS SDK.
I. Create GetObject Bucket policy permissions (make s3 bucket public)
“Version”: “2012–10–17”,“Statement”: [{“Effect”: “Allow”,“Principal”: “*”,“Action”: “s3:GetObject”,“Resource”: “arn:aws:s3:::YOUR__BUCKET__NAME/*”}]}
If you need more information about the Bucket Policies:
II. Configure CORS
<?xml version="1.0" encoding="UTF-8"?><CORSConfiguration xmlns="http://s3.amazonaws.com/doc/2006-03-01/"><CORSRule><AllowedOrigin>*</AllowedOrigin><AllowedMethod>GET</AllowedMethod><MaxAgeSeconds>3000</MaxAgeSeconds><AllowedHeader>Authorization</AllowedHeader></CORSRule><CORSRule><AllowedOrigin>https://api.YOUR__WEBSITE.com</AllowedOrigin><AllowedMethod>PUT</AllowedMethod><MaxAgeSeconds>3000</MaxAgeSeconds><AllowedHeader>*</AllowedHeader></CORSRule></CORSConfiguration>
This setting enables the Image Processor Service to make modifications in Our Storage Server using AWS SDK and to set our media library public.
4. Enable and configure static website hosting mode
Setting Our bucket to Website Hosting Mode is imperative in order to process 404 requests to Our Image Processor Service.
Redirection rules:
<RoutingRules><RoutingRule><Condition><HttpErrorCodeReturnedEquals>404</HttpErrorCodeReturnedEquals></Condition><Redirect><Protocol>https</Protocol><HostName>api.YOUR__WEBSITE.com</HostName><ReplaceKeyPrefixWith>media/optimiser?url=</ReplaceKeyPrefixWith><HttpRedirectCode>302</HttpRedirectCode></Redirect></RoutingRule></RoutingRules>
5. How to use your S3 in Website Hosting Mode
When your bucket is running in Website Hosted Mode, you need to use it with a different endpoint url.
AWS S3 has 2 different usages:
-
Using it as an API (https and .s3.)https://s3.REGION.amazonaws.com/YOUR_BUCET_NAME/grumpy_cat.jpghttps://YOUR_BUCET_NAME.s3.REGION.amazonaws.com/grumpy_cat.jpg
-
Using it as a Website (http and .s3-website.)http://YOUR_BUCET_NAME.s3-website.REGION.amazonaws.com/grumpy_cat.jpg
In this tutorial we need to use our Bucket in website mode, otherwise the redirection will not work.
6. Using our bucket in website hosting mode with https protocol (optional)
Unfortunately the S3 in website mode doesn’t support HTTPS protocol. If you are using https protocol in your website you need to use a proxy server to your bucket url. (AWS cloudfront, nginx, express-proxy, etc…)
Nginx example:
server_name www.media.YOUR__WEBSITE.com media.YOUR__WEBSITE.com;return 301 https://$host$request_uri;}
server {listen 443 ssl;listen [::]:443 ssl;
    ssl\_certificate CERTIFICATE\_\_PATH;
    ssl\_certificate\_key CERTIFICATE\_\_PATH;

    server\_name www.media.YOUR\_\_WEBSITE.com media.YOUR\_\_WEBSITE.com;

    location / {
            proxy\_pass [http://YOUR\_BUCET\_NAME.s3-website.REGIO.amazonaws.com
](https://s3.eu-central-1.amazonaws.com/unleash-image-resizer-test/grumpy_cat.jpg) }}
You can now use your bucket with your https://media.YOUR__WEBSITE.com address
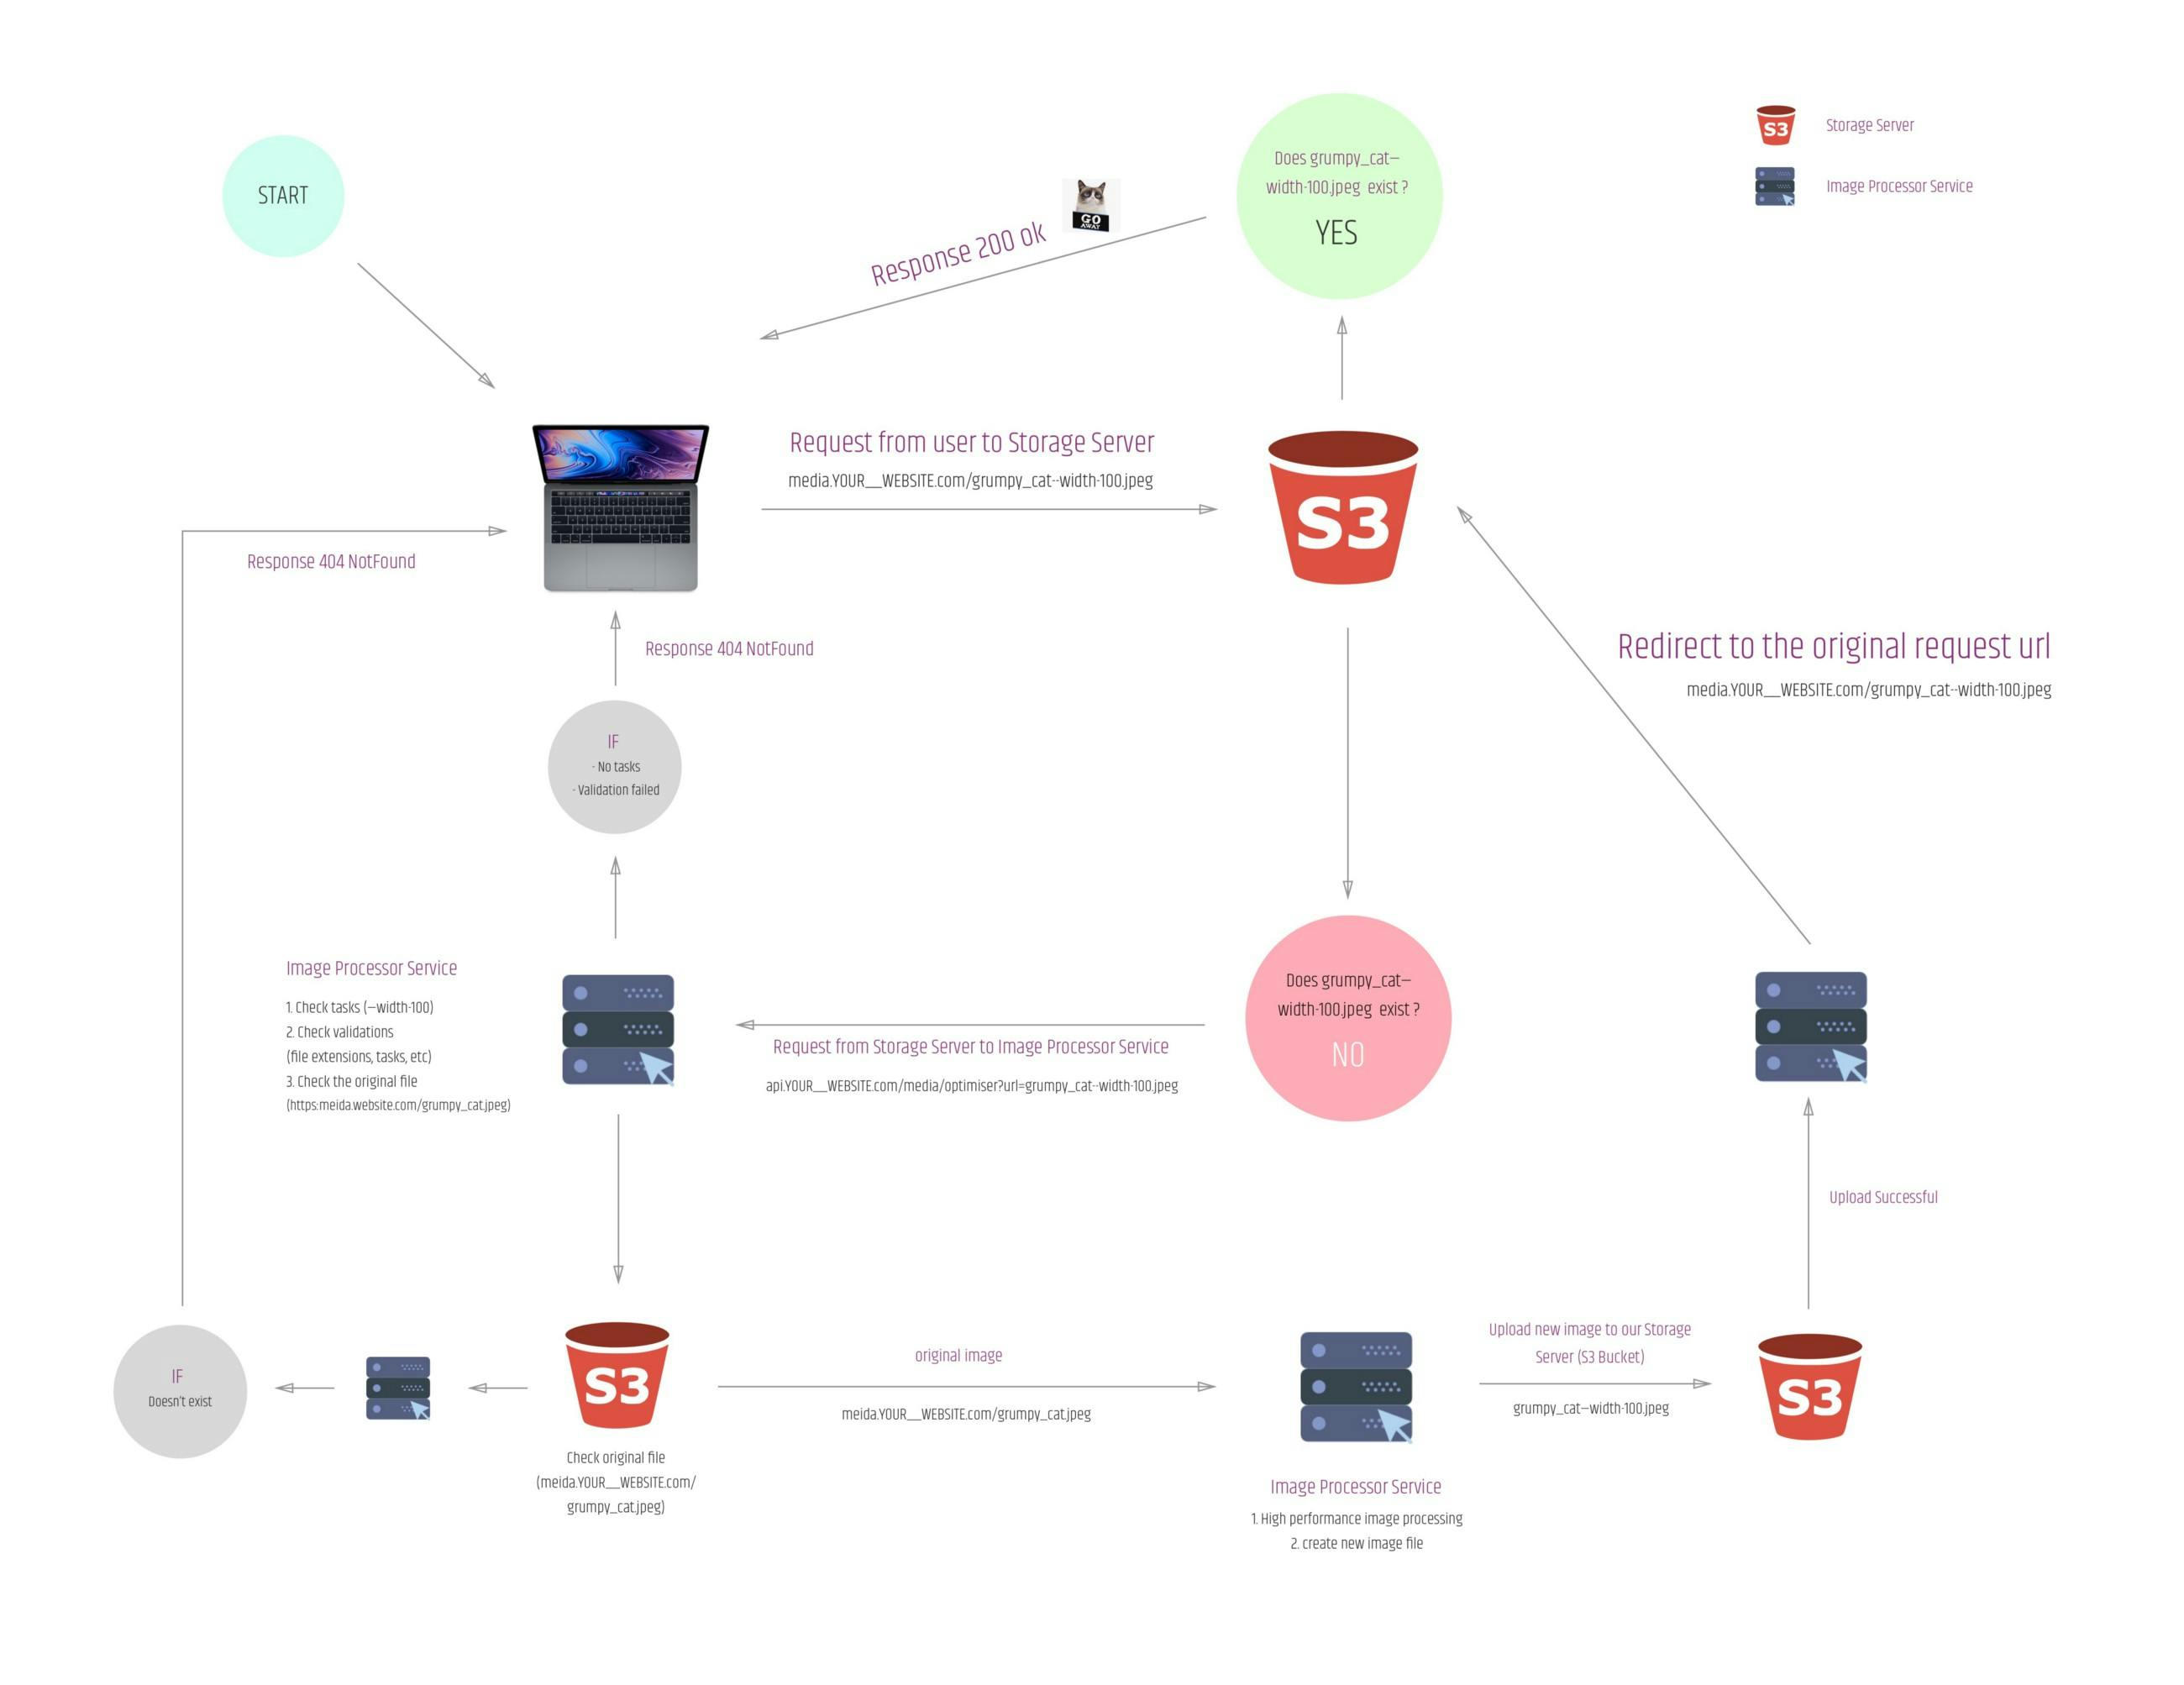
**_7. Testing our S3 setup_**Now when someone navigates to our s3 bucket url and the media asset does not exist, our bucket will automatically navigate to the redirect url.(api.YOUR__WEBSITE.com/media/optimiser?url=)
Please see the process (above) to see exactly how it works.
Of course at this stage you will receive an error message as our Image Processor Service is not complete yet.
Example:
fetched image url:http://YOUR_BUCET_NAME.s3-website.REGIO.amazonaws.com/grumpy_cat--width-100.jpg
or
fetched image url with using https protocol and proxy server: https://media.YOUR__WEBSITE.com/grumpy_cat--width-100.jpg
---------
redirect endpoint = https://api.YOUR__WEBSITE.com/media/optimiser?url=grumpy_cat--width-100.jpg
Now we can start writing our Image Processor ServiceEnd of the first part…
Second Part —Writing Image Processor Service in NodeJs with Express and Sharp
Definitions:
url:ORIGINAL_IMAGE--key-Value--key-value.FILE_EXTENSION
original url:ORIGINAL_IMAGE.FILE_EXTENSION
bucketUrl:media.YOUR__WEBSITE.com orYOUR_BUCET_NAME.s3-website.REGION.amazonaws.com
1. Install and configure Express
In this tutorial we are using the http://expressjs.com/en/starter/hello-world.html starter example with ES6 import syntax
import express from 'express'
const app = express()const port = 3000
app.get('/', (req, res) => res.send('Hello World!'))
app.listen(port, () => console.log(`Example app listening on port ${port}!`))
2. Create The Function (simplified)
Warning! This code snippet is not a production ready script, if you’d like to use it, you need to extend it with validators, error handlers, more tasks, etc…
index.js
import Boom from 'boom' // Super useful error handler libraryimport { putObject, getObject } from './aws.helper'import { sharpImageConverter } from './sharp.helper'
const bucketUrl = process.env.bucketUrl
app.get('/media/optimise', async (req, res) => {try {const { query } = reqconst { url } = queryconst acceptedFileExtensions = /\.(jpg|jpeg|png)$/iconst acceptedTasks = ['width']
// check the original request url
if (!url) throw Boom.notFound()

// check the file extension
if (!acceptedFileExtensions.test(url)) throw Boom.notFound()

// check the tasks
const \[rawFilename, fileExtension\] = url.split('.')
const splittedFilenameByTasks = rawFilename.split('--')

// if we don't have tasks
if (splittedFilenameByTasks.length === 1) throw Boom.notFound()

// checking tasks
const tasks = {}
splittedFilenameByTasks.splice(1)
  .forEach((task) => {
    const \[key, value\] = task.split('-')

    // if we have unknown tasks
    if (!acceptedTasks.includes(key)) throw Boom.notFound();

    tasks\[key\] = value
    return
  });

// download the original image
const originalFilename = \`${splittedFilenameByTasks\[0\]}.${fileExtension}\`
const fetchedFileDataFromAWS = await getObject(originalFilename)

// create buffer
const { Body, ContentType } = fetchedFileDataFromAWS
const image = new Buffer.from(Body)

// filesystem tasks
const convertedImageBuffer = await sharpImageConverter(image, tasks)

// upload to the s3
await putObject(url, convertedImageBuffer, ContentType);

// redirect to the new image url
return res.redirect(\`${bucketUrl}/${url}\`);
} catch (_err) {...handle errors}})
aws.helper.jshttps://docs.aws.amazon.com/AWSJavaScriptSDK/latest/AWS/S3.html
import AWS from 'aws-sdk'import Boom from 'boom'
const s3Service = new AWS.S3({accessKeyId: process.env.AWS_ACCESS_KEY_ID,secretAccessKey: process.env.AWS_SECRET_ACCESS_KEY,region: process.env.AWS_REGION,})
export const getObject = key =>new Promise((resolve, reject) => {const params = { Bucket: bucketName, Key: key }
if (!key) reject(Boom.notFound())

s3Service.getObject(params, (err, data) => {
  if (err) reject(err)
  resolve(data)
})
})
export const putObject = (key, body, ContentType) =>new Promise((resolve, reject) => {const params = {Bucket: bucketName,ContentType,Key: key,Body: body,}
if (!key) reject(Boom.notFound())

s3Service.putObject(params, (err, data) => {
  if (err) reject(err)
  resolve(data)
})
})
sharp.helper.jshttps://github.com/lovell/sharp
import sharp from 'sharp'
export const sharpImageConverter = async (_image, params) => {const { width } = params
const modifiedImage = await sharp(_image).resize(width ? parseInt(width, 10) : undefined).crop().toBuffer()
return modifiedImage}
3. Deploy the script
We can now deploy our system which will enable us to speed up our website loading speed. We can guarantee your SEO results will improve.
I hope you find this tutorial useful, If you have any questions feel free to comment below.