
The Recipe Finder API is a versatile solution for efficiently storing and retrieving recipes based on ingredients, dietary needs, and other preferences. Whether you're building a personal meal planner or a recipe-sharing platform, this API offers the essential functionality to streamline recipe management.
This guide will walk you through setting up the project from scratch, integrating a MongoDB database for recipe storage, and testing key API endpoints to ensure smooth operation. Let's dive in and create a seamless recipe discovery experience.
Prerequisite
Before you begin, ensure you have the following:
- Basic knowledge of JavaScript and Node.js – If you're new to these technologies, consider learning the fundamentals from MDN Web Docs (https://developer.mozilla.org/en-US/docs/Web/JavaScript) or Node.js official documentation (https://nodejs.org/en/docs/).
- Node.js installed – Download and install the latest version from the official Node.js website: https://nodejs.org/.
- MongoDB installed – Get MongoDB from the official MongoDB website: https://www.mongodb.com/try/download/community.
- A code editor – Recommended options include Visual Studio Code (https://code.visualstudio.com/) or Sublime Text (https://www.sublimetext.com/).
- Postman for API testing – Download Postman from https://www.postman.com/downloads/ to test API endpoints efficiently.
With these tools in place, you're ready to proceed.
Project Overview
The Recipe Finder App enables users to:
- Search recipes based on ingredients or dietary preferences.
- Add and share recipes with the community.
- Generate personalized meal plans tailored to their needs.
- Create grocery lists automatically from selected recipes.
The backend is developed using Node.js, Express, and MongoDB, ensuring a seamless and efficient experience.
Setting Up The Project Folder And File Structure
Follow these steps to create the necessary folders and files for the Recipe Finder App using Node.js.
- Depending on your operating system, open a command-line interface:
-
Windows (Command Prompt): Press Win + R, type cmd, and hit Enter.
-
Windows (PowerShell): Press Win + X, then select Windows Terminal (PowerShell).
-
Mac/Linux: Press Cmd + Space, type Terminal, and hit Enter.Alternatively, navigate to your preferred directory using File Explorer or Finder before proceeding.
-
Create the project using Node.js.In the terminal, navigate to the location where you want to create the project and run the following commands:
mkdir recipe-finder-app
cd recipe-finder-app
 npm init -y
This will:
-
Create a new folder named recipe-finder-app.
-
Navigate into the folder.
-
Initialize a Node.js project with a default package.json file.
- Install dependencies
Run the following command to install the necessary dependencies:
npm install express mongoose dotenv
This installs:
-
express – A web framework for Node.js.
-
mongoose – An Object Data Modeling (ODM) library for MongoDB.
-
dotenv – A package for managing environment variables.
- Create the folder structure
Inside the recipe-finder-app directory, create the required folders using the command:
mkdir config controllers models routes
The mkdir command works on both Windows and macOS/Linux.
This will create four folders:
-
config – For database configuration.
-
controllers – For handling application logic.
-
models – For defining database schemas.
-
routes – For setting up API routes.
-
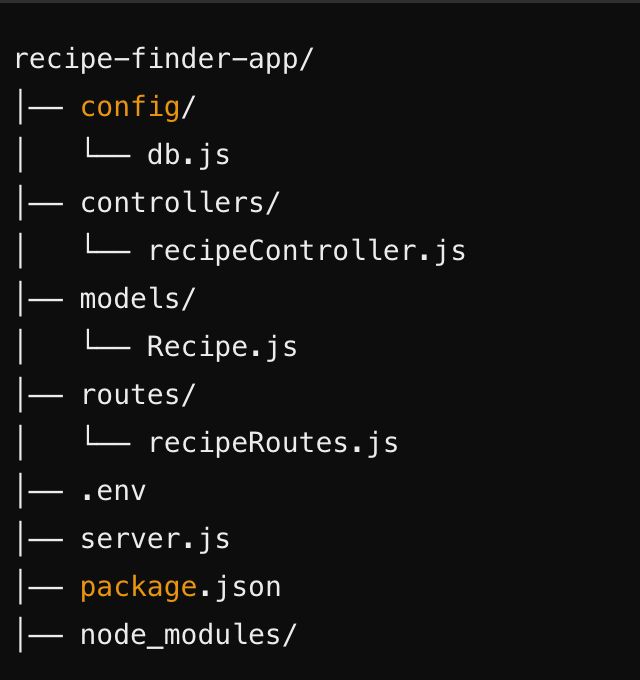
Create necessary filesRun the following commands to create the required files inside the appropriatefolders:
node -e "['config/db.js', 'controllers/recipeController.js', 'models/Recipe.js', 'routes/recipeRoutes.js', '.env', 'server.js'].forEach(f => require('fs').writeFileSync(f, ''))"This command works on both Mac Os, Linux, and Windows
-
. Your Project Structure will Look Like This:
Configuring MongoDB
In the config/db.js file, add the following code to configure your MongoDB connection:
const mongoose = require('mongoose');


const connectDB = async () => {
   try {
       // Connect to MongoDB
       await mongoose.connect(process.env.MONGO_URI, {
           useNewUrlParser: true,
           useUnifiedTopology: true
       });


       console.log("MongoDB Connected...");
   } catch (error) {
       console.error("MongoDB connection failed:", error);
       process.exit(1);
   }
};


module.exports = connectDB;
This code connects your app to MongoDB using the URI stored in the .env file.
Creating The Recipe Model
In the models/Recipe.js file, define the structure of the recipe data:
const mongoose = require('mongoose');


const RecipeSchema = new mongoose.Schema({
   name: { type: String, required: true },
   ingredients: [String],
   dietaryPreferences: [String],
   instructions: String,
   userContributed: Boolean
});


const Recipe = mongoose.model('Recipe', RecipeSchema); // Define the model once


module.exports = Recipe;
This code defines how the recipe data will be stored in MongoDB, with fields for name, ingredients, dietary preferences, instructions, and whether the recipe was contributed by a user.
Setting Up API Routes and Controllers
In controllers/recipeController.js, define the functions to handle incoming requests:
// controllers/recipeController.js


const Recipe = require('../models/Recipe');


exports.getAllIngredients = async (req, res) => {
   try {
       // Assuming you have a database model for ingredients
       const ingredients = await Recipe.find(); // Replace with actual model
       res.status(200).json(ingredients);
   } catch (error) {
       res.status(500).json({ message: "Error fetching ingredients", error });
   }
};


// Fetch recipes by ingredients or dietary preferences
exports.getRecipes = async (req, res) => {
   try {
       const { ingredients, dietaryPreferences } = req.query;
       let query = {};


       if (ingredients) query.ingredients = { $all: ingredients.split(',') };
       if (dietaryPreferences) query.dietaryPreferences = { $in: dietaryPreferences.split(',') };


       const recipes = await Recipe.find(query);
       res.json(recipes);
   } catch (error) {
       res.status(500).json({ error: 'Internal Server Error' });
   }
};


// Add a new recipe
exports.addRecipe = async (req, res) => {
   try {
       const newRecipe = new Recipe(req.body);
       await newRecipe.save();
       res.status(201).json(newRecipe);
   } catch (error) {
       res.status(500).json({ error: 'Error adding recipe', details: error.message });
   }
};
This code defines two API endpoints: one for fetching recipes based on ingredients or dietary preferences and another for adding new recipes to the database. The getRecipes function filters recipes based on query parameters, while the addRecipe function saves a new recipe submitted in the request body.
Creating the Routes
In routes/recipeRoutes.js, define the routes for the API:
const express = require('express');
const router = express.Router();
const recipeController = require('../controllers/recipeController');


/**
* @swagger
* /api/recipes:
*   get:
*     summary: Get recipes based on ingredients or dietary preferences
*     description: Fetch recipes by providing ingredients or dietary preferences as query parameters.
*     parameters:
*       - in: query
*         name: ingredients
*         schema:
*           type: string
*         description: Comma-separated list of ingredients
*       - in: query
*         name: dietaryPreferences
*         schema:
*           type: string
*         description: Comma-separated list of dietary preferences
*     responses:
*       200:
*         description: Successfully retrieved recipes
*       500:
*         description: Internal server error
*/
router.get('/recipes', recipeController.getRecipes);


/**
* @swagger
* /api/recipes:
*   post:
*     summary: Add a new recipe
*     description: Add a new recipe to the database.
*     requestBody:
*       required: true
*       content:
*         application/json:
*           schema:
*             type: object
*             properties:
*               name:
*                 type: string
*               ingredients:
*                 type: array
*                 items:
*                   type: string
*               dietaryPreferences:
*                 type: array
*                 items:
*                   type: string
*               instructions:
*                 type: string
*               userContributed:
*                 type: boolean
*     responses:
*       201:
*         description: Recipe added successfully
*       500:
*         description: Error adding recipe
*/
router.post('/recipes', recipeController.addRecipe);


/**
* @swagger
* /api/ingredients:
*   get:
*     summary: Get all available ingredients
*     description: Retrieve a list of all ingredients available in the database.
*     responses:
*       200:
*         description: Successfully retrieved ingredients
*       500:
*         description: Internal server error
*/
router.get('/ingredients', recipeController.getAllIngredients);


module.exports = router;
This code sets up two routes: a GET route (/recipes) to fetch recipes by calling the getRecipes function, and a POST route (/recipes) to add a new recipe by calling the addRecipe function. It then exports the router to be used in the main server file (Server.js).
Setting Up the Express Server
In server.js, set up the Express server to handle requests:
require('dotenv').config();
const express = require('express');
const connectDB = require('./config/db');
const swaggerJsDoc = require('swagger-jsdoc');
const swaggerUi = require('swagger-ui-express');


const app = express();
app.use(express.json());


connectDB();


// Swagger setup
const swaggerOptions = {
   swaggerDefinition: {
       openapi: "3.0.0",
       info: {
           title: "Recipe API",
           version: "1.0.0",
           description: "API for managing recipes",
       },
       servers: [{ url: "http://localhost:3000" }],
   },
   apis: ["./routes/recipeRoutes.js"],
};


const swaggerDocs = swaggerJsDoc(swaggerOptions);
app.use("/api-docs", swaggerUi.serve, swaggerUi.setup(swaggerDocs));


// Import routes
const recipeRoutes = require('./routes/recipeRoutes');
app.use('/api', recipeRoutes);


const PORT = process.env.PORT || 3000;
app.listen(PORT, () => console.log(`Server running on port ${PORT}`));
This will start the server and connect the routes for handling recipe requests.
Setting Up Environment Variables
In the .env file, set the MongoDB URI and the port number:
MONGO_URI=mongodb://localhost:27017/recipeFinder
PORT=3000
The .env file stores sensitive information, like the MongoDB URI, securely.
Testing The API with the Swagger User Interface
Swagger UI provides an easy-to-use interface to interact with the API and test the endpoints. Follow these steps to explore the API through Swagger:
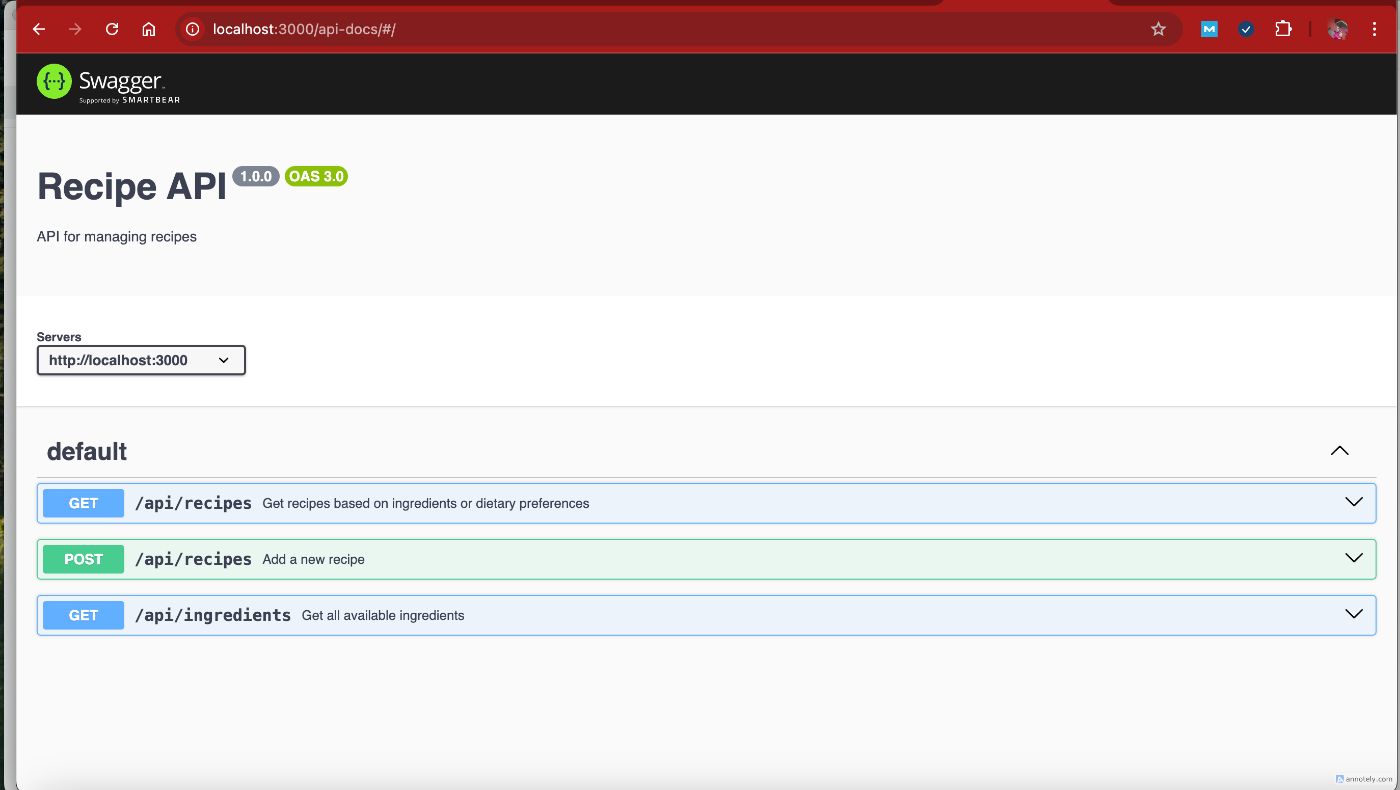
Follow these steps so you can easily test the API using Swagger UI. With Swagger, you can:
-
Search for recipes based on ingredients or dietary preferences
-
Add new recipes to the database
-
Get a list of available ingredients
-
Accessing the Swagger User Interface
Before you start, make sure your API server is running then open your swagger user interface by inserting
http://localhost:3000/api-docson your browser. -
Using Swagger to test API
Swagger makes it easy to send requests to the API with just a few clicks. Below are the key features you can test.
-
Get Recipes (Search by Ingredients or Dietary Preferences) This endpoint lets you search for recipes using ingredients or dietary preferences.
How to use
-
Find the
GET /api/recipesendpoint in Swagger. -
Click Try it out to enter the search parameters
-
Fill in the optional query fields:ingredients → (e.g., chicken, tomato)
dietaryPreferences → (e.g., vegan, gluten-free)
-
Click Execute to send the request.Note: If you leave both fields empty, it will return all recipes.
-
Add a New Recipe
This endpoint allows you to add new recipes to the database
How to use
-
Find the
POST /api/recipesendpoint in Swagger. -
Click Try it out to enter recipe details.
-
Fill in the request body with the following fields:
name → (e.g., "Chicken Salad")
ingredients → (List of ingredients, e.g., ["chicken", "lettuce", "tomato"])
dietaryPreferences → (Optional dietary info, e.g., ["gluten-free", "dairy-free"])
instructions → (Step-by-step instructions)
userContributed → (Set true if added by a user, otherwise false)
-
Click Execute to add the recipe.
-
Get All Available Ingredients
This endpoint retrieves a list of all ingredients stored in the database.
How to use
-
Find the
GET /api/ingredientsendpoint. -
Click Try it out (No input needed).
-
Click Execute to get the ingredient list.
- Understanding API responses
When using Swagger, you’ll see different response codes:
- 200 OK → Request was successful (e.g., recipes retrieved).
- 201 Created → A new recipe was successfully added.
- 400 Bad Request → Missing required fields or incorrect data format.
- 500 Internal Server Error → Something went wrong on the server.
If you get an error, double-check your inputs and try again.
Conclusion
In this guide, you have explored how to develop a Recipe Finder App using Node.js, Express, and MongoDB. This application enables users to search for recipes, add their recipes, and access a list of available ingredients. With a simple and intuitive API, users can easily find meals that match their ingredients or dietary preferences
[story continues]
tags