
After reading the title, you are probably wondering what a microservice is and what makes it different from a monolith Java program. If we look into the definition of microservices. Basically, a microservice is an architecture.
Microservices (or microservices architecture) are a cloud-native architectural approach in which a single application is composed of many loosely coupled and independently deployable smaller components, or services
So why microservices rather than using monolith programs?
- Easier to Build and Maintain Apps — The key principle of microservices is simplicity. Applications become easier to build and maintain when they’re split into a set of smaller, composable fragments. Managing the code also becomes less painful because each microservice is, in fact, a separate chunk of code. Services can be implemented using different programming languages, databases and software environments. This allows each service to be deployed, rebuilt, re-deployed and managed independently.
- Improved Productivity and Speed — Because of microservices, each developing team can only look at the specific service they are building without worrying about the whole source code. This will increase the productivity of the team with the delivery speed.
- Microservices are independently scalable — As demand for an app increases, it’s easier to scale using microservices. You can increase resources to the most needed microservices rather than scaling an entire app. This also means scaling is faster and often more cost-efficient as well.
- Microservices reduce downtime through fault isolation — If a specific microservice fails, you can isolate that failure to that single service and prevent cascading failures that would cause the app to crash. This fault isolation means that your critical application can stay up and running even when one of its modules fails.
So now we know why normally all the big organizations prefer microservices rather than maintaining a big combined source code. Let's try to develop a microservice using Spring Boot, which is a very popular Java framework which uses to develop enterprise applications.
Project Description
What we are going to develop is a microservice to create RESTful APIs for Tour Application in California 🗻. Let’s get started,
Create Project
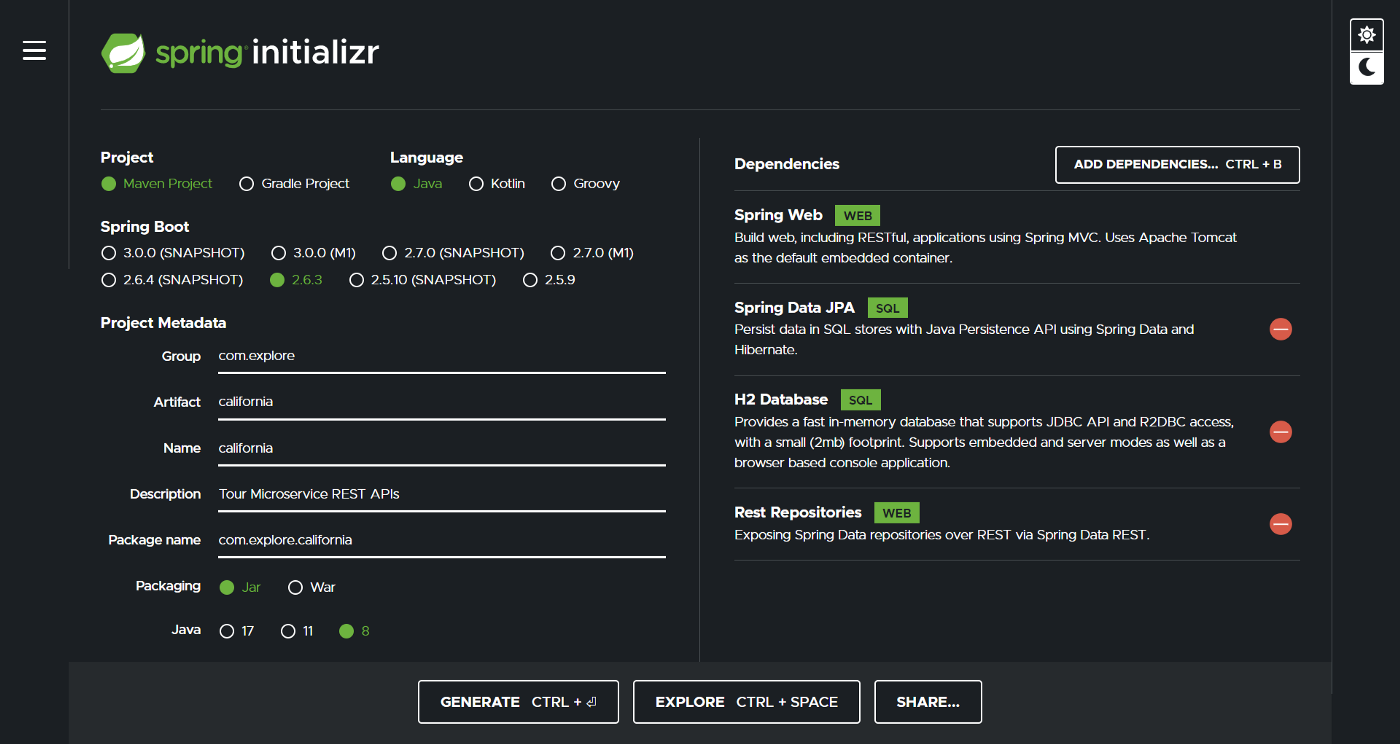
In the Spring ecosystem, there are a lot of dependencies you can find. For this, we are going to need dependencies for
- Web, which includes Tomcat and Spring MVC
- Rest repositories to expose Spring Data repositories over REST APIs
- Java Persistence API
- H2 in-memory database
You can easily create a Spring project by using
- Spring MVC
- REST Repositories
- Spring Data JPA
- H2 Database
And finally, click generate, it will download a zip file that created your project structure with the pointed dependencies in your pom.xml file.
Project Structure
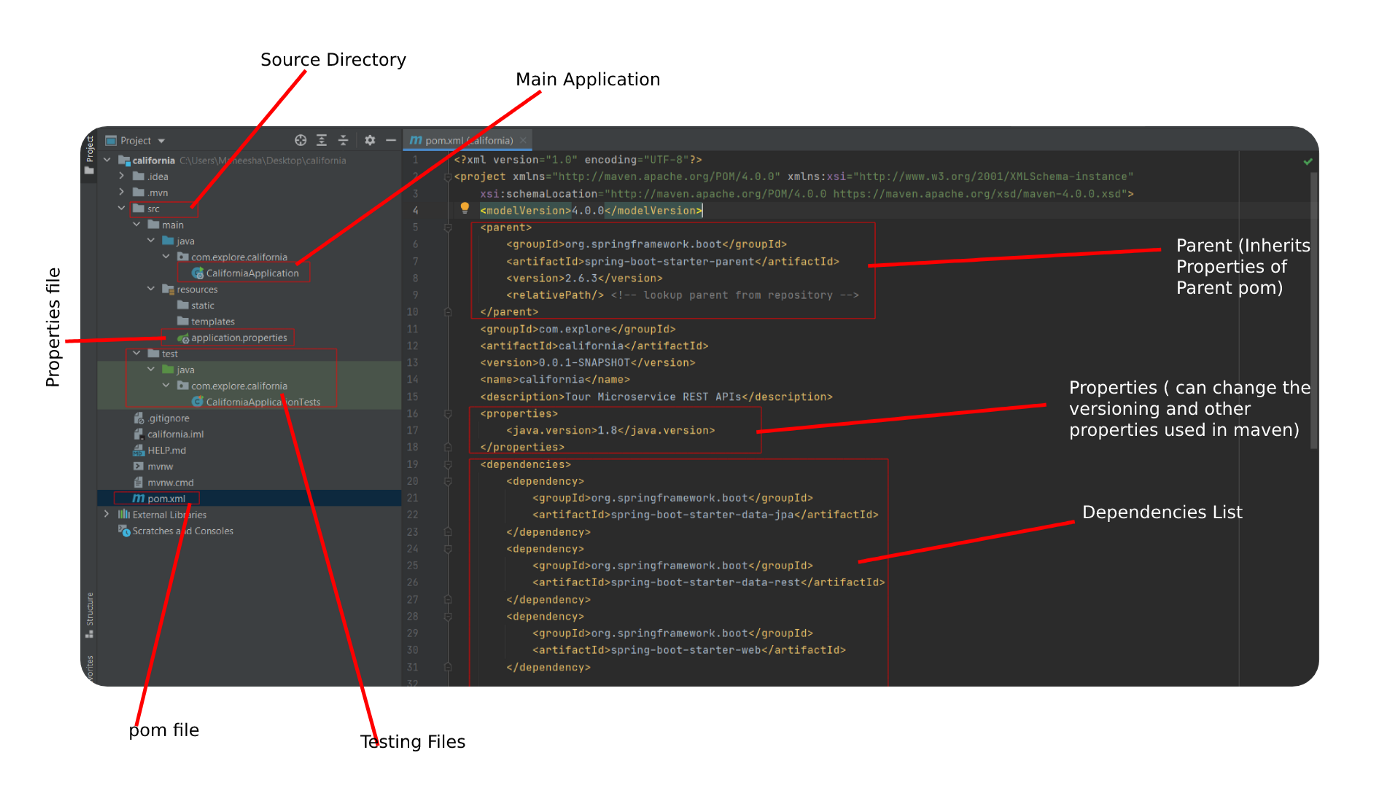
As you can see in the above picture there are a few files and if we check the pom.xml file we can see the dependencies which we added in the Spring initializer is presented here.
Let's look at the CaliforniaApplication.java file.
https://gist.github.com/maneeshaindrachapa/f0d9fc4cb4c06216abc94a0d8885731c
This CaliforniaApplication.java file has a main method and also there is @SpringBootApplication annotation. Adding this annotation means that we tell the JVM to this is where the microservice is starting and main the method is there so it is not like packaged war files so we can actually control the web application start and stop.
@SpringBootApplication annotation is used to mark a configuration class that declares one or more @Bean methods and also triggers auto-configuration and component scanning. It’s the same as declaring a class with @Configuration, @EnableAutoConfiguration and @ComponentScan annotations.
Starting Spring Boot Server
When you run the main method you can see that the Spring application is starting. To change the port that the server is starting you can go to the application.properties file and add a new property server.port=8081
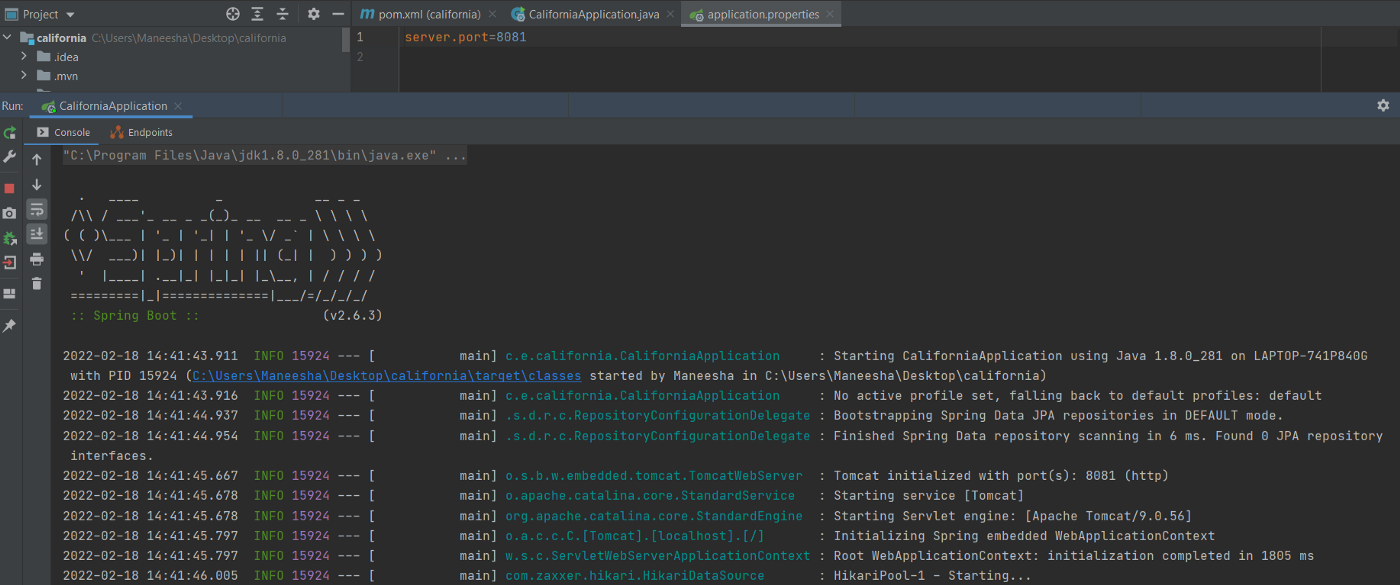
To check the server is working go to

Developing the Project
Now we are ready to develop the Tour California restful web service. First, let's check the class diagram of the restful web service we are going to build
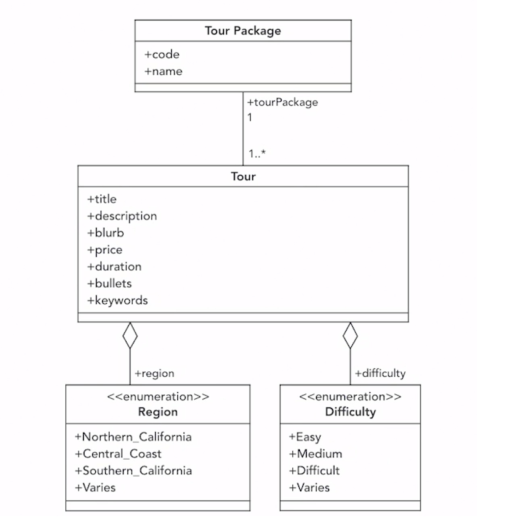
1. Create Models
First, create a new package and name it as a model, and create these business objects in there.
https://gist.github.com/maneeshaindrachapa/58ec8c3924b2044dcc0468e1026cb429
https://gist.github.com/maneeshaindrachapa/dab4d0be4308ff21d545c33188ce8119
https://gist.github.com/maneeshaindrachapa/9c1c7570931c43dd781d30f2d184348d
https://gist.github.com/maneeshaindrachapa/64ad22989db443dc1996881cff5e5249
As you can see in the Tour.java and TourPackage.java files, there are some annotations that have been used. Let's look at what they mean. These annotations are used in Java Persistent API. As a specification;
the Java Persistence API is concerned with persistence, which loosely means any mechanism by which Java objects outlive the application process that created them.
- @Entity — Annotate all your entity beans with @Entity.
- @Column — Specify the column mapping using @Column annotation.
- @Id — Annotate the id column using @Id.
- @GeneratedValue — Let the database generate (auto-increment) the id column.
- @OneToOne — For entities sharing the same primary key, we can associate them using @OneToOne.
- @ManyToOne — For entities that have many relationships with one entity, as an example, in our project, one TourPacakge consists of many Tours.
- @Enumerated — This way, we can instruct a JPA provider to convert an enum to its ordinal or String value.
2. Create Repositories
Create a new package name repository and create the repositories need for the project
https://gist.github.com/maneeshaindrachapa/7cff46d5fa9eb49330c7f5a99947d2ab
https://gist.github.com/maneeshaindrachapa/638b0cf86a76bf4ed18958c202eb5ae0
We are creating repositories for the two entities we have and also we are extending the CrudRepository interface which is a Spring Data interface for generic CRUD operations on a repository of a specific type. It provides several methods out of the box for interacting with a database. When extending CrudRepository<T, ID> you need to define T-entity, ID-the type of your ID column in Entity .
In the above code, some annotations were used. Let’s see what are they,
- @RepositoryRestResource — used to set options on the public Repository interface — it will automatically create endpoints as appropriate based on the type of Repository that is being extended (CrudRepository/PagingAndSortingRepository/etc)
- @Repository — specialization of @Component annotation which is used to indicate that the class provides the mechanism for storage, retrieval, update, delete and search operation on objects.
3. Create Services
Create a new package name service and create the services need for the project in there.
https://gist.github.com/maneeshaindrachapa/61ca2e4a380135eff34e9ab261c5b5a8
https://gist.github.com/maneeshaindrachapa/f6e61d5623268fd12d1b90e68714111e
In the above code, some annotations were used. Let’s see what are they,
-
@Service — this is used with classes that provide some business functionalities. Spring context will autodetect these classes when annotation-based configuration and classpath scanning is used.
-
@Autowired — this annotation provides more fine-grained control over where and how autowiring should be accomplished. The @Autowired annotation can be used to autowire bean on the setter method just like @Required annotation, constructor, a property, or methods with arbitrary names and/or multiple arguments.
As you can see in the above code we are using the repository interfaces we created before this to use the methods already developed in CrudRepository the interface such as findById(),findAll() . Basically, we use services to mask out the repositories from the external parties and use the logic that we want in the business layer.
4. Database SetUp
In our project to see that the APIs are working we need to have some data in our database. Here we are using the h2 in-memory database. So let’s first add some configurations to application.propertieswhere we can access the in-memory database.
spring.h2.console.enabled=true
spring.datasource.url=jdbc:h2:mem:tourcalifornia
spring.datasource.driverClassName=org.h2.Driver
spring.datasource.username=admin
spring.datasource.password=admin
spring.jpa.database-platform=org.hibernate.dialect.H2Dialect

spring.jpa.hibernate.ddl-auto=create-drop
Now from CaliforniaApplication.java where the main method has, we can implement the interface CommandLineRunner which is a simple Spring Boot interface with a run method. Spring Boot will automatically call the run method of all beans implementing this interface after the application context has been loaded.
First, we add a property to our application.properties file to read theExploreCalifornia.json file
ec.importfile=ExploreCalifornia.json
And then we add some code to read the JSON file and add them to the database in CaliforniaApplication.javafile. We can use @value in spring to import the file name.
- @Value — this annotation provides a convenient way to inject property values into components. It’s also quite useful to provide sensible defaults for cases where a property may not be present
https://gist.github.com/maneeshaindrachapa/eefdf5333c6607eff93ae7e6be82e2a9
And we need to add a new method for the TourPackageRepository.java file because we use
TourPackage tourPackage = tourPackageRepository.findByName(tourPackageName).orElseThrow(() ->
        new RuntimeException("Tour package does not exist: " + tourPackageName));
So let’s add the Optional<TourPackage> findByName(String, name); to TourPackageRepository.java file.
https://gist.github.com/maneeshaindrachapa/f50f664fdd163d1d85694d866d40a68d
Let’s restart the server and go to the
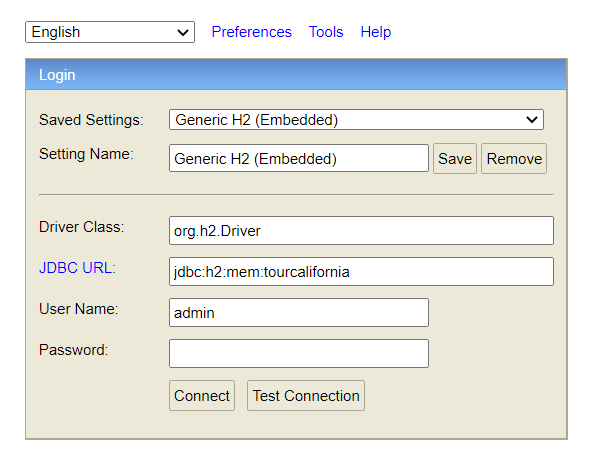
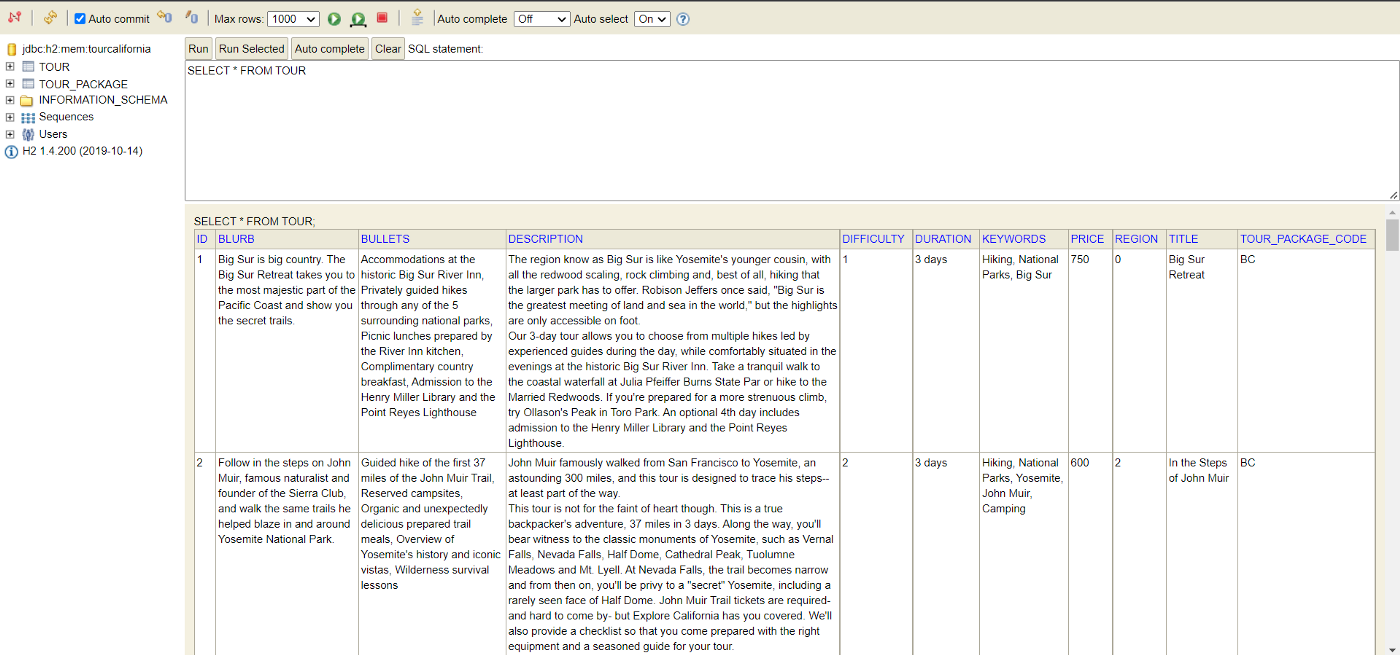
Then add the username, password, JDBC URL you configured in application.properties and log in to the h2 console. To see that the data populated to the tables can run a simple query such as SELECT * from TOUR;
Or we can actually go to the
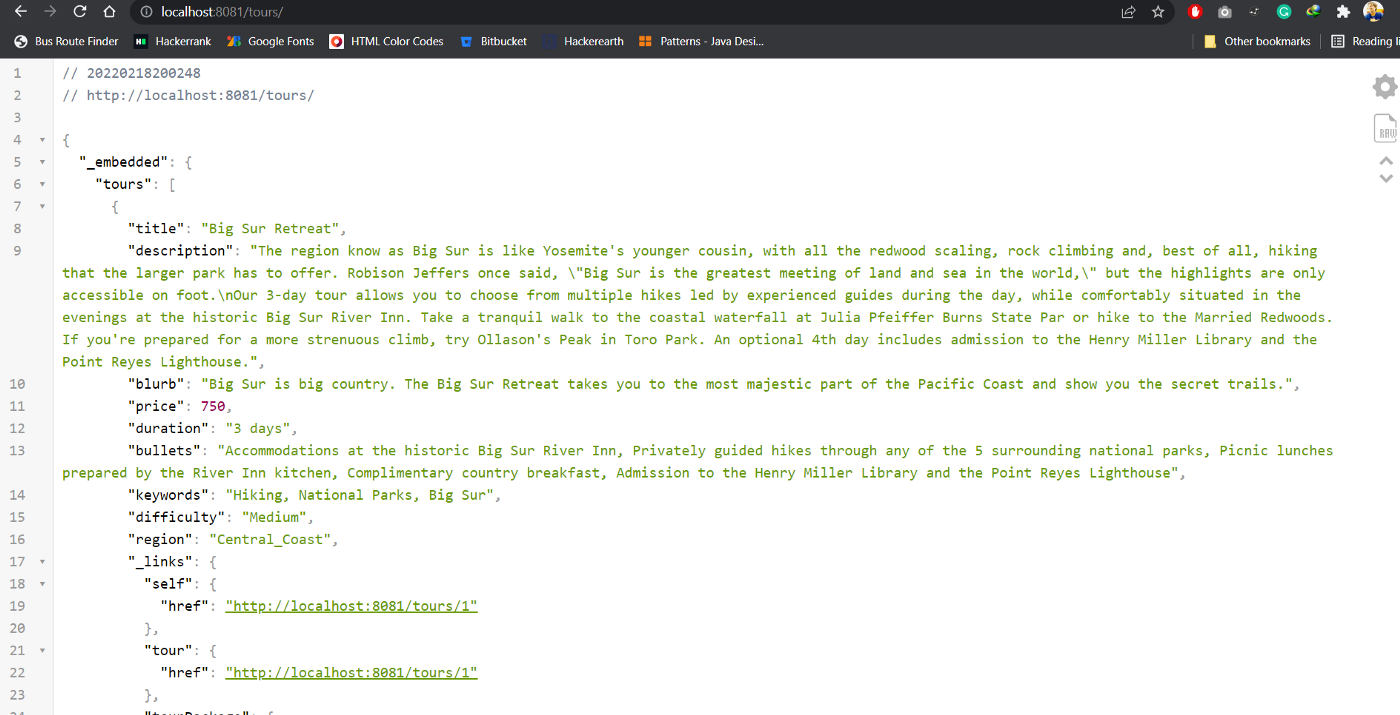
if you don’t want the data exposed like this, you need to add @RepositoryRestResource(exported = false) in your repositories.
5. Creating Controllers
Create a new package name controller and create the controllers that need for the project in there.
https://gist.github.com/maneeshaindrachapa/33b9175a896a064c92b9242ff32d7f9c
In the above code, some annotations were used. Let’s see what are they,
- @RestController — The @RestController combines @Controller and @ResponseBody
- @RequestBody — which maps the body of the HTTP request to an object.
- @PathVariable — This annotation indicates that a method argument is bound to a URI template variable.
- @RequestParam — this annotation is used for accessing HTTP request parameters @PostMapping— The @PostMapping annotated methods in the @Controller annotated classes handle the HTTP POST requests matched with the given URI expression
- @GetMapping — The @GetMapping annotated methods in the @Controller annotated classes handle the HTTP GET requests matched with the given URI expression
- @PutMapping — The @PutMapping annotated methods in the @Controller annotated classes handle the HTTP PUT requests matched with the given URI expression
- @DeleteMapping — The @DeleteMapping annotated methods in the @Controller annotated classes handle the HTTP DELETE requests matched with the given URI expression
- @PatchMapping — The @PatchMapping annotated methods in the @Controller annotated classes handle the HTTP PATCH requests matched with the given URI expression
- @ExceptionHandler — using this annotation we can declare a custom error handler method. Spring calls this method when a request handler method throws any of the specified exceptions.
- @ResponseStatus — using this annotation we can specify the desired HTTP status of the response if we annotate a request handler method with this annotation. We can declare the status code with the code argument, or it's an alias, the value argument
- @RequestMapping — this annotation marks request handler methods inside @Controller classes; it can be configured using,
-
path, or its aliases, name, and value: which URL the method is mapped to
-
method: compatible HTTP methods
-
params: filters requests based on presence, absence, or value of HTTP parameters
-
headers: filters requests based on presence, absence, or value of HTTP headers
-
consumes: which media types the method can consume in the HTTP request body
-
produces: which media types the method can produce in the HTTP response body
-
6. Testing the APIs
To test the APIs we can use the
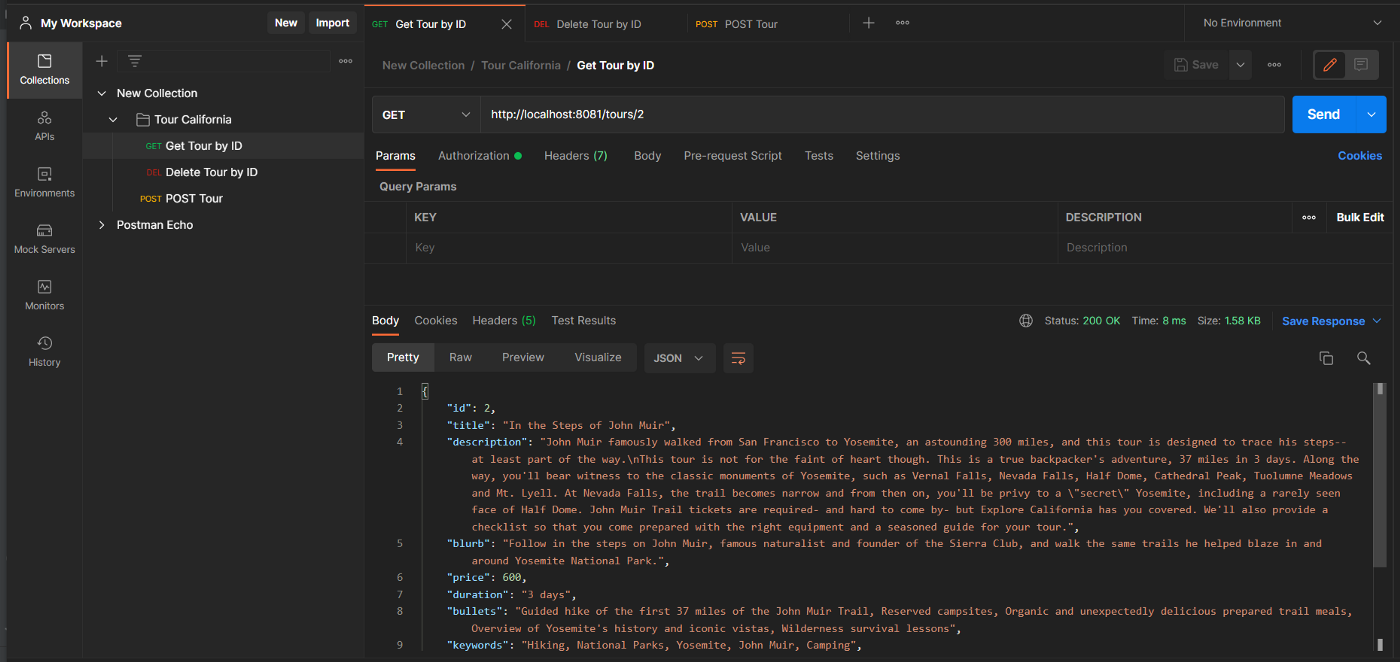
You can find the full code
So this is it. This is how you develop a microservice using Spring Boot. This is only a small bit of the Spring ecosystem. Let's look at how to secure APIs and what are the next steps we can do with springs in another blog post.
First Published here
[story continues]
tags