Monday morning. The fluorescent lights buzz as you step into the office. The usual weight settles in — emails piling up, reports to review, a dozen tasks waiting.
But today feels different.
You sit down, open your laptop, and everything’s already in motion. Dashboards updated. Reports ready. Meetings lined up. While you slept, your agents pulled data, cleaned it up, and actually did something useful with it—200 times over.
No magic here. Just a system that works, that system runs on n8n, and this guide will show you exactly how to build one for yourself.
But Wait Max, What’s N8N?
n8n is a visual automation platform. You simply drag nodes onto a canvas, connect them, and hit run. That’s it.
Behind the scenes, n8n connects your apps, moves your data, and triggers the right actions at the right time. It’s how reports get written, dashboards stay updated, and tasks get handled before you even log in.
The best part? You don’t need to set up servers, write miles of code, or hire a team of engineers to make it happen.
Starting with simple flows and scaling to automated pipelines, this guide walks you through building systems that keep running while you’re off the clock.
You’ll learn the fundamentals, see real-world examples, and get practical, design and troubleshooting tips that only come from actually doing the work.
Whether you’re a founder scaling solo, an analyst sick of repetitive tasks, or just someone who wants to automate the boring stuff — this is for you.
Let’s get started.
Step 1: Set Up Your n8n Environment
Before you start building, the first decision is where your workflows will actually run.
You’ve got two main choices:
-
n8n Cloud
The quickest way to get going. No setup hassle, just sign up and start. Your workflows run on n8n’s servers, which works great for most users.👉
Create a free n8n Cloud account -
Self-Hosted
Run n8n on your own machine or server. This gives you full control over privacy and customization. Perfect if you’re a developer, part of a team, or need a secure, production-ready setup.
👉__Docs: n8n Self-Hosting Guide__
After setting up your environment, you’ll land on the Overview section. Here’s a what you’ll see:
Just click the orange Create Workflow button in the top right to start building your automations.
Here’s a quick guide to understanding the Status Dashboard:
- Production executions: How many times your workflows have run
- Failed executions: How often something went wrong
- Failure rate: The percentage of failures (0% means you’re crushing it)
- Time saved: Rough estimate of how much time your automations have freed up
- Average run time: How long your tasks usually take to finish
If everything’s showing zero, don’t sweat it, that’s totally normal when your account is brand new.
Tabs to know:
- Workflows: This is where all your automation recipes live
- Credentials: Where your saved login info for connected apps hangs out
- Executions: A log of every time your automations have run
Step 2: Get Familiar with the Workflow Canvas
Here’s how the Workflow Canvas works:
You start by grabbing nodes from the sidebar and dragging them onto the canvas. Then, connect them with lines to set the order they run in.
Each node has its own settings where you can add prompts, plug in API endpoints, enter credentials, or set up conditions.
As your workflow runs, each node passes its data to the next, keeping everything moving smoothly. Behind the scenes, it’s all saved as JSON — but you don’t need to worry about that. Just focus on building your workflow, and n8n takes care of the rest.
Step 3: Understanding Node Types
In n8n, nodes fall into five main categories:
- Trigger Nodes
- Action Nodes
- Logic Nodes
- Code Nodes
- AI Agent Nodes
Let’s look at each of them
1 — Trigger Nodes
These are what kick off your workflow. They decide how your AI agent gets started. For example, you might use a Webhook Trigger that listens for HTTP requests, a Chat Trigger for conversational bots, a Schedule Trigger to run things on a timer, app-specific triggers like Gmail or Slack events, or even a Manual Trigger when you want to test things out.
2 — Action Nodes
These nodes get things done. They let your agent connect with other services and carry out tasks. That might mean using LLM nodes like OpenAI or Google Gemini to analyze data and reason, making HTTP requests to external APIs, working with databases, or sending notifications. Whenever your workflow needs to take action, these nodes make it happen.
3 — Logic Nodes
Think of these as the traffic controllers of your workflow. They decide which path to take next based on conditions you set. Nodes like If, Switch, Merge, and Loop Over Items help you control the flow. They also handle fallback options and errors, making sure everything keeps moving without a hitch.
5 — AI Agent Nodes
This is where the magic happens. The AI Agent Node takes input from triggers, uses Large Language Models (LLMs) to understand and reason through them, then picks the right tools to get the job done. You can set how it thinks step-by-step, what it remembers, and which tools it can access. It’s basically the brain of your workflow, helping you build smart agents that understand requests, make decisions, and take action — all in one spot.
Step 4: Adding Intelligence
To make your workflows truly smart, you layer on reasoning, memory, and tool access.
Here’s how those nodes fit into these three key layers:
- LLM Nodes are the reasoning layer. They take in input, think through it, generate responses, and make decisions based on prompts and data. Basically, they’re the “brain” doing the heavy thinking.
- Memory Nodes form the memory layer. They store past conversations, context, or state, so your agent can remember what happened before and keep the conversation or process going smoothly.
- Tool Nodes give your agent access to the outside world. They connect to APIs, databases, scrapers, or custom services — letting your workflow take real actions, not just talk.
Step 5: Test, Trace, and Troubleshoot
When you build an agent in n8n, you need to test it to make sure everything works. Here’s how to do that without getting lost:
-
Test one step at a time
Run individual nodes instead of the whole workflow. This helps you pinpoint exactly where things break.
-
Use pinned data
You can “freeze” input data for testing, so you always test with the same values. This way, your results are predictable and bugs are easier to find.
-
Read the logs
n8n records what happens at each step. Review these logs to see what data went in, what came out, and if any error popped up.
-
Add debugging helpers
Use
NoOpnodes to pause and focus on specific part of your workflow. AddConsolenodes to print values for inspection. -
Handle errors properly
Set up a global error handler to catch problems. That way, you can log in issues, get alerts, or recover gracefully instead of your workflow just crashing.
Step 6: Keep It Modular, Keep It Sane
Here’s the thing: your AI workflows won’t stay small for long. They’ll grow more steps, more tools, more complexity. Without a solid structure, things get messy fast.
The solution? Start with modularity from the beginning.
You’re not just automating a task. You’re building a system that needs to adapt and evolve. That means designing with reusability, clarity, and maintainability in mind.
Here’s how to do it:
- Break Workflows Into Sub-Flows
Use theExecute Workflow node to call other workflows. It keeps your main flow clean and lets you reuse logic across projects. - Create Reusable Components
Don’t rebuild the same logic again and again. Wrap it once, use it everywhere. This helps scaling without headaches. - Use Clear, Consistent Naming
Name your nodes and workflows in a straightforward way. When something breaks (and it will), clear names save you time and frustration. - Add Notes Where They Matter
Leave comments for your future self. A few well-placed notes can save hours when you revisit or tweak your flows. - Version Control with Git
Export your workflows as JSON files and store them in Git so you can actually track changes, roll things back, and stop guessing what broke.
The goal is to build systems that are easy to follow, simple to update, and ready to scale.
Next, we’ll shift from basic automation to building agentic workflows.
Agentic Workflows
Nature had agentic workflows figured out long before we did. Take an ant colony.
There’s no central boss telling each ant what to do. Instead, they operate with a shared goal: survival, food gathering, nest building, and each ant adjusts its behavior based on what it sees, smells, or bumps into. One ant finds food, leaves a trail, and others follow. If the trail stops working? They adapt. Try a different path. Communicate through chemicals. Reroute.
It’s messy and decentralized, but incredibly effective.
This is what agentic workflows are all about: individual parts that sense, decide, and act independently without a fixed script. They respond and adjust in real time, just like ants.
That’s the kind of intelligence modern automation aims to replicate.
Agentic Workflows: What Comes After Basic Automation
Let’s be honest: most automation is glorified scripting.
You set up a trigger, define some steps, and pray the world doesn’t change too much. It’s useful, sure, but the moment something unexpected happens, your “automation” turns into a helpdesk ticket.
Traditional workflows are like recipes.
You take some inputs, follow a fixed sequence, and hope it all comes out right. But if one ingredient’s missing, or the situation changes, you’re stuck. The whole thing breaks.
That’s where agentic workflows come in.
Instead of following a fixed set of instructions, an agentic workflow looks at the situation, understands the context, and decides what to do next.
It’s automation that isn’t frozen in time.
For example, say your workflow is handling support tickets. A basic version might route them based on a keyword or category. An agentic would read the actual issue, check customer history, weigh priority, maybe even spin up a custom response or flag it for human review — based on context, not just input.
This is the key shift: from reacting to input… to reasoning through context. And that’s what unlocks flexibility, especially when the environment is unpredictable, fast-moving, or messy (read: the real world).
This doesn’t mean they’re perfect. Or that they magically “think.” But they make decisions in context, which puts them somewhere between rigid automation and full autonomy — right where most real systems need to be.
Examples of Agentic Workflows in N8n
Let’s get practical. Here’s how to build agentic workflows in n8n — real examples that show how to turn the idea into something that actually works.
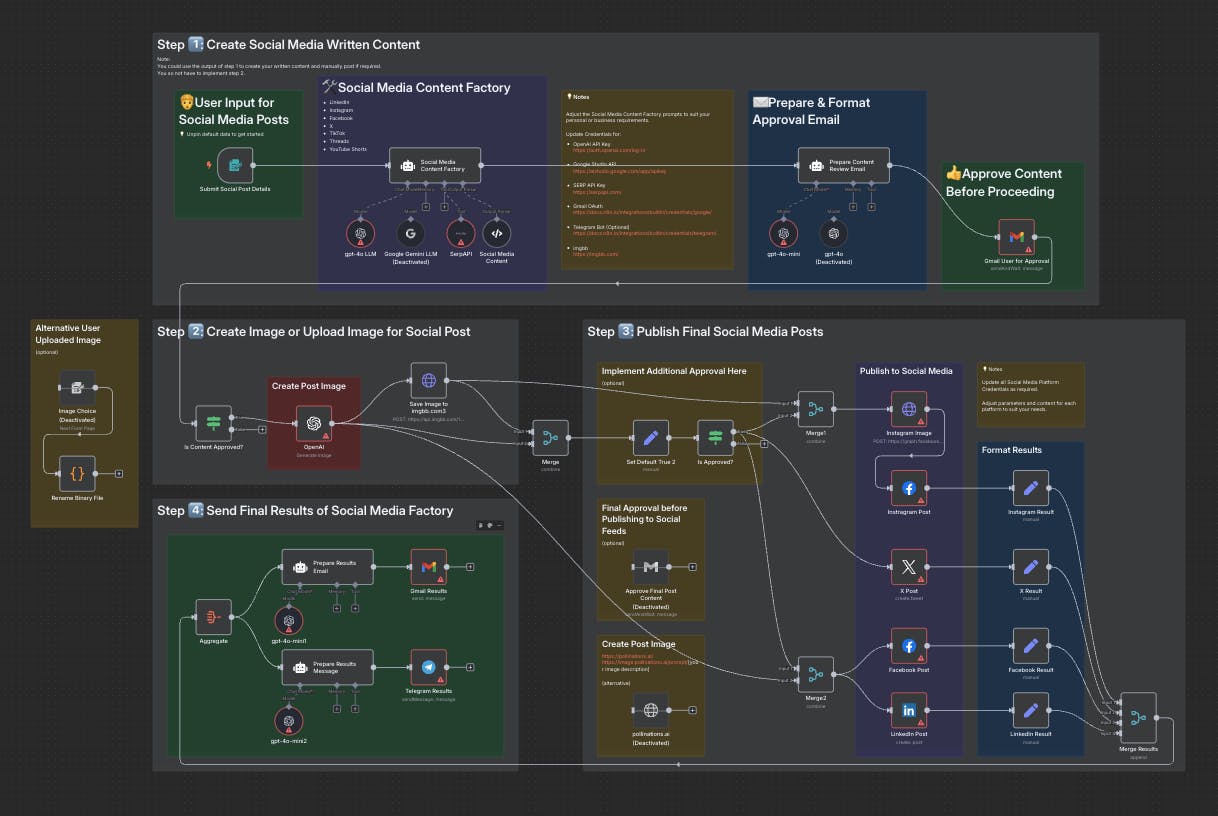
Automate Multi-Platform Social Media Content Creation with AI
This workflow helps you repurpose content across platforms: X, Instagram, LinkedIn, TikTok, and more. It uses AI to rewrite each post to match the style of each platform, so you stay consistent without doing it all manually.
Agentic Workflows: What Comes After Basic Automation
Let’s be honest: most automation is glorified scripting.
You set up a trigger, define some steps, and pray the world doesn’t change too much. It’s useful, sure, but the moment something unexpected happens, your “automation” turns into a helpdesk ticket.
Traditional workflows are like recipes.
You take some inputs, follow a fixed sequence, and hope it all comes out right. But if one ingredient’s missing, or the situation changes, you’re stuck. The whole thing breaks.
That’s where agentic workflows come in.
Instead of following a fixed set of instructions, an agentic workflow looks at the situation, understands the context, and decides what to do next.
It’s automation that isn’t frozen in time.
For example, say your workflow is handling support tickets. A basic version might route them based on a keyword or category. An agentic would read the actual issue, check customer history, weigh priority, maybe even spin up a custom response or flag it for human review — based on context, not just input.
This is the key shift: from reacting to input… to reasoning through context. And that’s what unlocks flexibility, especially when the environment is unpredictable, fast-moving, or messy (read: the real world).
This doesn’t mean they’re perfect. Or that they magically “think.” But they make decisions in context, which puts them somewhere between rigid automation and full autonomy — right where most real systems need to be.
Examples of Agentic Workflows in N8n
Let’s get practical. Here’s how to build agentic workflows in n8n — real examples that show how to turn the idea into something that actually works.
Automate Multi-Platform Social Media Content Creation with AI
This workflow helps you repurpose content across platforms: X, Instagram, LinkedIn, TikTok, and more. It uses AI to rewrite each post to match the style of each platform, so you stay consistent without doing it all manually.
AI Web Researcher for Sales
This workflow speeds up lead research for sales teams. It uses AI to find key info about each account online, so you can skip the manual digging and focus on more targeted outreach.
This workflow lets you build an AI-powered data analyst. It connects to sources like Google Sheets or databases, runs calculations, and answers questions about your data — no need to dig through spreadsheets yourself.
This workflow powers Angie, a personal AI assistant on Telegram. It connects to your email, calendar, and contacts to summarize messages, send reminders, and retrieve info. You can talk to it by voice or text — like having a smart, responsive teammate in your pocket.
What’s Next
Agentic systems are growing from simple workflows into complex ecosystems. What begins as a single automated task often grows into a network of connected workflows that communicate, optimize themselves, and grow more capable over time.
As this web grows, its value compounds. The more pieces you connect, the more powerful the system becomes. That’s the network effect at work, but in automation.
This evolution changes your role, too. You’re no longer just someone who sets up workflows. You become the architect of an adaptive, intelligent system. You decide how agents talk to each other, when humans should step in, and where new automations might unlock value.
Ironically, as machines get smarter, your job becomes more human. It’s about steering the ship, spotting gaps, applying judgment, and creating feedback loops that make the whole system better over time.
In short: agentic workflows don’t eliminate the need for people — they elevate what people focus on. The more fluent you get in this new language of automation, the more leverage you’ll have in shaping the future.
Conclusion
You don’t have to be stuck doing busywork anymore. Agents can take care of updating spreadsheets, firing off emails, summarizing calls, handling follow-ups, and much more.
That frees you up to focus on what only humans can do: strategizing, creative problem-solving, and and shaping the direction of your work.
This isn’t just about saving time, it’s about getting more done with less effort. And it’s already happening. If you’re not automating, you’re already behind.
Start small. Automate one task. Then another. Let the system grow as you do.
Sure, agents break sometimes. You’ll have to fix them. But that’s still better than spending hours on stuff that should run itself.
So if your goal is to build systems that don’t crumble under real-world complexity, agentic workflows are worth understanding. Not as a buzzword. As a mindset.
Because in the end, brittle systems create busy people. And flexible systems? They create space.
The future of work isn’t about replacing people, it’s about working smarter. The tools are here. The use cases are clear. Now it’s your move.